- BOAT OF THE YEAR
- Newsletters
- Sailboat Reviews
- Boating Safety
- Sails and Rigging
- Maintenance
- Sailing Totem
- Sailor & Galley
- Living Aboard
- Destinations
- Gear & Electronics
- Charter Resources
- Ultimate Boating Giveaway

How to Paint Sailboat Decks
- By Tom Zydler
- Updated: March 14, 2013
Painting a sailboat
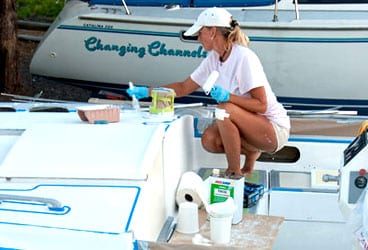
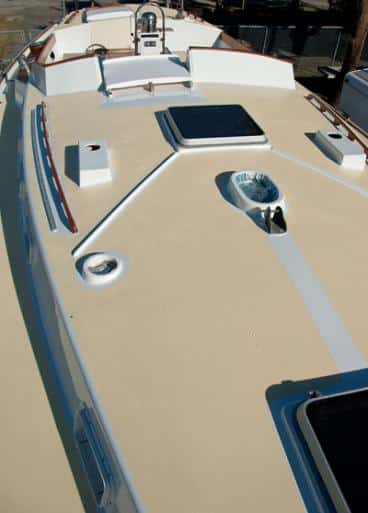
Janet Van Leuwen and Steve Van Wig own a Whitby 42. Looking at their beautiful, well-groomed ketch, you’d never guess it was built in 1982. The name on the stern, Lunacy , may be the only hint of the incredible amount of work that the couple has put into rejuvenating their boat. Bringing the decks and the coachroof top to their present glory was a large part of the project, as these tasks would’ve been on any glass boat more than 25 years old. This is how they did it. And frankly, this is how it should be done.
Before the couple could begin doing any prep work for painting, the deck hardware had to be removed. They needed access to tight spaces where the horizontal deck surface turned into vertical bulwarks, around the masts’ partners, near the windlass base, and so on. (They also removed the chainplates, which needed attention as a separate project.) Out came all stanchions, their bases, various padeyes, winches—anything and everything, in fact, that could obstruct the power sanders required to remove the worn-down, cracking, original nonskid pattern. Steve then used silicon sealant to plug all the fastener holes that would be reused; silicon repels paint, so the fastener locations would be visible when they began reinstalling the hardware.
Donning breathing masks and kneepads, the couple spent days grinding the old surfaces with 80-grit discs. Using thick foam pads on machines running at high rpm prevented any gouging in the laminate. Smaller sanders (both round and square) helped them to negotiate tight turns; at times, they resorted to manual sanding blocks. Working with thickened polyester and epoxy resins, Steve filled several hairline cracks and dings. They then sanded this filler with 80-grit, then 100-grit, and finally 120-grit sandpaper to achieve a smoother surface before vacuuming up all the accumulated dust.
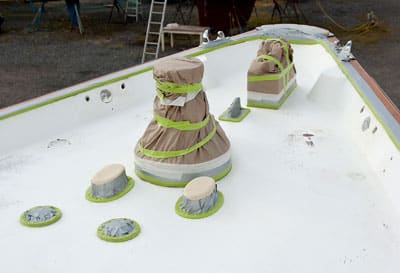
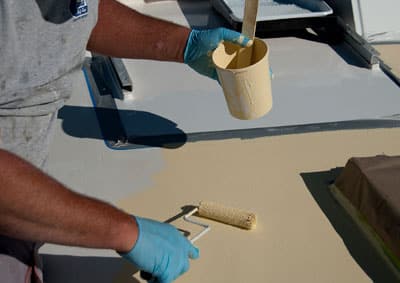
Next, to keep paint drips off teak handrails, the windlass, and the portholes, they masked these with heavy paper and tape. Right after the final wipe with a cleaning solvent, they took two days to roll and brush on two coats of epoxy primer, the base for the final topcoat. Over the next few days, the primed surfaces were sanded with 120-grit paper, followed again by vacuuming and hosing the resulting dust. Afterward, Janet cleaned all the surfaces with non-sticky tack cloths designed for multipart polyurethanes.

At this juncture, Steve identified and outlined the future nonskid areas, then spent a couple of days taping their inner edges with long-life 3M masking tape. At the corners, joining short lengths of tape on tight curves required meticulous care. After they wiped everything with cleaning solvent, they applied the first coat of multipart polyurethane to all the surfaces outside the future nonskid. Two more topcoat applications followed within allowable, 16-hour intervals. After sanding with 220-grit paper, dusting, using the tack rag, and wiping the solvent, they rolled and brushed on the fourth and final topcoat. The solvent-resistant, ultra-smooth, high-density foam-roller covers and quality brushes delivered the best finish. Working in the hot Florida sun required frequent additions of brushing reducer.
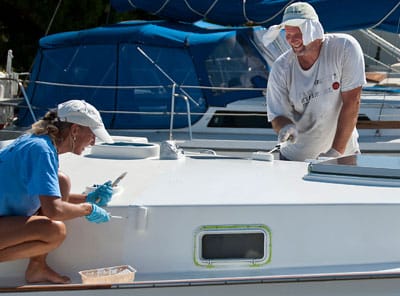
After allowing 48 hours to fully cure, they removed the masking tape. Fresh tape was then applied along the outside margins of the nonskid areas. All was ready for applying the nonskid coats. But first Steve spent a few days experimenting. He mixed his own color tints—too dark, and you couldn’t walk barefoot on the sun-heated deck; too white, and the deck glare was intolerable.
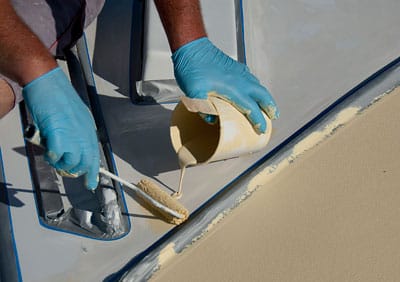
Also, he tested paint combined with various nonskid additives on scrap plywood; very coarse grit could damage human skin if a sailor knelt or fell on deck. He decided to combine equal amounts of coarse and fine grit. Significantly, this mixture prevented the coarse grit from settling down in the paint in lumps. On the big day, Steve and Janet mixed the activator with the paint base in a large container, added the correct nonskid grit, poured in the brushing reducer, and thoroughly stirred it all. After pouring small dollops within a taped area, Steve spread it out with a roller with Janet assisting, adding more paint or grit as necessary. She also wiped up Steve’s occasional paint drips with a solvent-soaked rag. The work went quickly and smoothly, though constant stirring of the paint/grit mixture was absolutely vital.
Twenty-four hours passed before heavy, late summer rain rolled in. By then, the paint had cured hard, and the coachroof was finished. They then repeated the whole operation to paint the deck. Nobody said rejuvenating a classic-plastic yacht would be quick or easy. But when the entire project was finished and Lunacy ‘s deck sparkled, the two sailors realized that all their meticulous efforts had been well worth it.
Steps:** 1. In preparation for the job, much of the deck hardware, including the stanchions, had to be removed. The remaining gear was carefully and completely covered and masked. 2. All the fastener holes were filled with silicon sealant, and the couple spent days grinding the old surfaces. Then Janet used a solvent wash to ensure a strong bond with the primer paint. 3. After dings and cracks were repaired and sanded, two coats of epoxy primer were applied. 4. Following another round of sanding, vacuuming, cleaning, and taping, the couple rolled and brushed on a fresh coat of Awlgrip topcoat. 5. After four coats of Awlgrip, it was time for the nonskid. First, Steve experimented with colors and grits. Once under way, he poured on a dollop of pre-mixed paint and spread it evenly. Note the paint stirrer, which was used to prevent the grit from settling. 6. Stirring frequently, to make sure the coverage was even in each masked area, Steve worked quickly and efficiently while Janet addressed small splashes with a solvent-soaked cloth. 7. Voilà! Once the masking tape was removed, the fresh decks fairly glistened.
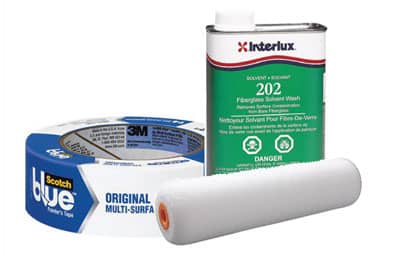
What You’ll Need: • Hook-and-loop sanding discs, sized to fit the sander pads • Sheets of sandpaper of grits 80, 100, 120, 180, 220, and 320 • 3M masking tape in widths of 1/2 inch (No. 256), 1 inch (No. 2090), and 2 inches (No. 225) • Gerson synthetic tack cloths • Roller frames and roller covers, with phenolic cores: ultra-smooth, high-density 4-inch and 6-inch roller covers (available from Home Depot; for the primers and topcoats) and Yellow stripe 3/8-inch nap (from West Marine; for the nonskid paint mixture) • Good-quality varnishing brushes • Cabisil (colloidal silica) thickening agent for making fairing putty with epoxy or polyester resin • Plastic putty knives • Interlux Fiberglass Solvent Wash 202 (for cleaning surfaces) • M.E.K. solvent (for cleaning all brushes) • Disposable paper/plastic pails of various sizes • A dozen wooden paint stirrers • Interlux Epoxy Primekote • Awlgrip topcoat (with Brushing Reducer and brushing converter) • Awlgrip Griptex nonskid additive (fine and coarse grades) • Ryobi and Makita random orbital sanders • Ryobi 6-inch palm polisher (used with a foam pad as a sander in complex spaces) • 3M breathing dust masks, ear protection, and solvent-resistant gloves
Longtime CW contributor Tom Zydler and his wife, Nancy, plan on spending this summer exploring the coast of Labrador aboard their Mason 44, Frances B .
- More: boat maintenance , How To , maintenance
- More How To

Surviving the Storm: A Sailor’s Tale of Hurricane Lee

Best Practices for Boat-Show Shopping

Grease the Wheels of Your Boat: A Guide to Proper Lubrication

A Bowsprit Reborn: A DIY Renovation Story

Sailboat Review: Dufour 41

Storm-Tossed, Lobster-Blessed: A Culinary Cruising Tale

Minimalist Cruising: Georgian Bay by Dinghy
- Digital Edition
- Customer Service
- Privacy Policy
- Terms of Use
- Email Newsletters
- Cruising World
- Sailing World
- Salt Water Sportsman
- Sport Fishing
- Wakeboarding

- Forum Listing
- Marketplace
- Advanced Search
- About The Boat
- Gear & Maintenance
- SailNet is a forum community dedicated to Sailing enthusiasts. Come join the discussion about sailing, modifications, classifieds, troubleshooting, repairs, reviews, maintenance, and more!
Painting Deck and Cockpit....DIY or Pay?

- Add to quote
My deck and cockpit are the last things that are needing attention. While not bad for an older boat, a fresh paint would certainly make it look very good. The topsides of the boat are in gear condition with the original gel coat still shining. The decks and cockpit are a little chalky and the original color was more of an eggshell or off white and that makes it look even more dingy especially if a newer boat is next to it with a bright white deck. So is this a DIY for a newbie that has done ZERO painting on a boat? Or should I find an experienced guy to do the decks? I am in Newport Beach..anyone know of anyone?
If the gelcoat isn't cracking, I would first try a restoration. Wet sanding, with ultra fine grit, followed by a series of progressively stepped down compounding. You could even just try compound right out of the gate to see if it gets results you're happy with. Painting is an option, but I consider it a last choice. Once painted, always painted. The paint is not as tough as the gelcoat and will scratch, leaving you with needing to repaint down the road. If you change the color, scratch will be all the more noticeable. Then again, you'll have a different base primer color anyway, I suppose. The only paints I would consider are either Awlgrip or Alexseal, which would benefit from a professional, with a paint gun. Alexseal is more repairable. You could do all the sanding and filling, if you wanted.

I agree with trying to bring it back first. If the non-skid is in bad shape, redoing it with KiwiGrip is an option.

Gelcoat is a lot thicker and more forgiving than paint, so it is MUCH easier and cheaper to keep gelcoat and not paint. Painting involves hours and hours and hours of prep work. Much of it involves using "materials known by the State of California to cause cancer" and possibly nerve and brain damage. Using a carbon-filter breathing mask is a strong suggestion. A positive air pressure respirator is better. What's actually involved? 1. Sand everything (5-8 hours?) 2. Tape everything you don't want to get paint on. (5-6 hours?) 3. Check to make sure you taped everything (2-3 hours) 4. Wipe down everything with solvent (see above) to ensure there is no dust, wax or other contaminant that will cause the paint to fail. (3-4 hours) Note that contaminants can be airborne, like from a nearby freeway, or come aboard on the bottoms of your shoes. 5 .Paint with primer. The primer is lovely. It fills cracks and creates a uniform base for the finish coats. (4-6 hours) 6. Sand primer (see above) 7. Wipe down everything with solvent (see above) 8. Apply first finish coat for nonskid areas. Note that to apply nonskid, the nonskid areas have to be taped off first. (Add 4-5 hours for taping nonskid areas. Then another 2-3 the next day for the spots you missed because you were too tired) After painting nonskid, remove the tape from the nonskid areas. (4-5 hours) 9. Paint non- nonskid areas (cabin sides, cockpit backs...) You will have to wait for the nonskid to dry first, of course. 10 Sand non-nonskid areas. (Sanding the nonskid would remove the grit.) (3-4 hours) 9. Wipe down everything with solvent (see above) 10 Apply second finish coat (see above) 11. Sand non-nonskid areas (see above) 12 Wipe down everything with solvent (see above) 13 Apply (hopefully) final finish coat. (see above) 14 Remove tape (2 hours - some is painted on) 15 Try to clean spots that weren't taped over well enough (winches, portlights, cleats...) (3-4 hours) There are discussions about what paint to use: one or two part polyurethanes. The prep work and steps involved (see above) are essentially the same for both. Both look great when completed. The hurdle for the two-part paint is the "pot life"- mixing enough to not have it harden in the mixing pot before you can get it onto the deck. After mixing a few batches you learn how fast it sets up and how fast you paint and figure it out. The 2-part is also a touch more expensive. It lasts a LOT longer, however. People who use the one-part extol how beautiful it is and how easy to apply, but start to mumble when you ask them how long it holds up. We painted our deck about 12 years ago with 2-part polyurethane. It now needs repainting. THAT is the problem with paint. If you paint it, it will need to be repainted. It has simply worn off in places where the lines rub against the cabin and where crew step aboard, Flexing of the boat in a seaway has reopened cracks, and the finish has dulled from salt,UV and pollutants. After launching next week we are getting ready to do an initial sanding, weather permitting. Polyurethanes are sensitive to temperature and humidity levels. You also don't want to paint on days when dust or pollen could be blown onto the finish. The weather in California would help make this less of a problem. In New England we had weeks of waiting for the right conditions to make any progress, and then rushing to complete steps (see above) before the weather changed. We did get quotes for having our deck painted professionally. Of course, professionals know their work has to look professional or it will be bad for business. They therefore insist upon removing all the deck fittings (cleats, stanchions, line blockers...) so the completed job will look perfect. Not having to tape or paint around all these things makes the job go faster too. But you have to pay for the removal and re-install of all the gear, along with all the prep work (same as above), overhead (they'll want to do it inside to avoid weather/dust issues), equipment (respirators, pressured air supplies, paint sprayers...) and insurance (did we mention that the State of California knows this stuff causes cancer?) The quotes we got for painting our boat deck about 12 years ago - when we could get an outfit to give us one - was a touch less than $1000 per foot. Our 1981 J/boat did not warrant that much expense, so we did it ourselves. Since then prices have not gone down. We wish we'd left our fiberglass deck alone. Spending just a full day getting yours back in shape would be a much better investment of your time and money. Then you can go sailing and not worry about it.

I am working my way through painting my decks doing 1/3 at a time. But I had to paint since my decks had been painted previously and the gelcoat was now exposed and looked dryed out with superficial micro cracking. (By that I mean shallow grooves visible under a magnifying glass which do not go all the way through the gelcoat and which are not stress cracks.) I also wanted to rebed all of the hardware. Doing it the way that I am doing it is a big job. I have been doing it in thirds at a time. A year ago in the fall I did the cockpit. The following spring I did the teak trim and painted the cabin top and sides. I still need to do the flat part of the decks. The process started by taking off all 40 something pieces of hardware in the cockpit for the first part of the work. I took off a similar number on the cabin, when the portlights and hatches were added in. Then I sanded the living daylights out of everything starting with 100 grit then 120, then 150. I used a bronze brush on the non-skid. The goal in my case was to get rid of any remnant of the old paint and any oxidized gelcoat. Because of the micro cracking, I chose to prime with an epoxy barrier coat. That made the job harder, but I felt that the better adhesion and barrier to moisture was worth the extra effort. I should note that most modern polyurethane paints will adhere to gelcoat without primer. I chose to use Petit Protect rather than Interprotect because Petit Protect is a higher build product and I wanted to have thickness so I could sand out any telegraphed micro cracking. I have used both Petit Protect and Interprotect. Interprotect goes on smoother but needs more coats. I slightly thinned the Petit Protect which helped a little. After sanding I used Petit EZ Poxy. I chose that rather than Interlux Brightsides since there is much higher build on the Petit EZ Poxy than Brightsides requiring way fewer coats. Brightsides will lay out flatter showing fewer brush marks, but I have not found it to hold up as well and again the sheer number of coats of paint was not an option. I did use Petit's EZ Poxy Enhancer. This is an additive which increases hardness, UV resistance, shine and ease if leveling. I was only trying for a six foot job, meaning that it looks good from 6 feet away. My near vision has deteriorated to the point that I can't see any defects when I am closer than 6 feet without my glasses and I don't wear those on deck since my distance vision is still very good. I will also say that I have not used Interlux Perfection. I have heard good things about about that product, but when I was researching which paint to use the Interlux rep was pushing Brightsides so I didn't consider the Perfection. In hindsight, after talking with pros, at least some speak very highly of Perfection. I rolled and tipped the paint on. The best results were achieved applying the paint when the air temperature was coolest. I would agree with others that you should first at least try to polish out the smooth gelcoat to see whether it can be restored to an acceptable sheen. There is not much you can do to restore non-skid. But if you end up painting, then just plan the job carefully and be methodical. I put each piece of hardware and fasteners into a numbered baggie and kept a log of each part as it came off. As I went along, I kept a separate list of replacement parts and fasteners that I needed to buy. I am pleased with the results of the job. Good luck with whatever you elect to do. Jeff
Note effect of fumes on count of steps above.

I repainted my entire deck in 2015, 30' boat, similar to yours. I considered the one part-two part issue and settled on one part for ease because I'm an amateur and I just knew I would screw it up. During prep, I sanded so much that I developed tendonitis on my elbow. Also, they say never wet sand, but I did all my work in the mornings and like OC, MdR has marine layer every morning and it's just wet. If I had to do it over again, I would go with two part. I had planned on selling her before the paint faded, but here I am. I don't like the way its held up, and I keep her covered 5 months of the year! Still looks good though. One of the hardest things was cutting the tape for the rounded corners. I became an exacto knife expert! I rolled and tipped. If you do 2-part, practice on your anchor locker or something. Removing deck hardware is straightforward (ie. difficult), but it did allow me time to fully service my winches while I had them off. For the non-skid I also used KiwiGrip, which I highly recommend. Super easy to apply and you don't have to completely sand down your old non-skid to do it. I had a yard guy quote me $10,000 for the job. I did it for about ~$800. I'll suffer tendonitis for $9200 any day!

I like Jeff's method of doing part of the project each year. We spent most of one sailing season painting our deck. Because it was record hot that early summer, some of the paint didn't really look that good. If you do paint, go with a two part paint, like Interlux Perfection, rather that a one part paint like Interlux Brightsides.

I have one of the shiniest boats in my marina. 24 years old Catalina, and has similar lines to a current Catalina, and people ask me how I like my "new" boat. I can't say having shine makes my life better, but I like to keep my boat at a certain level. Might just be some sort of OCD. I agree with those who have suggested trying to restore the gelcoat. You're lucky if you have no cracks, so it would be a shame to paint if you don't have to. Check out MaineSail's instruction on this site...he has the ultimate low-down on restoring gelcoat. Or try him at marinehowto.com. You could do a section at a time. Pick an area. You'll probably need to wet sand with 800, 1000, 1200, 1500, then use Presta Ultra Cutting Compound with a circular grinder polisher, followed by Presta polish with the grinder polisher. With the proper pads. Follow his techniques t o the letter ...no shortcuts or substitutions, and you have a very good chance of bringing back your gelcoat. It isn't easy, but it's much better than paint, and you don't have to do it all at once. The only real downside is that the grinder tends to sling the polish, so take care with that (your Sunbrella and your neighbor's boat). The Kiwi grip, as has already been suggested, is a good solution for the nonskid. One part, and just rolls on.
It is a LOT of detailed work to get the job done right. On the other hand, to get a shop to do it properly, that means an enclosed climate controlled EPA-sanctioned paint booth, and that's gonna cost. Anyone who says they can do the job outside without that? Yeah, good from 50 feet, good from 25 feet, any closer and you'll see the bugs and fluff that came in the wind while they were working. The materials aren't cheap, no matter how you do it. If you try to mask off hardware, plain masking tapes become iron after a couple of days in the sun. The green or blue ones may remain pliable for a week. One guy working on one deck? You need the 3M silver masking tape, about 4x the price, but it can be removed after 30 days without fighting. And you won't find that at the big box stores. The paints (excuse me, "coatings") tend to be sensitive to temperature and humidity, so you need to practice under the same conditions that you'll be working under. It can be a very satisfying job--but you will need some practice, a LOT of sandpaper and prep fluids, and a good respirator and eye protection and other things. Plus, a place to work. Many yards won't allow the painting and sanding. But if you've got the time and place, and are willing to practice the skills, you can spend a lot less than what a proper climate-controlled paint shop is going to charge. Having a reliable helper, who can roll and tip along with you, or help un/blot deck hardware from the other side, is really important too. FWIW I think the extra time and effort to remove all hardware and rebed it, is worth more than any savings to be had masking things off.

Do everything you can not to paint the deck and cabin. I had to paint mine because of many holes from old, no longer installed equipment. The paint job came out great but hasn't stood up to everyday use of the boat. Many scratches and wear points in the paint that were shrugged off by the gelcoat for four decades have appeared. Had sheet bags in the cockpit that I left in place for a couple of months only to discover the paint had blistered underneath them. Now remove them after each sail. The blisters have shrunk but not disappeared. Paint was two part industrial polyurethane not a marine paint but have heard of similar problems from Marine paint suppliers.
- ?
- 176.4K members
Top Contributors this Month

- Forums New posts Unanswered threads Register Top Posts Email
- What's new New posts New Posts (legacy) Latest activity New media
- Media New media New comments
- Boat Info Downloads Weekly Quiz Topic FAQ 10000boatnames.com
- Classifieds Sell Your Boat Used Gear for Sale
- Parts General Marine Parts Hunter Beneteau Catalina MacGregor Oday
- Help Terms of Use Monday Mail Subscribe Monday Mail Unsubscribe
Painting the cockpit?
- Thread starter Astrozombie
- Start date Jul 2, 2015
- Hunter Owner Forums
- Smaller Boats
Astrozombie
So ive read a hundred ways to repaint the cockpit but I cant decide what would be best. My cockpit is faded and oxidized from the Texas sun. So what would be best, sanding then painting using the roll and tip method or just a acetone cleaning and then painting using the same roll and tip. the non-skid areas are still good and I would just like to paint over those areas while preserving the existing non-skid, is that possible. Has anyone done this? any tips/advice would be greatly appreciated.
Have you considered wet sanding, compounding & wax?
Crazy Dave Condon
Get some comet and clean the topsides with that first and then wash off with a dish wash detergent. Then look at what is there and test patch with a cleaner wax. If no go, then compound and I suggest Finese It by 3M in the gallon as the liquid version stinks.
Unless the gelcoat is gouged or scratched all the way through, or you want to change the color, you're better off wet sanding and polishing. Save paint as a last resort. No matter what quality paint you use, it will not be as durable as gelcoat. On my 1969 Columbia, the gelcoat had been sanded through on a few places, so i had to paint. And now it needs doing again.

I'd have to say that the only problem is chalky oxadation. So I'll do the wet sand route which I'm really familiar with. I did it after refinishing my cabinet doors and companion way hatches, the finish turned out like a mirror. Thanks for the advice.
AStorzombie; I use to be a Hunter dealer and the way described is what I did for my customers. Once done, apply Melges pure wax as a final layer. Remember, You need to wax topsides at least twice during the season and hull once. Topsides may required more waxing depending on the area if the sun is harsher. I used Finese it by 3 M in the paste form but remember slow speed no more than 1000 rpm and go over quickly or you can burn the gel coat with any compound.

I agree with saving the gel coat. Painting is not a good option if all you have is oxidation. I'd even take it a little slower. You might try Soft Scrub. I've had a lot of luck with it. My thought is take off as little gel coat as possible. If Soft Scrub, or maybe even Bar Keepers doesn't work well enough, then go the light sanding route. Whatever you do apply wax after, as Crazy Dave suggests.
- This site uses cookies to help personalise content, tailor your experience and to keep you logged in if you register. By continuing to use this site, you are consenting to our use of cookies. Accept Learn more…
How To Paint A Sailboat: A Complete Guide

Whether you’re new to owning a sailboat or not, you have likely put some thought into painting your boat yourself. It is important to keep your boat well painted as it can save you a lot of money in the long run. It can also save you a lot of money if you choose to paint your boat yourself.
Whether or not this is the first time you have painted your boat, you will still find this article useful. It has lots of tips and tricks for making sure you get the job done and get it done well. Hiring a professional may be easier, but there is a sense of pride and accomplishment in doing it yourself. If you use this article as a reference, you can’t go wrong.
Table of contents
Why is it important to paint your sailboat?
Painting your boat is not just an excuse to put some creative flair into your boat, it is an important process in keeping the boat safe. Safe from salt, safe from barnacles, and safe from damage. The paint acts as a vital protective layer, without it your boat will be vulnerable to all kinds of damage. If you have a wooden hull, this protective layer will keep the wood from rotting. It can also plug any minuscule holes that might allow sea life and salt to make its way into the body of the boat.
There is also, of course, the added benefit of having a boat that looks good . A boat is a point of pride and should be treated as such. Having a glossy looking boat is something to be proud of. Most boats are not painted far above the waterline, so it is even an opportunity to make your boat stand out. Some people also believe that painting a boat brings good luck. Unless of course, you paint it green, green is thought to bring bad luck. Whether or not you believe that is up to you.
What are the benefits of painting your boat yourself?
When it comes to painting your boat there are only two options. Hire a professional boat painting contractor, or bite the bullet and do it yourself. They both have their pros and cons, of course, but there is so much more to be gained by doing it yourself. First of all, painting your boat yourself is just as fun as it is difficult. Learning to paint is a valuable life skill that you won’t regret learning as early on in your sailing career as possible. If you can learn to paint your boat now, you will save yourself a small fortune in the long run.
Hiring a contractor is expensive, to say the least, it may be faster and easier overall, but the extra cost can make it simply not feasible. Or simply unappealing. If this is the first time you are painting your sailboat you will need to make a one-off purchase of all the equipment needed for prepping, painting, and finishing the boat. After these one-off purchases are out of the way, you will only need to buy paint and new rollers the next time. Even if you need to buy all the equipment brand new, it can be cheaper than hiring someone else to do the job for you.
How often do you need to paint your sailboat?
The general rule of thumb for painting your boat is that it will need bottom paint about once a year. This is when you will need to take the boat completely out of the water and give it a fresh new coat. If your boat spends all of its time in the water, it certainly needs painting at least once a year. The saltwater is so corrosive that you shouldn’t let your boat go without a fresh coat of bottom paint for more than 2 years. Even if your boat only spends half its time in the water, and the other half on land, you will find that its best to keep its coat topped up.
The top paint, or the above waterline paint, doesn’t need painting anywhere near as often. It isn’t in direct contact with the seawater so it simply isn’t going to get eroded down as much. The salty sea spray can still be damaging over time so this paint should be re-done every 3 years. It can be more or less frequent depending on use and personal preference. Some people like to do above waterline paint yearly, with the rest of their boat, but it isn’t necessary.
What are the best paints to use for your sailboat?
There are plenty of great brands of paint out there, in various colors and shades, so you won’t struggle for choice. There are some things you might want to look for in your paint . For example, you may have noticed that a lot of boats tend to have red hulls. This isn’t just a fashion statement, and while red is supposed to bring luck this isn’t the main reason either. The reason is that this red/orange paint is perfect for added protection along the bottom of your boat.
This red/orange paint is interestingly chosen because it is, of course, traditional; but mostly because of its copper. The copper is actually what gives the paint its red/orange color.
Copper is perfect for the bottom of your boat for several reasons. First, copper acts as a biocide. It stops worms from making their way into the hull if your boat is wooden. If it is metal or fiberglass, it still has the benefit of stopping barnacles and other sea life from attaching themselves deep into the hull of the boat. Copper is also strong enough to hold up to scraping.
Scraping is when you scrape barnacles and other sea life off the hull of your boat. Scraping is an important part of keeping your boat in good condition. It is important to check with the marina or port authority whether or not you are allowed to scrape. If you scrape without permission you may find yourself on the receiving end of a hefty fine. The reason is that they don’t want you introducing invasive species on to the marina floor. This is mostly a problem when you are coming from somewhere vastly foreign, not sailing from New York to Chicago for example.
How many coats of paint does a sailboat need?
When painting your boat it’s a good idea to think about how many coats of paint you are going to need. There is no exact number that is needed, it is mostly to do with how well protected your boat needs to be and how much time you have on your hands. Every coat takes time and attention to detail.
If you choose to do four coats of paint it is going to be time-consuming but very well protected. That being said, the minimum number of coats is two. One is not enough. If your boat only spends part of the time in the water, two to three coats are plenty.
If you are someone who lives on their boat full-time, or at least most of the time, you may want to do more coats. Three, maybe even four, might be ideal here. The reason is that first, your boat is going to experience way more wear and tear than one that is just an ocean part-timer. And second, taking out your boat (which is also your home) is a giant hassle. It is a tedious process, so doing it as infrequently as possible is probably in your best interest. More coats last longer. When you are sailing from place to place, finding somewhere to take your boat out of the water and perform this maintenance is inconvenient. You want to be doing it as little as possible.
What safety precautions do I need to take when painting my sailboat?
All paint can be toxic when inhaled. Even if it is “non-toxic” paint it is going to be harmful to your lungs. They aren’t meant to inhale anything but air, even non-toxic paint is going to be bad for them. This is why it is important to wear a face mask.
Your mask should be specifically for painting, not surgical masks or other cheap medial masks. They are not going to be strong enough, with a fine enough air filter. Whether you feel the need to wear eyewear is up to you during the painting process.
Before the painting begins, when you are scraping and sanding, it is a good idea to wear some goggles to keep debris and splinters out of your eyes. It is also a good idea to wear gloves. You don’t want to rough your hands up too much, they need protection from not only the paint but splinters and sharp pieces of metal.
Painting a boat can be dangerous work. Without taking the proper safety precautions you are putting yourself at unnecessary risk. This safety equipment costs just a few bucks and is equally important as any of the other tools needed to paint your boat.
What tools do I need to paint a boat?
There is more to painting your boat than just using paint and a brush . You will also need tough sandpaper , potentially an angle grinder or welder , paint, primer , brushes, paint rollers , paint thinner , and solvent. You will need to make sure you have all of these things before you start painting. You can pick any of these items up at a boating goods store.
It is a good idea to bring some buckets with you for filling with water, both for rinsing off your boat and your brushes. All of your safety equipment needs to be brought too.
If this is your first time painting your boat yourself, you may find you need to buy all of these things at once. That can be a lot to stomach when its all in one go, luckily, most of these tools and equipment can be reused. Besides, it is still going to be far cheaper than hiring someone to do it for you. All of this equipment is an investment in your boat.
How to paint a sailboat
Whether this is the first time you have painted your boat or not, you may find some of the tips in this next section useful. Painting your sailboat may be tricky at first, but over time you will get the hang of it. The problem with painting your boat is that it can be a very expensive mistake if you get it wrong.
It is important to read this guide carefully, take your time, and make sure you do the job properly. It may be slow going at first, speed will come over time. Once you have gathered all of your safety equipment and tools you are ready to get started.
The workspace
First of all, you need to ensure you have the right workspace. You cant paint your boat in the water so you are going to need to find somewhere to do your work. This is easy enough if you don’t live on your boat full time, take the boat to your house and do your painting on the driveway. If this isn’t an option because you don’t have space or live on your boat full time, you are going to need to rent somewhere. There are typically places affiliated with the marina that you can use. In some cases, these even come with a majority of the equipment you will need. This, of course, drums up the price a bit, but that’s unavoidable.
Your workspace needs to be well ventilated, or you risk making yourself very sick. Both from paint fumes, rubbing alcohol fumes, and fine matter from when you sand the hull down. This means painting your boat in your garage, if it even fits, is not always the best idea. If you do decide to paint outside, it is important to consider the chance of rain. Of course, your boat is pretty waterproof, but once you begin sanding rain might damage the wood if left to sit there.
Before you do anything else, it is important to look your boat over fully from top to bottom. You are looking for any bumps, scrapes, cracks and general damage. This damage is not going to be noticeable while the boat is in the water, so just before you paint it is one of the only times you get to have a close look. Once you have made note of all this damage, it is time to get to work repairing it. Depending on just how severe this damage is, you may want to get help with this next stage.
All of this damage needs to be repaired before anything else can take place. Painting over these damaged areas is just going to hide the problem temporarily, the next time it comes to painting you will find they are far worse. If you don’t deal with this now, they are going to snowball into complicated and expensive repairs.
After your repairs are done it is time to start sanding. This is very time consuming as you need to do it three times. Per coat. First, take the 600 grit sandpaper and make your way around the boat. It is best to use electrical tape to mark out a section at a time so you don’t keep losing your place. After you have finished with the 600 grit sandpaper, it is time to move on to 800, then 1200. This process is important so you will be painting on as smooth a surface as possible. It is then a good idea to wipe the surfaces of the boat down with a damp cloth to remove any of the dust and flakes of metal/wood. Otherwise, you end up painting over them.
You could wash the boat down with a hose but you want to avoid getting the boat unnecessarily wet now that the hull has lost its protective layer. If you are sanding down a boat with a copper paint bottom, you may find the sanding process difficult. Just do your best, it doesn’t need to be 100% perfect. It is important to get as much of the old paint off as possible. Your new paint won’t adhere to the old paint as well as it would to the boat hull itself.
Putting on a layer of primer is not 100% necessary but it is recommended. The idea is that you want your topcoat to adhere to the boat as well as possible, a layer of primer can help you do that. The primer needs to be painted on evenly all over the boat. If you only feel like doing below the waterline, that is fine too. It will save you a lot of time. Putting on the layer of primer is not the most time-consuming part, it is mostly the sanding down that you will have to do. You will need to sand down using the 600 grit paper, then the 800, then 1200. Just like last time. Your layer of primer needs to be as smooth as possible for the maximum adhesion.
Now comes the paint. It is recommended to do at least two layers of paint. One undercoat and one top. Some people choose to go as far as two layers of primer, two layers of undercoat, and three layers of topcoat. This is going to be very time consuming, remember you will need to sand down three times between each layer of paint. You can paint using a brush if you like but is far easier to use a roller. It is also far easier if you employ someone to help you with this stage. It could be your spouse, child, friend, or anyone. It doesn’t need to be a paid professional. It can take a long time to go through this process. Especially if you are effectively doing 8 layers of paint (including primer).
The fastest way to paint, especially if you are on your own, is to use a sprayer. They are easy to use, with a little practice. If you haven’t used one before you may find that you struggle to get an even coat. You should always paint in vertical stripes, not horizontal. Additionally, it is a good idea to have someone following after you with a small brush doing small touch-up jobs. Any unevenness will need to be sanded down and repainted. The whole painting process can take a week if you aren’t efficient.
Take pictures
It is a good idea to take pictures throughout the whole process. This is for future reference. For example, if you take pictures of the boat when you are assessing it for damage, you can compare them to after you have repaired or sanded the trouble spots down. If you cant see the trouble spots still, great! If you can, it will help you keep an eye on them after you have painted too. It’s a good idea to catalog all of these areas if they start to become regular problems you may want to have your boat looked at by a mechanic. You might also like to have a before and after picture for your blog, or just as a personal memento.
Hopefully, you now have all the theory needed to paint your boat. There is a lot more that goes into painting your boat than simply grabbing some paint and a brush. It takes planning, practice, and attention to detail. If you follow this guide you will have no trouble at all. If this is your first time painting your boat, don’t be disheartened if it takes a lot longer than you expected. Speed will come with time, it is far more important to get the job done right than get it done quickly. If you put the work in you will be painting like a pro in no time at all.
Related Articles
Daniel Wade
I've personally had thousands of questions about sailing and sailboats over the years. As I learn and experience sailing, and the community, I share the answers that work and make sense to me, here on Life of Sailing.
by this author
Repairs and Maintenance
Most Recent

What Does "Sailing By The Lee" Mean?
October 3, 2023

The Best Sailing Schools And Programs: Reviews & Ratings
September 26, 2023
Important Legal Info
Lifeofsailing.com is a participant in the Amazon Services LLC Associates Program, an affiliate advertising program designed to provide a means for sites to earn advertising fees by advertising and linking to Amazon. This site also participates in other affiliate programs and is compensated for referring traffic and business to these companies.
Similar Posts

How To Choose The Right Sailing Instructor
August 16, 2023

Cost To Sail Around The World
May 16, 2023

Small Sailboat Sizes: A Complete Guide
October 30, 2022
Popular Posts

Best Liveaboard Catamaran Sailboats
December 28, 2023

Can a Novice Sail Around the World?
Elizabeth O'Malley
June 15, 2022

4 Best Electric Outboard Motors

How Long Did It Take The Vikings To Sail To England?

10 Best Sailboat Brands (And Why)
December 20, 2023

7 Best Places To Liveaboard A Sailboat
Get the best sailing content.
Top Rated Posts
© 2024 Life of Sailing Email: [email protected] Address: 11816 Inwood Rd #3024 Dallas, TX 75244 Disclaimer Privacy Policy
Marine Paint: A Comprehensive Guide for Owners

Marine paint is a specialized type of coating designed specifically for use in marine environments. Its primary purpose is to protect marine vessels, structures, and equipment from the harsh conditions.
Marine paint is formulated to provide superior protection to boats, yachts, ships, and other watercraft. It is available in a wide range of colors and finishes, including gloss, semi-gloss, and matte.
Some of the key characteristics of these coating systems include:
- Resistance to saltwater, UV radiation, and temperature fluctuations
- High durability and abrasion resistance
- Resistance to fading and chalking
- Resistance to marine fouling, such as algae, barnacles, and other organisms
Marine paint is formulated with special additives and resins that provide these properties. Some of the most common resins used in boat paint include epoxy, polyurethane, and alkyd. These resins provide high durability, adhesion, and chemical resistance.
When selecting marine coating systems, it is important to consider the specific needs of the vessel or structure being painted. Factors such as the type of watercraft, the intended use, and the environmental conditions will all impact the choice of coating. It is also important to follow proper surface preparation and application techniques to ensure the best possible results.
Overall, marine coating is an essential component of any watercraft maintenance program. By providing superior protection against the harsh marine environment, it helps to extend the life of boats and other marine structures and equipment.
Types of Marine Paint
When it comes to marine paint, there are several types to choose from. Each type of paint is designed for a specific purpose, and it is important to choose the right one for your boat. Here are the most common types of marine coatings:
Topside Boat Paint
Topside boat paint is designed to be used above the waterline of a boat. This type of paint is used on the hull, deck, and interior of a boat. Topside paints come in a variety of options, including one-part polyurethane, two-part polyurethane, and alkyd marine enamel. One-part polyurethane is the easiest to apply, while two-part polyurethane provides a more durable finish. Alkyd marine enamel is a budget-friendly option that is easy to apply, but it is not as durable as polyurethane.
Boat Bottom Paint
Boat bottom paint is used on the hull below the waterline. This type of paint is designed to protect the hull from the harsh marine environment, such as barnacles, algae, and other marine growth. There are two types of boat bottom paint: hard bottom paint and ablative bottom paint. Hard bottom paint is a durable option that provides long-lasting protection, while ablative bottom paint slowly wears away over time, releasing biocides to prevent marine growth.
Antifouling Paint
Antifouling paint is a type of boat bottom paint that is specifically designed to prevent marine growth. This type of paint contains biocides that prevent barnacles, algae, and other marine growth from attaching to the hull. Antifouling paint is available in both hard and ablative options.
Marine Deck Coatings
Marine deck coatings are used on the deck of a boat to protect it from the harsh marine environment. This type of paint is designed to be slip-resistant and to provide a durable finish. Marine deck coatings come in a variety of options, including epoxy, polyurethane, and acrylic. Epoxy is the most durable option, while acrylic is the most budget-friendly. Polyurethane provides a balance between durability and cost.
Choosing the right marine paint for your boat is important to ensure that it is protected from the harsh marine environment. By understanding the different types of paint available, you can choose the right one for your boat’s needs.
Application of Marine Paint
Here are some guidelines on how to apply marine paint effectively.
Surface Preparation
Before applying marine paint, it is essential to prepare the surface properly. The surface should be clean, dry, and free of any contaminants such as oil, grease, or rust. The following steps should be followed for surface preparation:
- Remove any loose paint, rust, or other debris using a wire brush or sandpaper.
- Clean the surface thoroughly using a solvent or detergent.
- Rinse the surface with clean water and allow it to dry completely.
- Sand the surface to create a rough surface for better adhesion of the paint.
Paint Application
Once the surface is properly prepared, it is time to apply your coating. The following steps should be followed for paint application:
- Stir the paint thoroughly to ensure that it is well mixed.
- Apply the paint using a brush, roller, or spray gun, depending on the size and shape of the surface being painted.
- Apply the paint in thin, even coats, and avoid over-applying the paint to prevent runs and drips.
- Allow each coat to dry completely before applying the next coat.
Drying Time
The drying time of marine paint depends on several factors, such as temperature, humidity, and the thickness of the paint layer. Generally, these coatings take about 24 hours to dry completely. However, it is recommended to wait for at least 48 hours before exposing the painted surface to water or other harsh conditions.
In conclusion, proper surface preparation, paint application, and drying time are crucial for the effective application of marine paint. By following these guidelines, one can ensure that the painted surface is protected from the harsh marine environment.
Marine Paint Brands
When it comes to marine paint, there are several reputable brands to choose from. Each brand has its own unique features and benefits, so it’s important to do your research and choose the one that best fits your needs. Here are some of the top brands:
Interlux is a well-known brand in the marine industry, offering a wide range of high-quality paints and coatings. Their products are designed to provide long-lasting protection against the harsh marine environment, including resistance to fading, chalking, and abrasion. Interlux offers both topside and bottom paints, as well as varnishes and primers.
Pettit has been a trusted name in marine coatings for over 150 years. Their products are known for their durability and long-lasting protection against the elements. Pettit offers a wide range of bottom paints, topside paints, varnishes, and primers, as well as specialty coatings for specific applications.
Awlgrip is a premium paint brand, known for its high-gloss finish and superior durability. Their products are designed to provide long-lasting protection against UV rays, saltwater, and other harsh marine conditions. Awlgrip offers a range of topcoats, primers, and specialty coatings, as well as custom color matching services.
TotalBoat is a newer brand in the marine industry, but they have quickly gained a reputation for offering high-quality products at an affordable price point. Their products are designed to be easy to use and provide long-lasting protection against the elements. TotalBoat offers a range of paints and coatings, including topside paints, bottom paints, and varnishes.
Overall, there are many great marine paint brands to choose from. Whether you’re looking for a premium product or something more affordable, there is a brand out there that can meet your needs. It’s important to do your research and choose a product that will provide the protection and durability you need for your specific application.
Environmental Impact of Marine Paint
Marine paint is a coating applied to the exterior of ships and boats to protect them from corrosion, fouling, and other environmental factors . However, the environmental impact of marine paint has been a growing concern in recent years.
One of the main issues with marine paint is that it can contain toxic chemicals such as copper, lead, and tributyltin (TBT). These chemicals can leach into the water and harm marine life, including fish, shellfish, and other aquatic organisms. TBT, in particular, has been linked to reproductive problems in marine mammals and has been banned in many countries since 2008.
Another environmental issue these coatings is the release of microplastics and paint particles into the ocean. These particles can be ingested by marine life, leading to potential health problems and even death. Estimates suggest that paint particles may contribute up to 35% of the synthetic micro-debris input in the ocean.
To address these environmental concerns, many countries have implemented regulations on the use of marine paint. For example, the International Maritime Organization (IMO) has developed guidelines for the use of antifouling coatings, which are designed to prevent the growth of marine organisms on the hulls of ships. These guidelines limit the use of harmful chemicals and require the use of environmentally friendly alternatives.
In addition to regulations, there has been a growing trend towards the use of eco-friendly marine coatings. These coatings are made from natural materials and are designed to be biodegradable, non-toxic, and sustainable. While these coatings may be more expensive than traditional marine paint, they offer a more environmentally friendly solution to protecting ships and boats from the harsh marine environment.
Overall, the environmental impact of marine paint is a complex issue that requires careful consideration and regulation. While there have been efforts to reduce the use of harmful chemicals and promote eco-friendly alternatives, more work needs to be done to ensure the long-term sustainability of the marine industry.
Frequently Asked Questions
What is the difference between marine paint and regular paint.
Marine paint is specially formulated to withstand the harsh marine environment. It is designed to provide a durable, long-lasting finish that can protect the boat from corrosion, fading, and other forms of damage. Regular paint, on the other hand, is not designed to withstand these conditions and can quickly deteriorate when exposed to the marine environment.
What kind of paint is used in marine painting?
There are different types of marine paints available, including antifouling paint, topside paint, and bottom paint. Antifouling paint is used to prevent marine growth, such as barnacles and algae, from attaching to the hull. Topside paint is used above the waterline and can be used to paint the deck, cabin, and other areas. Bottom paint is used below the waterline to protect the hull from marine growth and other forms of damage.
What is a good brand of marine paint?
There are several good brands of marine coating available, including Interlux, Pettit, and West Marine. These brands offer a range of products, including antifouling paint, topside paint, and bottom paint, that are designed to provide durable, long-lasting protection for boats in the marine environment.
How long does marine paint last?
The lifespan of marine paint can vary depending on several factors, including the type of paint, the quality of the application, and the conditions of the marine environment. Generally, a high-quality coatings can last for several years, but it may need to be reapplied every few years to maintain its protective properties.
Does marine paint need primer?
In most cases, marine paint does require a primer. The primer helps to ensure that the paint adheres properly to the surface and provides a smooth, even finish. However, there are some types of paint that are self-priming, so it is important to read the manufacturer’s instructions carefully before applying the paint.
Can you use marine paint on fiberglass boats?
Yes, marine paint can be used on fiberglass boats. However, it is important to use a paint that is specifically designed for use on fiberglass surfaces. These paints are formulated to adhere properly to fiberglass and provide the necessary protection against the marine environment.
Leave a Comment Cancel reply
Save my name, email, and website in this browser for the next time I comment.
How to Articles | Bottom Paint Store
Learn more about boat paint applications and marine supplies.

A Guide to Choosing Marine Paint
Marine paint is specially formulated paint designed for use on boats and other marine vessels. It provides a protective barrier between the boat’s hull and the water, helping to prevent corrosion, osmosis, and the growth of marine organisms such as barnacles and algae. It is also designed to withstand the harsh marine environment, including exposure to saltwater, UV radiation, and abrasion.
The lifespan of marine paint can vary depending on factors such as the type of paint, the conditions in which the boat is used, and the level of maintenance. Generally, marine paint can last anywhere from 3 to 7 years or more.
Using marine paint offers several benefits, including protection against corrosion, osmosis, and marine growth. It also helps improve the appearance of your boat and can increase its resale value.
Marine paint can typically be applied over existing paint, but it’s important to properly prepare the surface to ensure good adhesion. This may involve cleaning, sanding, and applying a primer before painting.
When choosing marine paint, consider factors such as the type of surface you are painting, the conditions in which the boat will be used, and your budget. It’s also important to choose a paint that is compatible with any existing coatings.
Many marine paints are now formulated to be environmentally friendly, with low VOC (volatile organic compound) content and biocide-free options. Look for paints that are labeled as friendly or environmentally safe.
Maintaining and cleaning marine paint is essential for prolonging its life and protecting your boat. Regular cleaning with a mild detergent and water, along with periodic waxing and polishing, can help keep your marine paint looking its best.
Overall, marine paint plays a crucial role in protecting and maintaining your boat. It is formulated to meet the unique challenges posed by the marine environment, providing long-lasting protection and performance for boats, ships, docks, and other marine structures. By understanding the different types of marine paint and how to choose and maintain them, you can ensure that your boat remains in top condition for years to come. I you need any assistance selecting the right marine paint for your needs please contact the Bottom Paint Store customer service team 888.505.2313.
- New Sailboats
- Sailboats 21-30ft
- Sailboats 31-35ft
- Sailboats 36-40ft
- Sailboats Over 40ft
- Sailboats Under 21feet
- used_sailboats
- Apps and Computer Programs
- Communications
- Fishfinders
- Handheld Electronics
- Plotters MFDS Rradar
- Wind, Speed & Depth Instruments
- Anchoring Mooring
- Running Rigging
- Sails Canvas
- Standing Rigging
- Diesel Engines
- Off Grid Energy
- Cleaning Waxing
- DIY Projects
- Repair, Tools & Materials
- Spare Parts
- Tools & Gadgets
- Cabin Comfort
- Ventilation
- Footwear Apparel
- Foul Weather Gear
- Mailport & PS Advisor
- Inside Practical Sailor Blog
- Activate My Web Access
- Reset Password
- Customer Service

- Free Newsletter
Dufour 44 Used Boat Review

Blue Jacket 40 Used Boat Review

Catalina 270 vs. The Beneteau First 265 Used Boat Match-Up

Ericson 41 Used Boat Review

How to Create a Bullet-Proof VHF/SSB Backup

Tips From A First “Sail” on the ICW

Tillerpilot Tips and Safety Cautions

Best Crimpers and Strippers for Fixing Marine Electrical Connectors

Solving the Dodger Dilemma

Polyester vs. Nylon Rode

Getting the Most Out of Older Sails

How (Not) to Tie Your Boat to a Dock
Fuel Lift Pump: Easy DIY Diesel Fuel System Diagnostic and Repair

Ensuring Safe Shorepower

Sinking? Check Your Stuffing Box

Why Choose the Wharram Design?

Winterizing: Make It Easy With Checklists

Boat Improvements for the Technically Illiterate

What Do You Do With Old Fiberglass Boats?

Stopping Holding-tank Odors

Giving Bugs the Big Goodbye

Galley Gadgets for the Cruising Sailor

The Rain Catcher’s Guide

Sailing Gear for Kids

What’s the Best Sunscreen?

UV Clothing: Is It Worth the Hype?

Preparing Yourself for Solo Sailing

R. Tucker Thompson Tall Ship Youth Voyage

On Watch: This 60-Year-Old Hinckley Pilot 35 is Also a Working…

On Watch: America’s Cup

On Watch: All Eyes on Europe Sail Racing

Dear Readers
- Sailboat Reviews
- Sails, Rigging & Deck Gear
A Practical Look at Sailboat Cockpit Design
Ps outlines what to look for when searching for a comfortable, functional cockpit..

Cockpit ergonomics involve more than a concern about coaming angles and comfortable seating. These are just two items on a long list of attributes that define the space where sailors spend most of their waking time.
At boat shows, the crowd can be divided into those that poke around on deck and those who head directly below. Brokers know the difference between racing sailors and cruisers and which end of the companionway ladder will seal the deal. Racers want performance and scrutinize the on-deck design features that make it all happen, while cruisers look below for the amenities of a house afloat. This stereotype may be too rigid, but from what we’ve seen at recent boat shows, cruisers need to take a closer look at the cockpit and get a feel for how a sailboat will handle underway, as well as serve as a home away from home.
There’s much more at stake than comfort for the crew. Cockpit design and layout drives many boat-handling tasks, ranging from steering and sail trimming to what goes on when its time to reef. Angles of view can even affect watchkeeping.
For example, a high center cockpit and a large overlapping genoa create a 90-degree-plus no see zone, and thats a big deal when it comes to collision avoidance. A large catamaran with a tall bridge-deck cabin can add an even larger no see zone, especially when running on autopilot with no one perched on the elevated helm seat.
In short, many cockpits are optimized for at-anchor enjoyment instead of underway usability. So part of the boat-shopping process should include careful scrutiny of how essential sailing and boat-handling tasks will be accomplished. For starters, note how much contortion it takes to really crank each winch, determine whether or not the line leads favor easy reefing, and check to see how well the cockpit shape contributes to keeping the crew from being washed overboard. These are essential attributes, and for some, they are more vital than galley counter material and the fabric that covers the cushions below.
Grand Prix racers have long favored wide open, low sided, no-transom cockpits that are more of an open deck than a protective trench. In heavy weather, these nothing-to-cling-to cockpits can become perilous. In 1997, during the Hong Kong to Osaka, Japan Race, Americas Cup trials veteran Makoto Namba was at the helm of Escape One when a 20-foot breaking sea washed him out the open transom of the 45-foot racer. In 2006, Dutch Volvo Ocean racer Hans Horrevoets was swept from the deck of ABN AMRO TWO and lost at sea. Closer to home, pro sailor Dan Cianci was tossed over the lifelines of the 50-foot ocean racer Snow Lion. The accident occurred at night, in heavy weather just off the Delaware River mouth. In each case, the cockpit design favored sail trim and line handling over heavy-weather safety considerations. Many ocean racers mitigate such design tradeoffs with careful use of harnesses, tethers, jack lines, and hard points for tether attachment.
Just the opposite design trend can be found in the deep cockpit and conventional closed transom of sailboats such as Ted Hoods 25-year-old design, American Promise. Dodge Morgan sailed the heavy-displacement 60-footer solo around the world. The big, double-head rigged sloop provided a great deal of crew protection and seakeeping ability during Morgans voyage. And for years after he donated the boat to the U.S. Naval Academy, midshipmen also learned to appreciate the cockpit layout-particularly during bad weather offshore.
PS Technical Editor Ralph Naranjo sailed that boat in a gale-strewn trans-Atlantic with an able crew and encountered a nasty 979-millibar low at about 45 degrees North latitude. According to the log, AP was reaching eastward at 9 knots under storm trysail and storm jib with green water routinely sweeping the deck. Seas had silenced the mini-M satphone by regularly immersing the dome shaped antenna in wave faces, eventually flooding the internal circuitry.
It was a rough passage, and little things taken for granted in smoother seas showed their true value. Features like the deep cockpit well, the heavy-duty, water-tight companionway doors, and the massive cockpit drains all proved their worth.
The flip side of the coin is that really bad weather encounters are a rare occurrence for most sailors. More often, 0- to 20-knot sailing conditions prevail. And our coastline is dotted with safe havens in which to hide from the elements. So one of the big challenges facing every designer and naval architect drawing lines for their next new boat is the question of exposure. Will owners use the boat as a dockside second home and be underway only in fair weather, or will they take the cruiser label to heart and leave land well astern? A close look at cockpit layouts will give you some indication of the boats intended use.
We prefer to evaluate cockpit ergonomics from both static and dynamic points of view. On some boats, these underway and at anchor evaluations lead to disparate conclusions. A cockpit that works well underway may be confining in port, or another vessel with a patio-size stern may be altogether dysfunctional at sea. It’s all an issue of trying to do two different jobs with one fixed set of dimensions and appendages. Buyers need to know what attributes they will make best use of.
For monohulls, coping with heel is the first big challenge, and wide-open space, whether its in the cockpit or main saloon, can be a tough challenge. The universal solution to carrying wide beam aft on cruising boats seems to be the ubiquitous cockpit table. It can be a handy centerline support, but it’s a tough addition to a seafaring cockpit in the minds of many traditional sailors. That said, production boatbuilders have gotten much better at making these centerline, folding-leaf tables sturdy enough for sea duty and effective as a handhold.

Industry Trends
Over the last 50 years, mainstream production sailboat design has moved noticeably away from the racer/cruiser defined by Pearson, Tartan, C&C, Cal, Columbia, Ranger, Islander, Ericson, and others. The new boats are roomier with less emphasis on performance under sail. Racers now have their own genre of sailboat, and they are faster, better handling, and more capable than their predecessors. But whats most surprising is that many mainstream cruisers are anything but optimized for long-distance passages and long-term living aboard.
These boats feature convenience, style, and comfort, and the actual design objective in many cases is more focused on weekend cruising and an annual two-week summer harbor-hopping cruise. Easy sail-setting and large boat interiors in shorter waterline lengths prevail, and such trends influence the shape and layout of the cockpit. When it comes to ergonomics, the split between cruisers and racers is more apparent than ever, but theres also some real differentiation within the ranks of cruisers themselves.
In Practical Sailors recent scrutiny of cockpit designs at local boat shows, weve noted four emerging sailboat stereotypes. These include daysailers that feature few, if any, accommodations; racing boats brimming with performance-enhancing hardware; and ocean-going cruisers capable of extended passagemaking. The fourth grouping-larger than all the other three combined-are also labeled cruisers, but with less draft, less stability, and less versatile sail plans, they are more like an SUV designed more for the highway than off-roading in the backcountry.

Sizing Up a Cockpit
The takeaway lesson for us was the importance of making sure that the cockpit of the boat you are about to buy is in keeping with the mission of the rest of the boat. If you are a serious club racer, the centerline table wont be a crew favorite. Those making a double-handed passage on a 40-footer will see a tight, narrow cockpit differently than when eight sail the same boat. So with complete belief in the old adage, different strokes for different folks, heres what we looked for when evaluating cockpit design. It can be used as a helpful buyers guide when you’re surveying your next boat.
Working the winches: All too often, winch location is an afterthought, and fine hardware is stuck on side coamings shaped more as a roof for the aft cabin than as a key component of sail trim. We always like to check sheet leads angles that lead lines to a particular winch and then mimic what cranking with a two-handed winch handle would be like. Look for 360-degree clearance with no knuckle-busting stanchions in the way. Be sure that the winch grinding works on either tack. Genoa sheeting may always put you on the leeward side of the cockpit, but runners and spinnaker guys will usually be worked on a windward winch.

Sheets and halyards: One of testers major complaints was builders habit of running seldom-used halyard lines attached to roller-furling headsails and in-mast furling mainsails all the way aft to the cockpit. Doing so left lengthy line tails cluttering up the area under the dodger where reefing lines, the boom vang, and in some cases, the main sheet all arrived like too many trains in a station.
Theres no perfect mainsheet arrangement, but some are better than others, and the one you choose has a lot to do with how much attention you pay to the nuance of sail trim. The current vogue among serious racers involves 2-to-1 end-boom sheeting: an in-boom lead of the double-ended sheet returns aft via turning blocks near the mast and runs to winches on both sides of the boat (often referred to as Admirals Cup, or German mainsheet). Fast, no-load hand trimming is the upside, but in any breeze, theres good reason to quickly get the sheet on a winch drum. The sheet tail is shorter because of the low ratio (2-to-1) lead. One nuisance is that the sheet can end up bunched up on one side or the other.
Many cruisers prefer higher ratio, multi-part tackles for mainsheeting and may lead each end to a Harken-type adjustment system rather than using a winch. When fast tacking action is not in the cards, this is a user-friendly system.
Some cruisers incorporate mid-boom sheeting because it moves the tackle out of the cockpit than rather then because of how effectively it allows the mainsail to be trimmed. The shortened lever arm means the sheet needs a winch sooner than later. There is also more of a leech-flattening, vang-like effect to this type of sheeting, not the best feature for light-air efficiency.
The trend toward travelers roosting on over-cockpit arches, a longtime standard in Hunter Yachts and a recent adoption in some Beneteau lines, helps protect the crew from accidental jibe injuries and allows dodgers and biminis to flourish, but windows in these covers are essential, if a crew is to see whats happening whey they are pulling the strings.

Anticipate the angles: Look at how things will change as heel increases and note where vulnerability lies. We recently ran into a crew who had lost an engine due to the shape of the cockpit. During the design phase, the location for an engine instrument recess was placed within easy reach of the person at the helm. In an upright trim-and even at 30 degrees of heel-all was well, but in a knock down when the cockpit began to flood, the engine instruments ended up in a low spot, and despite their sealed all-weather design, submerging them in saltwater had not been part of the engine manufacturers gameplan. The ensuing corrosion took out the panel and the alarm system, and a novice crew failed to notice the changes in sound and smell as a raw-water blockage in the cooling system went critical.
Those headed offshore need to pay special heed to the companionway and have a feel for what angle of heel sends water down an open hatch. Whats a surprise to many is that the first part of the hatch to reach the water may be the top rather than the lower portion of the companionway. Sticking in a washboard or two will help keep a breaking wave from sloshing below, but it may be of little use in a deep knockdown.
Getting in and out: One of the most important safety features of a good boat is the transitional path that leads a crew from the cockpit to the deck. Good engineering focuses on step heights, deck camber, handholds, and the quality of the nonskid surface. This transition in and out of the cockpit is one of the most repeated movements on the vessel. If a dodger, bimini, or Florida room compromises access, they become a hazard. Small, molded steps are of little help in a seaway.
There is no ideal cockpit that meets everyones preferences, and plenty of bad ideas still persist. No matter what your aims are as a sailor, some things deserve to take precedence. Ample space for entertaining friends for sundowners dockside is nice, but comfort underway, including ergonomic seats for sitting or napping, and secure places to steer and stand watch when the boat is heeled should be a higher priority.
Likewise, sight lines and sensible sheet arrangements should come before drink-holders. Next time you prowl the boat show, spend some time exploring the cockpit and comparing features. It is the hub of the boat.
Rating cockpit attributes is a worthwhile endeavor for a serious boat shopper. Start by rating component parts. It will allow you to more effectively compare and contrast one boat with another, according to your specific sailing plans and needs.
For example: Above, we have focused on seven key cockpit attributes and rated five new boats accordingly. Below is a brief explanation of each of the criteria selected. The result of the data table is not a winner-take-all report card. It’s a means of determining what has been emphasized in a specific cockpit design on a wide variety of very different vessels.
Rating for this attribute reflects both the location of a winch and the way in which crew members must bend, lean, or contort themselves while sheeting. We considered how efficiently a manual winch could be cranked and whether or not an electric winch could be safely operated while retaining a clear view of the sail being sheeted or hoisted.
This was not a look at the vessel’s steering hardware, rudder design, or feel of the tiller. It was more focused on helm location and how the person steering the boat could carry on the process comfortably for lengthy periods of time.
We consider the ability to quickly and efficiently reduce and add sail area to be a primary aspect of seamanship. Cockpit layouts teamed up with efficient well-chosen hardware can make or break this facet of cockpit ergonomics. Awkward winch placement, too many lines clustered together around a big bank of rope clutches, and attempting to place sheets, halyards, and reefing lines all in the helmsman’s lap with only one or two undersized winches usually lead to lower ratings.
Collision avoidance requires seeing what’s about to cause trouble well ahead of time, and anything shy of a 360-degree angle of view detracts from the process. We were concerned about view angles and obstructions ranging from dodgers, to deck-sweeping headsails, cabinhouse bulkheads, and other design features that limit the helmsperson’s field of vision. Aboard many multihulls, there’s a growing trend toward providing one perch that offers an all-around view. But when the vessel is operating on autopilot and no one is in the elevated helm seat, watchkeeping efforts are hampered.
When floating on an even keel, it’s easy to get in and out of most cockpits. However, a modest heel of 15 degrees can turn wide-open cockpits with awkward coamings and narrow sidedecks into a hazard. Getting around on a vessel in a seaway requires good nonskid, an abundance of ready handholds, and an unobstructed pathway in and out of the cockpit. Seats need to be usable underway, and the dodger, companionway, and bimini must work in concert.
Short Handing
Because most cruisers sail short-handed, we are always on the look out for features that make watchkeeping more user friendly. These include line leads and winch layouts that allow headsail trimming from the helm and may even offer the chance to tuck or shake a reef from the confine of the cockpit. Crew alone on deck also benefit from deeper-welled open space. Giving the short-handed crew protection from seeping seas and offering well-placed hardware goes a long way to ensure safe, efficient passagemaking.
Entertaining
At anchor and in port, the cockpit changes from an operations center to a backyard patio. Gone is the need for seakeeping attributes, and what counts is how well the area at the aft or center portion of the boat stacks up as a place for stationary fun. Tables that can serve dinner for six or drinks for 10 get high marks. Transoms that fold down, offering access to the sea, are also a current rage. It’s no surprise however, that many of the attributes that drive high scores for entertaining earn a lower grade at sea—the reason many designers and builders have spent time developing fold-up swim platforms and wellreinforced drop-leaf tables ready for sea duty.
VALUE GUIDE: Comparing Cockpit Design
| VESSEL | TRIMMING | STEERING | REEFING | VISIBILITY | HEELED | SHORT HANDLING | ENTERTAINING |
|---|---|---|---|---|---|---|---|
| FARR 400 | Excellent | Excellent | Fair | Excellent | Excellent | Poor | Fair |
| BENETEAU SENSE 43 | Fair | Good | Good | Good | Fair | Fair | Excellent |
| DUFOUR 445 | Fair | Good | Fair | Good | Good | Good | Good |
| LEOPARD 39 | Fair | Good | Fair | Fair | NA | Fair | Excellent |
| PASSPORT 545 CC | Fair | Good | Good | Excellent | Good | Good | Excellent |
RELATED ARTICLES MORE FROM AUTHOR
Leave a reply cancel reply.
Log in to leave a comment
Latest Videos

The Performance Sailboat from Island Packet: Blue Jacket 40 Boat Review

Top 3 Winter Boat HACKS!

Cabo Rico 34 Boat Review

Super Shallow Draft Sailboat: The Leeboard Sharpie
Latest sailboat review.

- Privacy Policy
- Do Not Sell My Personal Information
- Online Account Activation
- Privacy Manager
Free Shipping On All Orders!
- Epoxy Resins
- Polyester Resin
- Urethane Resins
- Epoxy Project Supplies
- Antifouling Paints
- Topside Paints
- Thinners & Solvents
- Paint Supplies
- Wood Oils & Finishes
- Wood Finishing Supplies
- Cleaning & Polishing
- Accessories

Table Top Epoxy

Clear High Performance Epoxy Kits

5:1 Traditional Epoxy Resin Kits
- Thinners & Solvents

Wet Edge Topside Paint

Premium Marine Topside Primer

Spartan Multi-Season Antifouling Paint
- Wood Finishes
- Wood Oils & Finishes

Gleam Marine Spar Varnish

Lust Rapid Recoat Marine Spar Varnish

Halcyon Water-Based Marine Varnish

TotalBuff Rubbing Compound

TotalShine Finishing Compound

White Knight Fiberglass Stain Remover
- TotalBoat Gear

FlexFit Fitted Mesh Back Baseball Cap

Men’s Long Sleeve T-Shirt Hoodie

Women’s Long Sleeve T-Shirt Hoodie
FREE SHIPPING with a minimum puchase of $1,200.00 You are $10.00 away from your free shipping!
Shipping, taxes, and dicount codes calculated at checkout.
Collection: Paint

23 products

TotalTread Non-Skid Marine Deck Paint

TotalBilge Epoxy Bilge Paint

Aluminum Boat Topside Paint

Elixir Enamel Topside Paint

JD Select Water-Based Bottom Paint

Underdog Boat Bottom Paint

Krypton Copper-Free Antifouling Bottom Paint

AlumiPaint AF Aluminum Antifouling Paint

Outdrive AF Prop & Outdrive Aerosol Spray

Outdrive AF Prop and Outdrive Antifouling Paint

Inflatable Boat Bottom Paint

TotalProtect Epoxy Barrier Coat Primer

Aluminum Boat Barrier Coat Epoxy Primer

Special Brushing Thinner 100

Spray Thinner 101

Dewaxer & Surface Prep Solvent

TotalStrip Paint Remover
- Choosing a selection results in a full page refresh.
COMMENTS
First, carefully prepare the surface, and when applying an LPU paint by roller and brush, remember "less is best.". A slower reducer allows the paint to flow and makes brush and roller marks disappear. Multiple light coats with scuff sanding in between works best. Your Alden has a certain market value based upon a specific level of fit and ...
Then Janet used a solvent wash to ensure a strong bond with the primer paint. 3. After dings and cracks were repaired and sanded, two coats of epoxy primer were applied. 4. Following another round of sanding, vacuuming, cleaning, and taping, the couple rolled and brushed on a fresh coat of Awlgrip topcoat. 5.
DIY sailboat restoration: Painting the cockpit of my sailboat at anchor in Costa Rica | Untie The Lines S6E11 ⇩ Support my videos and get real time video upd...
My deck and cockpit are the last things that are needing attention. While not bad for an older boat, a fresh paint would certainly make it look very good. The topsides of the boat are in gear condition with the original gel coat still shining. The decks and cockpit are a little chalky and the original color was more of an eggshell or off white ...
Jul 2, 2015. #1. So ive read a hundred ways to repaint the cockpit but I cant decide what would be best. My cockpit is faded and oxidized from the Texas sun. So what would be best, sanding then painting using the roll and tip method or just a acetone cleaning and then painting using the same roll and tip. the non-skid areas are still good and I ...
Painting the Deck and Cockpit. When it comes to maintaining a sailboat, many sailors tend to focus on the engine, rigging, and sails. However, neglecting the deck can lead to slippery surfaces and hazardous conditions. Painting the decks with a non-skid coating is a crucial step in ensuring the safety of your crew and vessel.
A high-quality finish begins with proper preparation, and Practical Sailor' s hands-on refinishing projects on crafts ranging from an 11-foot sailboard to a 41-foot Ericson offered our experts plenty of insight into prep-work challenges. Preparing the hull's surface for painting is a laborious process, but if you review the primer on ...
I am coming to the final stages of painting now, a light sanding with 400 grit disks and a 2nd coat of international perfection paint. It was a lovely day ou...
Although the cockpit layout had worked well when the boat was built, it was clearly outdated by today's standards. ... After masking, the Interdeck paint was rolled over the non-skid areas. Hatches were painted before being installed on the boat. On a J/24 the cockpit is divided by the mainsheet traveler. Most of the time the helmsman sits ...
3. Paint at optimum times of day. If you're outside, paint in mid to late morning after the dew has evaporated, and in mid-afternoon. Avoid noontime when the sun is overhead and at its hottest, and late afternoon, when evening cooling and moisture can affect drying time and finish. 4.
After you have finished with the 600 grit sandpaper, it is time to move on to 800, then 1200. This process is important so you will be painting on as smooth a surface as possible. It is then a good idea to wipe the surfaces of the boat down with a damp cloth to remove any of the dust and flakes of metal/wood.
A few decades ago, an aircraft paint company executive decided to paint his boat with the same stuff used to coat aircraft that flew at 450 knots—the stuff that seemed immune to UV degradation and shed hydraulic fluid like water off a duck's back. The results were more than impressive, and his experiment with a paint called Alumagrip led to ...
I finish my topside paint job by painting the cockpit and sealing up the engine compartment! This is my first time doing a total paint job of the boat, or an...
October 2, 2023 by admin. Marine paint is a specialized type of coating designed specifically for use in marine environments. Its primary purpose is to protect marine vessels, structures, and equipment from the harsh conditions. Marine paint is formulated to provide superior protection to boats, yachts, ships, and other watercraft.
Nikki gets a wild hair to change the entire look of our sailboat cockpit by painting the cushions...that's right, I said PAINT!Read the Entire Post on our We...
It also helps improve the appearance of your boat and can increase its resale value. Marine paint can typically be applied over existing paint, but it's important to properly prepare the surface to ensure good adhesion. This may involve cleaning, sanding, and applying a primer before painting. When choosing marine paint, consider factors such ...
And for years after he donated the boat to the U.S. Naval Academy, midshipmen also learned to appreciate the cockpit layout-particularly during bad weather offshore. PS Technical Editor Ralph Naranjo sailed that boat in a gale-strewn trans-Atlantic with an able crew and encountered a nasty 979-millibar low at about 45 degrees North latitude.
Largo Blue (1)Largo Blue (1 products) Light Gray (2)Light Gray (2 products) Off White (1)Off White (1 products) Olive Drab (1)Olive Drab (1 products) Oyster White (2)Oyster White (2 products) There's a TotalBoat paint for just about every surface on your boat. Our lineup of bottom paints, topside finishes, primers, and solvents have you covered.
How to paint boat deck.How i improved the look and condition of my boat deck. better than new gelcoat DIY deck paintPainting my boat deck and cabin with Pe...
Megayachts are increasingly becoming the repositories of their owner's art collections. Art historians are sounding the alarm: owners do not know how to place a work of art, and the crew do not know how to properly care for it. On the Mediterranean and the U.S. East Coast - in the Mecca of yachting - some of the connoisseurs of art decided to fill the gaps and organize training courses for ...