
How To Make An Origami Boat That Floats: A Step-By-Step Guide
Do you want to learn how to make an origami boat that floats? It’s actually a lot easier than you might think! In this step-by-step guide, I will show you how to do it.
All you need is a piece of paper and some patience. Follow these simple instructions and you’ll be able to create your own floating origami boat in no time!
How To Make An Origami Boat That Floats Video Walkthrough
There you have it, that short video tutorial should be an easy and fun way for you to learn how to make an origami boat that floats! So what are you waiting for? Get out your paper and give it a try!
I’m not done yet though! If you prefer learning a different way and videos aren’t your thing, don’t worry! I have written out step-by-step instructions with images for you below.
If you enjoy this design, make sure to check out all my other Origami Vehicles !
How To Make An Origami Boat That Floats Step-By-Step Instructions
1. creating horizontal and vertical creases.
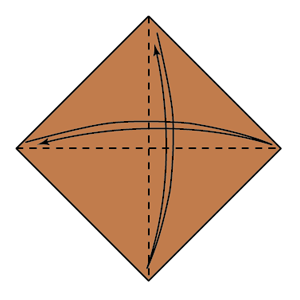
Fold in half horizontally and vertically. Then fold back to make crease.
2. Folding Diagonal Creases and Turning Over
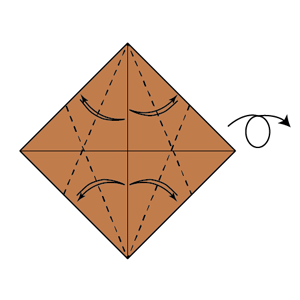
Fold in the dotted lines and fold back to make crease. Then turn over.
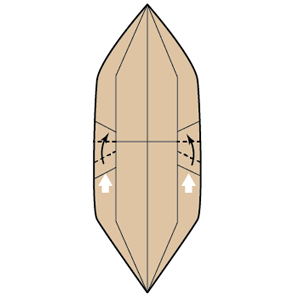
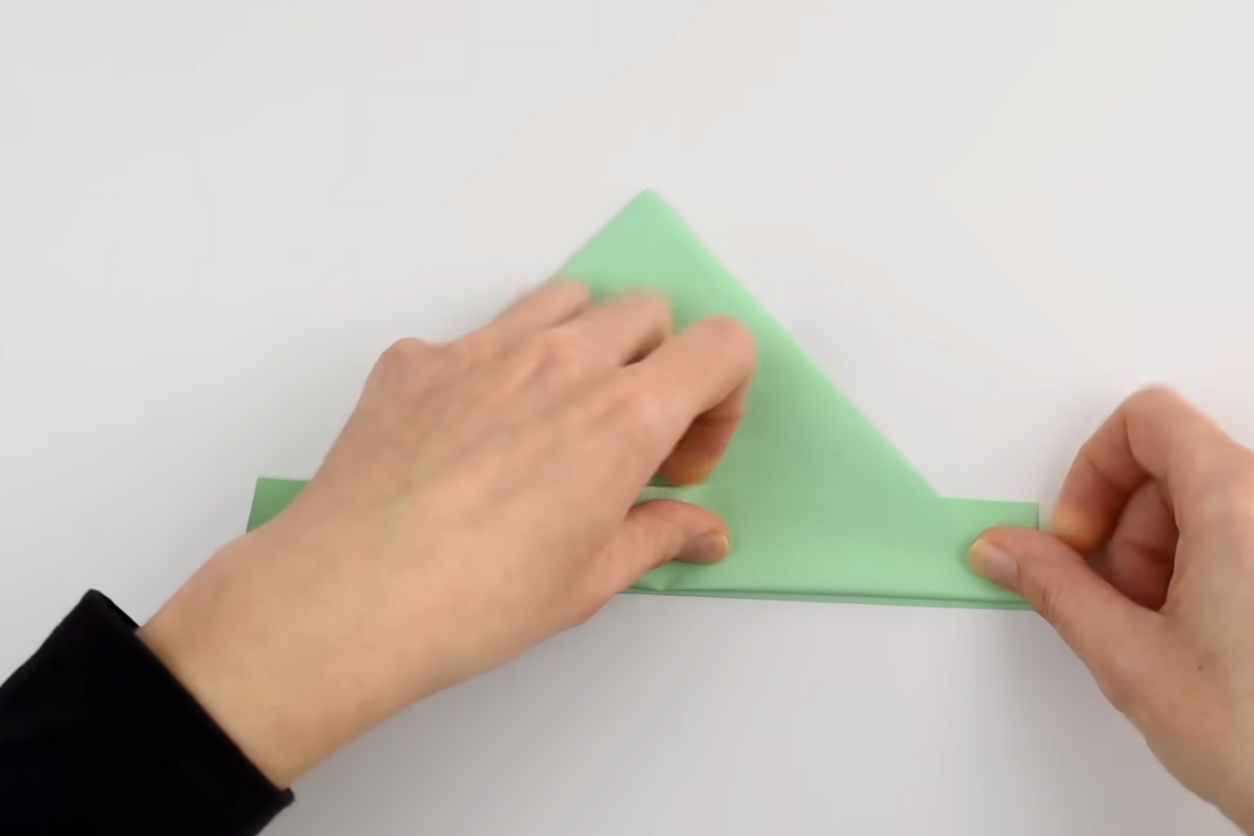
3. Folding Flaps Toward the Top
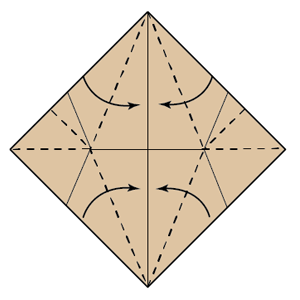
Fold in the dotted lines as directed by the arrow such that the flap is towards the top. Do that for the left and right diagonal.
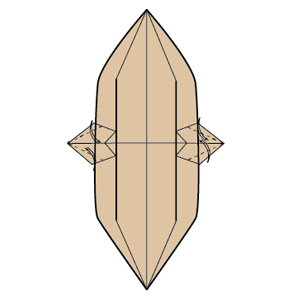
4. Bringing Flaps Downward
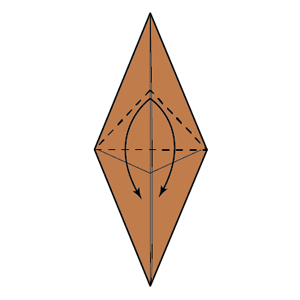
Bring the flap downward towards the center.
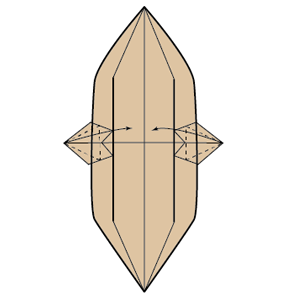
5. Creating Center Creases
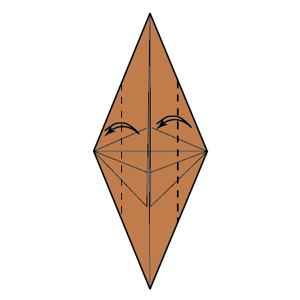
Fold the right and left diagonal towards the center and unfold to make crease.
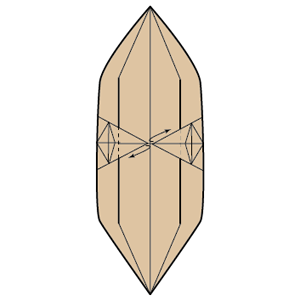
6. Folding and Unfolding Flaps
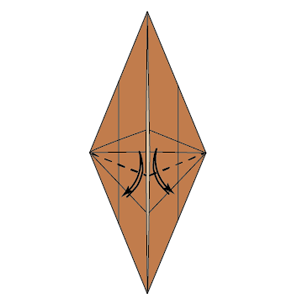
Fold the two flaps in the dotted lines and unfold to make crease.
7. Opening the Origami Model
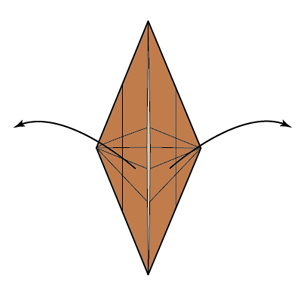
Open the model.
8. Performing a Squash Fold
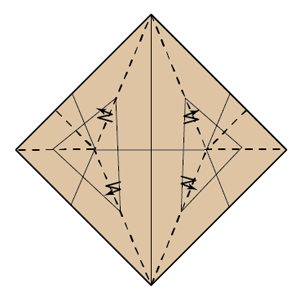
Squash fold.
9. Executing a Pocket Fold
Pocket fold.
10. Folding and Unfolding for Creases
Fold in the dotted line and unfold to make crease.
11. Bringing Flaps Toward the Center
Fold in the dotted line and bring the two flaps toward the center.
12. Completing the Pocket Fold
Pocket fold in the dotted lines.
13. Admiring the Final Result
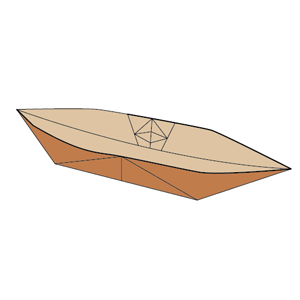
Congratulations! You have successfully completed the origami project. Enjoy your final result!
There you go! If you enjoy instructions more than videos I hope that these were simple and easy to follow! Bellow you’ll find the same instructions but in one large printable graphic!
How to Make an Origami Boat That Floats Printable Instructions
Now that I’ve shown how to make an origami boat, there are many other incredible origami creations you can make! Check out some of my other how-to origami guides to learn how to make a variety of different objects, animals, and more! I hope that you enjoyed this how-to guide and that you’ll continue exploring the wonderful world of origami!
Related Posts
Check out my other origami designs and sharpen your paper folding skills!
How To Make A Paper Plane That Returns: 12 Step Guide For Beginners
Learn how to make a paper plane that returns right to you! This is an extremely fun and rewarding project, and it's perfect for beginners because there are no fancy tools required....

How To Make A Paper Airplane For Kids: Step-By-Step Illustrated Guide
Wondering how to make a paper airplane for kids? This step-by-step guide makes it easy with illustrated instructions and a video tutorial!...

- PRO Courses Guides New Tech Help Pro Expert Videos About wikiHow Pro Upgrade Sign In
- EDIT Edit this Article
- EXPLORE Tech Help Pro About Us Random Article Quizzes Request a New Article Community Dashboard This Or That Game Happiness Hub Popular Categories Arts and Entertainment Artwork Books Movies Computers and Electronics Computers Phone Skills Technology Hacks Health Men's Health Mental Health Women's Health Relationships Dating Love Relationship Issues Hobbies and Crafts Crafts Drawing Games Education & Communication Communication Skills Personal Development Studying Personal Care and Style Fashion Hair Care Personal Hygiene Youth Personal Care School Stuff Dating All Categories Arts and Entertainment Finance and Business Home and Garden Relationship Quizzes Cars & Other Vehicles Food and Entertaining Personal Care and Style Sports and Fitness Computers and Electronics Health Pets and Animals Travel Education & Communication Hobbies and Crafts Philosophy and Religion Work World Family Life Holidays and Traditions Relationships Youth
- Browse Articles
- Learn Something New
- Quizzes Hot
- Happiness Hub
- This Or That Game
- Train Your Brain
- Explore More
- Support wikiHow
- About wikiHow
- Log in / Sign up
- Hobbies and Crafts
- Paper Craft
How to Make a Paper Boat
Last Updated: July 2, 2024 Fact Checked
This article was co-authored by Robert Homayoon . Robert Homayoon is an Origami Expert known for his engaging YouTube videos and accessible instructions. He has been teaching origami on YouTube since 2009. His channel has a following of over 676,000 subscribers, and his videos have garnered over 211 million views. Robert uses his channel to highlight his passion for teaching people origami, crafts, and how to solve puzzles. He graduated from SUNY Albany in 2007 and earned his D.M.D degree from Temple University Dental School in 2013. There are 7 references cited in this article, which can be found at the bottom of the page. This article has been fact-checked, ensuring the accuracy of any cited facts and confirming the authority of its sources. This article has been viewed 4,762,457 times.
Making an origami paper boat is a great activity that’s easy to finish and doesn’t require a lot of materials. The beauty of making a paper boat is that you only need one piece of printer paper to complete the task! By folding the paper with sharp creases and shaping it carefully, you can make a great-looking origami boat in minutes. We'll walk you through folding your own paper boat with our complete step-by-step instructions.
Creating the Initial Folds

- To strengthen the crease, run your finger down the fold 3-4 more times.
- You should now have 2 creases along both centers (x-axis and y-axis) of the page.
- Use the crease you made before to help line up the folds coming in from the corners.
- The 2 folds should line up with each other.
Tip : When you go to fold the second side, use the first fold as a reference point.
- The flaps closest to you should be folded in front of the back flaps, not over them. If you fold over the back flaps, you won’t be able to fold the back flaps themselves.
Making the Final Folds
- Crease the paper along its edges so that it stays in the square shape.
- The bottom of the diamond should be the part of the paper with extra folds.
- The bottom corners will line up to become the bottom point of a square diamond.
- You may need to pull up the triangle inside the diamond while pulling apart the two sides. Try to keep the triangle inside the diamond sticking straight up as this will be your boat's "mast."
- You can reinforce the corners with clear tape and tape around the bottom to keep your boat dry.
Tip : Waterproof your boat! Use a waxed paper from an art store to make your boat last longer, or color one side of the paper completely with a crayon. You can also try to make your boat out of aluminum foil.
Expert Q&A

- If you are floating your boat on a large body of water, like a pond, you can tape string onto one end of the boat. Hold on to the other end of the string so that it doesn't float away! Thanks Helpful 314 Not Helpful 150
- Try to get the edges of the paper to line up. An evenly made boat means less chances of tipping over. Thanks Helpful 61 Not Helpful 36
- If you are making a tiny boat, don’t float it on a big body of water. You may lose it! Thanks Helpful 21 Not Helpful 15
Tips from our Readers
- If you don't have specialty supplies like wax paper or crayons, no need to fret. You likely already have the tools to waterproof your delicate paper boat right at home. Simply construct two separate boats out of ordinary printer or construction paper. Then, gently place one inside the other, nesting them together into a double-walled vessel. This should reinforce them to better withstand water without getting too soggy. Though, test float gently, as the extra weight could cause sinking if the little boat gets overburdened.
- Missing wax paper for true waterproofing? Simply equip your artist's toolkit by raiding the crayon bin! Thoroughly color one whole side of the boat with thick crayon before setting it afloat in a pool, pond or puddle. The waxy buildup should act as a shield against light water exposure. Though if embarking on choppier seas, extra reinforcements may still be needed, matey!
- Forego the plain printer paper and opt for fun vibrant colors and patterns! Tissue paper can make for a festively hued sail, but be extra delicate as it shreds easily, especially once wet. For best durability, stick to construction paper or card stock to give your boat more sturdiness as you launch it into the open water.

- Make sure you don't have any holes, as one little hole can turn into a huge rip. This could be good in a procedural text. Thanks Helpful 23 Not Helpful 3
You Might Also Like

Expert Interview

Thanks for reading our article! If you’d like to learn more about origami, check out our in-depth interview with Robert Homayoon .
- ↑ https://ussconstitutionmuseum.org/wp-content/uploads/2018/09/Make-a-Paper-Boat-Hard.pdf
- ↑ https://www.youtube.com/watch?v=b3QZpBL8-Tg#t=1m20s
- ↑ https://www.origamiway.com/origami-boat.shtml
- ↑ https://kids.nationalgeographic.com/nature/article/make-a-paper-boat
- ↑ https://www.origamiway.com/origami-boat-2.shtml
- ↑ https://www.youtube.com/watch?v=b3QZpBL8-Tg#t=2m54s
- ↑ https://kids.nationalgeographic.com/explore/nature/make-a-paper-boat/
About This Article

If you want to make a paper boat, fold a piece of paper in half from top to bottom. Then, fold it again from side to side and unfold so you have a crease in the center. Fold the top right corner down towards the center. Next, flip the paper over and fold the other corner down on the other side. Fold each of the bottom edges of the paper up and outwards to make a paper hat shape. Then, open the hat and flatten it horizontally to create a diamond. Fold the bottom edge of the diamond upwards towards the top. Then, turn the paper over and repeat on the other side. Pull the paper apart again and smooth it out to create a boat shape. Did this summary help you? Yes No
- Send fan mail to authors
Reader Success Stories
Emily Rehak
Jul 9, 2016
Did this article help you?

Ken Cunningham
Apr 4, 2016
Desmond Hodges
Jul 1, 2019
Georgiana Lings
Nov 9, 2016
Matthew Griffin
Mar 29, 2022

Featured Articles

Trending Articles

Watch Articles

- Terms of Use
- Privacy Policy
- Do Not Sell or Share My Info
- Not Selling Info
Don’t miss out! Sign up for
wikiHow’s newsletter
- Art Supplies
- Beads and Jewelry
- Crafts and Hobbies
- Art Life Today
- Paper Crafts
How To Make a Paper Boat That Floats
Step 1: Choose Your Paper
Step 2: fold in half, step 3: fold again, step 4: create the point, step 5: fold the bottom up, step 6: shape the bottom, step 7: form the square, step 8: build the hull, step 9: final folds, the grand unveiling.
Ever wanted to make a paper boat that not only looks great but also floats beautifully on water? Whether it’s for a fun craft project with kids or just a nostalgic trip down memory lane, making a paper boat is simpler than it sounds, and it’s definitely a rewarding little project. Here’s a step-by-step guide on how to make one that’s both sturdy and buoyant.
First things first, grab a rectangle sheet of paper. The size doesn’t matter too much; just use whatever you have on hand, but a standard A4 or letter size works well for a first attempt.
Take your rectangular sheet and fold it in half along the shorter side. Crease it well and then open it back up. This initial fold is just to create a crease guide for later steps.

Now, fold the paper in half from bottom to top along its long side. After this, flip the paper so that the fold opens toward you. This helps set the stage for the next part of the folding process.

Here’s where it starts to take shape. Fold down the top corners of the paper to the center crease, leaving about an inch of space at the bottom. This forms a triangular shape at the top with a rectangular strip sitting at the bottom.

Next, fold the bottom strip of the paper upwards on both sides. This helps lock the corners you just folded down and adds a bit of stability to the structure.

Fold the outer bottom corners into the center line. This step sharpens the lower part of your boat’s structure and prepares it for the final shaping.

Pick up the paper so you’re looking at the triangle. Gently pull apart the layers at the bottom of the triangle, allowing it to pop open and flatten into a square. This is a bit like opening a paper bag.
Keeping the single-layered part of the square facing down, take the bottom point of the upper layer and fold it up to the top point. Flip the entire thing over and repeat this step on the other side. This starts to form the hull of your boat.

Again, open up the model by pulling apart the layers at the bottom. It will naturally begin to form a new square. This reinforces the base of your boat, making it more durable in water.

For the final step, find the two points at the top of your latest square that are sticking out slightly—these are part of the hidden triangles. Gently pull these points outwards and apart. As you do this, the boat will start to open up and take its final form.

Congratulations, you’ve just made a paper boat! It’s ready for its maiden voyage across your nearest puddle, bathtub, or pond. These boats can float quite well, especially if you’ve made your folds crisp and clean. Just remember, they’re still made of paper, so their time afloat might be limited based on the type of paper used and the conditions in the water.

Trusted Insights from Artists
At Art Life Today, our passion for arts and crafts is at the heart of everything we do. We understand that the right tools and materials can make all the difference in your creative projects, so we take our responsibility as reviewers seriously. Our goal is to help you discover the best products that will inspire your creativity and bring your artistic visions to life.
Contributors
How to Make a Paper Boat: Easy Step-by-Step Guide
Making a paper boat is a classic and entertaining activity for kids and adults alike. It's a simple and creative way to spend time and learn basic origami techniques. What's more, making a paper boat is not only an enjoyable pastime, but it also teaches patience and focus, making it an excellent educational activity.

In this article, you'll learn how to make a paper boat using a step-by-step tutorial. This guide will cover everything from selecting the appropriate materials to folding and decorating your paper boat, ensuring that it's both aesthetically pleasing and capable of floating. By carefully following the instructions provided, you'll be able to create a variety of boat shapes and sizes to suit your preferences.
Key Takeaways
- Learn how to make a versatile and entertaining paper boat with a clear, step-by-step tutorial.
- Discover creative ways to decorate your boat and how to make boats with different shapes and sizes.
- Explore educational activities related to paper boat making to enhance the learning experience.
Materials Needed
Choosing Your Paper
When making a paper boat, the first decision to make is the type of paper to use. While traditional origami paper can be used, it's not a requirement. A simple square sheet of paper will work well. If you're starting with a rectangular sheet, simply trim it down to a square before proceeding. Construction paper, card stock, and even waxed paper can be utilized for this project. For a more durable boat, consider using aluminum foil as an alternative material.
Preparing Additional Supplies
Aside from the paper, you can gather a few additional items to enhance your paper boat crafting experience. If you're using plain white paper, consider adding some colors to your boat with crayons , markers, or colored pencils. Younger children might enjoy decorating their boats with stickers or other craft supplies.
When selecting your materials, keep in mind the end goal of your paper craft . If you plan to float your boat on water, avoid materials that are too heavy or prone to absorbing water. Additionally, for increased stability, consider using heavier papers like card stock or waxed paper.
With the right materials, making a paper boat can be an enjoyable and educational activity. Remember to experiment with different types of paper and decorations to create unique and personalized boats.
Basic Paper Folding Techniques
Making Creases
Before folding a paper boat, it is essential to learn how to make creases properly. Creases are the foundation for any paper folding project. To create a strong and precise crease, first, align the edges of the paper and hold them in place using the thumb and index finger of one hand. Gently press down the folded edge with the other hand's thumb, moving from one end to the other, making sure it is even and firmly pressed. The more accurate the creases, the better the end result will be.
Basic Folds
There are a few basic folds that one must master to make a paper boat. Here's a list of folds used in creating a paper boat:
- Valley fold : Fold the paper towards itself, creating a downward crease.
- Mountain fold : Fold the paper away from itself, resulting in an upward crease.
- Triangle fold : Create a triangle shape by folding one edge of the paper to meet the other edge.
- Diamond fold : Form a diamond by opening up the bottom of a previously made triangle, aligning the bottom corners of the triangle, and folding them over each other.
These basic folds play a crucial role in creating a well-executed paper boat that not only looks good but also floats stably on water.
Unfolding Tips
As important as folding techniques, unfolding tips should be considered to ensure a successful paper boat. When unfolding the paper , be cautious not to tear or wrinkle it, as this can impact the boat's balance and appearance. One should be gentle when opening flaps, using fingertips to apply_even pressure on both sides to maintain the paper's overall structural integrity.
Utilize the basic folding techniques, like making precise creases and understanding the essential folds, combined with careful unfolding to create a perfectly-shaped paper boat . Remember, practice makes perfect, so don't be discouraged if the first few attempts are not perfect—keep folding, and soon creating a paper boat will become second nature.
Step-by-Step Guide to Making a Paper Boat
Creating the Base Shape
Begin by selecting a square sheet of paper, preferably origami paper . Place the paper in front of you with one corner facing upwards, forming a diamond shape. Fold the paper in half diagonally, so that the top corner meets the bottom corner, creating a triangle shape. Make sure the edges align perfectly and press firmly to create a sharp crease.
Forming the Boat
Now, grab the triangle and rotate it 45 degrees. Gently open up the bottom of the triangle and pull the paper apart until it pops into a square shape. Make sure the bottom corners of the triangle overlap each other, forming the bottom corner of the new diamond shape. Next, pick up the folded piece of paper and at the top point, pull apart the two sides. As you pull it apart, it should open into a boat shape. Adjust the paper as needed to make sure it's boat-shaped and pinch along the bottom edges to create a fold on each side.
Adding the Mast and Sail
To complete your paper boat, consider adding a mast and sail for added flair. With a separate piece of paper, cut a smaller square and fold it diagonally to create a triangle. This will serve as the sail. For the mast, use a thin wooden dowel or a straight piece of string and insert it through a small hole in the center of the sail. Attach the other end of the mast to the bottom center of the boat using glue or tape.
Your paper boat is now complete. Follow the above instructions to create more paper boats and enjoy your new fleet!
Decorating Your Paper Boat
Coloring and Customization
Before assembling your paper boat, it's a great idea to add some personal touches. Crayons , markers , and colored pencils can be used to create unique designs on your boat. You can also print coloring pages with different patterns or themes and use them as templates for your boat.
To further customize your paper boat, consider using stickers or other decorative items. Be creative and think of ways to make your boat stand out. For a more detailed guide on decoration techniques, refer to this video tutorial .
Waterproofing Considerations
When decorating, it's important to consider waterproofing as well. After all, a paper boat must withstand water. Common waterproof materials include clear tape, wax paper, or even a layer of wax from a candle.
Here's a brief list of materials that can be used to waterproof your paper boat:
- Waterproof spray
Remember to apply these waterproofing materials as an extra layer of protection after you've finished decorating your boat. This will help ensure your boat stays afloat and retains its colors and designs.
By following these decorating and waterproofing tips, your paper boat will not only look visually appealing, but also be ready for its maiden voyage.
Making Different Shapes and Sizes of Boats
Altering Dimensions for Variability
In order to create different shapes and sizes of paper boats, you can experiment with the size of the paper itself. A larger paper size will result in a larger boat, while smaller paper will create a smaller boat. Additionally, the paper shape can be altered for variability. For example, you can use a square or a rectangular sheet , which will result in slightly different boat shapes.
To begin, choose a paper size appropriate for your desired boat size. Here are some suggestions for paper size and corresponding boat shapes:
- Square paper (e.g. 20cm x 20cm, 30cm x 30cm): Traditional boat shape
- Rectangular paper (e.g. 20cm x 40cm, 30cm x 60cm): Longer, narrower boat shape
Experiment with folding techniques that involve triangles , diamonds , and other shapes. For instance, folding a rectangular sheet of paper in half, followed by folding the corners down into triangular shapes will eventually result in a boat shape. Such techniques can help create various boat styles and shapes.

Advanced Origami Boats
For those interested in trying more complex boat designs, advanced origami techniques can be used to create a variety of intricate boat shapes. Some examples include:
- Double-layered boats : These boats can be made by folding the paper in a way that creates two layers, adding stability and a unique appearance to the boat.
- Boats with sails : Create boats with sails by folding additional paper into triangular shapes and attaching them to the boat's top.
- Multi-hulled boats : Construct multi-hulled boats, such as catamarans or trimarans, by folding multiple boat shapes and connecting them together.
In summary, by varying the paper size, shape, and folding techniques, you can create an array of different boat shapes and sizes. Experiment with square and rectangular sheets of paper, and try advanced origami techniques to take your paper boat-making skills to the next level.
Ensuring Your Boat Floats
The Science of Floating
To ensure that your paper boat floats, it's essential to understand the basic science behind the floating phenomenon. When an object is placed in water, it displaces an amount of liquid equal to its own weight, in accordance with Archimedes' principle . If the displaced water weighs more than the object, the object will float as it experiences an upward buoyant force.
In the case of a paper boat, it is important to create a design that will displace enough water to counteract its weight. Key factors that affect the boat's ability to float include:
- Surface area: A wider base increases the surface area in contact with the water, which helps increase water displacement and stability.
- Weight distribution: Distributing the weight evenly across the base will help the boat remain stable and balanced.
- V-shape: Origami paper boats usually have a V-shaped hull , which helps them cut through the water and maintain stability while moving.
Testing and Troubleshooting
Once you have crafted your paper boat, it's crucial to test and troubleshoot its ability to float. Some key steps include:
- Make sure the boat's surface area is wide enough and the shape is correct, as shown in this tutorial .
- Test your boat in calm water conditions, avoiding windy areas or strong currents that can tip the boat over.
- If the boat is sinking, you may need to adjust the shape and make sure all folds are properly made.
- If the boat is unstable, check the weight distribution and ensure that the sides are symmetrical.
- To enhance your boat's stability and buoyancy, you can add waterproof material like tape or a layer of wax on the paper.
Testing and troubleshooting are essential steps in achieving a boat that floats and is stable in water. Once you are confident in your paper boat's ability to float, you can enjoy watching it sail across the water surface or even set up races with your friends.
Educational Resources and Activities
Incorporating Paper Boats into Lessons
Teaching the art of paper folding , also known as origami, is a wonderful way for teachers and parents to engage children in creative and educational activities. Paper boats are a perfect example of an easy-to-learn origami craft that can be incorporated into various subjects such as history, geography, and physics. One of the main advantages of this activity is that it only requires a single piece of paper - making it a cost-effective and easily accessible craft.
To incorporate paper boats into lessons, teachers can use Japanese origami as a starting point for discussing the history and cultural significance behind this art form. In geography, they can explore the role of boats and water travel in different countries. For physics, young learners can experiment with the buoyancy of their paper boats, demonstrating principles like Archimedes' principle.
Some useful resources for teaching origami paper folding include:
- Online tutorials: Websites like wikiHow and YouTube channels offer step-by-step guides on how to fold a paper boat.
- Books: Origami-themed books are available at local libraries or bookstores, which can provide inspiration for both children and adults.
- Workshops: Some museums, cultural centers, and schools may offer workshops on origami paper folding, where children can learn from a knowledgeable instructor.
Craft Ideas for Parents and Teachers
When it comes to incorporating paper boats into kids' craft activities, the options are endless. Here are a few Summer-themed ideas to consider:
- Nautical-themed parties: Use paper boats as decorations or centerpieces at a kids' summer party, encouraging the children to race their boats in a kiddie pool or a shallow water area.
- Storytelling sessions: Incorporate paper boats into your storytelling sessions, using them as props to act out scenes from classic tales like "The Owl and the Pussycat" or "Paddle-to-the-Sea."
- Art projects: Encourage your kids to decorate their paper boats with paint, glitter, or colored pencils, making each boat unique and personal.
- Races and competitions: Organize paper boat races, offering small prizes or certificates of achievement to the fastest boats.
Remember, involving the children in the creative process helps to foster a sense of accomplishment and reinforces the educational benefits of these activities. So, whether you're a teacher, a parent, or simply a fan of Japanese origami craft, there are countless ways to enjoy and share the fun of making paper boats with the younger generation.
Frequently Asked Questions
What are the steps to create a floating paper boat?
To create a floating paper boat, first, fold a square piece of paper diagonally in half to form a triangle. Then, fold the bottom corners of the triangle towards the center, forming a diamond shape. Open up the bottom of the diamond and shape it into a square. Gently pull the top flaps apart to form the boat shape. For detailed steps, visit this tutorial .
Can you show how to make a paper boat with a sail?
Yes, to make a paper boat with a sail, start by following the steps for a basic paper boat. Then, create a small sail out of a rectangle of paper. Finally, attach the sail to the boat using a small piece of tape or glue. You can watch this video for a visual guide.
What is the ideal paper type for constructing origami boats?
The ideal paper type for constructing origami boats would be a lightweight yet sturdy paper, such as origami paper or regular printer paper. Keep in mind that heavy paper may not fold as easily, and thin paper may not hold its shape well. Visit this guide for tips on choosing the right paper.
How can I make a simple paper boat for children?
For children, start with a square piece of paper and follow the same steps mentioned above for creating a floating paper boat. Make sure an adult is present to supervise and help children with folding. Visit this tutorial for an easy-to-follow guide specifically designed for children.
Are there any specific designs that help paper boats float better?
Yes, specific designs can help paper boats float better, such as wider and more stable bases. Experimenting with different folding techniques and boat shapes can lead to more efficient designs. Refer to this step-by-step guide for more ideas on paper boat designs.
Could you provide a guide on making a paper boat using square paper?
Certainly. To make a paper boat using square paper, begin by folding the paper diagonally in half to form a triangle. Then, fold the bottom corners towards the center to create a diamond shape. Open the bottom of the diamond and re-shape it into a square. Gently pull the top flaps apart to form the boat shape. For a detailed guide, check out this tutorial .

Related Articles

Wicked Tuna Cast 2024: Meet the Expert Fishermen Dominating the Seas

H&M Landing: Premier Deep-Sea Fishing Destination

4.3 MerCruiser: Essential Maintenance for Optimal Performance

Formula 43 Sport: Revolutionizing High-Performance Motorsports

The Ultimate Pontoon Buyers Guide 2023: Essential Tips for Smart Purchasing

Seaboard Marine: Enhancing Global Shipping and Logistics Solutions

Top 5 Boat Loan Rate Offers: Best Financing Options for 2024

Is The Boat Market Crash Here? 2024 Outlook Unveils Key Insights
How to Make a Floating Paper Boat

Introduction: How to Make a Floating Paper Boat

This is a simple 10 step process of how to make an origami floating paper boat.
Here are a few key points to remember:
- Do not worry if your paper boat leans towards its side
- Please follow the steps at your own pace
Step 1: Step 1

Fold your construction paper hot dog style.
Step 2: Step 2

Unfold paper and refold the paper hamburger style, you should have an X and Y-axis on the paper. (4 quadrants)
Step 3: Step 3

Flip the paper (still in hamburger style) 180 degrees so that the opening is facing you. Then fold down the top left and right corners along the middle crease (in a triangular form) allowing about 1 ½ in. of unfolded space.
Step 4: Step 4

Take the extra 1 ½ inches of unfolded paper and fold up over the triangles on the front and backside. (It should resemble a paper hat)
Step 5: Step 5

Looking at the paper hat figure, take the top left corner of the rectangle paper and fold away from you along the triangles edge. Take the back left corner of the rectangle and fold towards you, overlapping the fold previously made. Repeat the same steps for the right side corners.
Step 6: Step 6

Pick up the paper and rotate 45 degrees, use your thumbs to open up the folds to create a diamond like figure. Once in the diamond shape squish it to make a square. (May need to turn it back 45 degrees to see the square figure) Press down along the creases to keep the square shape.
Step 7: Step 7

Arrange the paper so that the opening is facing you. Fold one flap upwards to match the top corner, flip paper over and repeat with the other side. You should have a triangle figure.
Step 8: Step 8

Repeat step 6. Should have a smaller square/diamond figure.
( Step 6 ) Pick up the paper and rotate 45 degrees, use your thumbs to open up the folds to create a diamond like figure. Once in the diamond shape squish it to make a square. (May need to turn it back 45 degrees to see the square figure) Press down along the creases to keep the square shape.
Step 9: Step 9

Turn the square to a diamond shape and pull apart the top of the triangles so that 3 triangles appear (2 on the sides 1 in the middle). Gently pull the two side triangles away from each other and press down on the bottom crease so that the boat is stronger.!
Step 10: Step 10

Place in water and watch your boat float!
Origami Way
Make a paper boat origami boat instructions and diagram.

If you've always wanted to play with boats in the tub, but your parents wouldn't get one for you, don't worry. I will show you how to make an origami boat out of paper, and yes it floats...for a little bit, but it's still fun nonetheless. However, I heard that if you color the bottom of the boat with crayon, then it will float longer. Just be careful not to splash too much water on it!
Before we get into how to make an origami boat, let us first discuss where this paper folding originated and where it first appeared. If you're interested in the history of paper folding, continue reading to learn the fundamentals of origami.
Research studies say that origami was first invented about a thousand years ago by the Japanese, but its roots may well be in China. The term refers to the craft of paper folding. The word "origami" is an inclusive term for the folding process of paper. "Ori" means "folding," and "gami" means "paper." The objective of origami is to transform a flat square sheet of paper into a fully completed piece of art through folding techniques and cutting methods.
How to Make a Paper Boat Float Longer?
If you're ready to make your paper boat origami, keep these tips in mind to ensure it will last a long time on the water. The most common is that if you color the bottom of the origami boat with crayons, it will float longer but not long enough to reach the finish line. Some people also say that to make the boat last longer when it is on water, try using foil paper or grease-proof paper.
How to Make a Paper Boat?
The origami boat is actually very simple to make. All you need is a rectangular piece of paper, so any 8.5x11 copy or lined paper will do. Then follow the instructions and pictures carefully and you'll be able to make your own origami boat that floats.
With the help of this simple step-by-step lesson, you can quickly and easily create the most well-known origami paper boat.
| Step 1: Start with an 8.5x11 sheet of rectangular paper. | |
| Step 2: Fold the paper in half left to right, then unfold. | |
| Step 3: Fold in half again, this time folding top to bottom. | |
| Step 4: Fold the upper left and right corners to the middle. | |
| Step 5: Fold the bottom strip up. | |
| Step 6: Do the same to the strip on the other side. | |
| Step 7: Open up the paper all the way to collapse it into a diamond shaped figure. Go to Next page to continue with the origami boat instructions. |

- © Origamiway.com
Mud Paper Scissors
Crafts, Kids, Chaos
5 Ways to Make Boats | A STEM Activity
We decided to try out this boat making STEM activity the other day and take our homemade boats down to a stream to see them in action.
Conclusion: the kids loved the boats! All the boats. They also all floated pretty well. The boys' favourite part - of course! - was racing all the boats down the stream.
Disclaimer: This post contains affiliate links, which means that I earn a small commission, at no extra cost to you, if you purchase things from these links.

How to Make Boats that Float
We were thrilled that all of our boats actually floated. We built them at home and then tried floating them down a stream.
You can also do this activity with a kiddie pool in your back yard, in a large puddle after a rainstorm, or in the bathtub.
One thing that we found about boats that float v. boats that don't: when paper sails get wet, they make the boat extra top-heavy and prone to capsizing.
Our paper boat, when we made it out of card stock, and our tin foil boats were the boats that floated the best. They were the most durable in water, and they were not prone to capsizing.
The stick boat, the straw boat, and the cork boat all floated quite well - until their sails got wet. The stick boat was the boat that still floated the best even with a wet sail. The cork boats all tipped over with wet sails, and the straw boat was more prone to capsizing with a wet sail.

Turning Your Boat Making into a STEM Activity
Making and floating boats is already a STEM activity, since you have to engineer your boat and figure out how to put it together and make it float.
But to add some other STEM elements and turn your boat making activity into more of a science experiment, you can do a few things:
- See which type of boat floats best. Which type is most durable? We made 5 different types of boats, using sticks, straws (the paper kind), paper and cardstock, corks, and tin foil.
- See if you can add cargo to your boat. Use pennies or nickles (or anything else you can find that can get wet) and stack them on or in your boat. How many can you add to your boat before it capsizes? Which type of boat can hold the most cargo? (Note: do this in a kiddie pool or a bathtub, not a stream.)
- Experiment with boat design. For the stick and the straw boats, we just glued our elements together in a straightforward raft. Are there other ways you can construct your boat? Can you make it into other shapes? Which method is the most durable? Least likely to capsize? Holds the most cargo?

How to Make a Boat out of Straws
We used paper straws to make this boat, and glued them together in a flat raft design.
- paper straws
- popsicle stick and paper triangle for a sail (optional)
Making your boat
- Cut your straws in half. We used 4 straws cut in half, giving us 8 half-straws for our raft.
- Glue the straws together in halves. We glued 2 sets of 4 together before gluing both halves to each other in step 5.
- Glue the paper triangle to the popsicle stick to make the sail.
- Glue the popsicle stick to one half of your boat.
- Glue the two halves together so the the popsicle stick sail is in the middle.
The popsicle stick sail is optional. It makes the boat look more like a boat, and less like a raft. But when a paper sail gets wet, it makes the boat much more likely to capsize.
STEM experiment: Try a straw boat with a sail and without a sail. What difference does it make?
Also, try loading your straw boat with cargo (like small coins). How many can you fit on before it capsizes.
Experiment with size for your boat construction as well. Try full size straws to make a bigger raft. Try more and fewer straws to make a wider or skinnier raft.

How to Make a Boat out of Sticks
Our stick boat was constructed in a very similar way as our straw boat. We found some sticks (my kids have a huge stick collection!) and glued them together. We also added a sail to this raft.
- sticks in whatever size and shape you can find
- paper or fabric triangle for a sail (optional)
- Gather enough sticks to make a boat. You only need a handful. They can be small or large.
- Glue the sticks together in halves. We glued 2 sticks together, and then another 3 together. If you're going to make a sail, don't glue the two halves together yet.
- For a paper triangle: glue it to another stick to make a sail. For a fabric triangle: tie both ends to another stick to make a sail.
- Glue the bottom of the sail to one of the stick-halves.
- Glue the two stick-halves together so the the sail is in the middle.
The sail is optional. It makes the boat look more like a boat, and less like a raft. But it is a bit clunky and can be tricky to attach to the boat. We used some extra hot glue around the base of the sail to make it stick.
STEM experiment: Try a stick boat with a sail and without a sail. What difference does it make?
Experiment with size for your boat construction as well. Can you make a small boat with twigs? A giant boat with big sticks? Try more and fewer sticks to make a wider or skinnier raft.

How to Make a Paper Boat
We found instructions on how to make an origami paper boat for this boat making activity. Here are some visual instructions.
This boat is pretty simple.
- regular 8.5 x 11 sheet of paper or card stock
Follow the instructions for how to make a paper origami boat.
Or use the paper origami boat video tutorial.
Make it into a STEM experiment: Try different types of paper. We found that regular paper disintegrated in water pretty quickly. Card stock, however, made a very durable boat even when it got wet.

How to Make a Tin Foil Boat
This was hands-down the easiest of our STEM boat making experiments. It also made a really durable and really fast boat.
- a sheet of tin foil
Making your tin foil boat
- Fold your sheet of tin foil in half once, and then again (so that you have a square, or close to a square).
- Pinch two ends together to make the front and back (bow and stern) of the boat.
- Fold and pinch and fiddle with the ends so that your bow and your stern of your boat are fairly stable. You don't want the tin foil coming apart when you put the boat in the water.
STEM experiment: Load your boat with cargo, like pennies or nickles (or anything else you can find). How much cargo can you get in your boat before it capsizes?

How to Make a Cork Boat
Making cork boats was another super easy STEM activity for the kids. I think this boat version was also their favourite.
- corks (2 per boat)
- popsicle stick
- paper triangle
- rubber bands
How to make a cork boat
- Place two corks side by side and wrap a rubber band or two around them.
- Glue your paper triangle onto a popsicle stick to make the sail.
- Slide the sail in between the two corks. If your rubber bands are tight enough, the sail will stay in without glue.
STEM experiment: Try making the boat with more corks. Can you make a boat with three corks? How does adding corks change the boat?
Can you add cargo to your boat? How much can you add before it capsizes? Can you add cargo evenly so that one side isn't heavier than the other?

Rebecca is a chaplain at a girls’ school, a mom to boys, and a crafter of all things. She crochets in every free moment she has, and she spends much of her time gluing cotton balls to toilet paper rolls and mopping up glitter.

Published by Rebecca
Rebecca is a chaplain at a girls' school, a mom to boys, and a crafter of all things. She crochets in every free moment she has, and she spends much of her time gluing cotton balls to toilet paper rolls and mopping up glitter. View all posts by Rebecca

How To : Make a paper sailboat that really floats

Check out this video for info on how to origami a paper boat. This is no ordinary paper boat, either! This boat actually floats! All you need is some paper, a bit of tape and your fingers and pretty soon you will have a fun new bath toy. Granted, it is still paper so it won't last long in water, but it sure does provide a cool effect when you first make it! And on a breezy day, your paper sailboat will take off like a kite!!
Just updated your iPhone? You'll find new features for TV, Messages, News, and Shortcuts, as well as important bug fixes and security patches. Find out what's new and changed on your iPhone with the iOS 17.6 update.
Be the First to Comment
Share your thoughts, phd in paper craft : make this insanely detailed & anatomically correct human torso—complete with removable organs, trippy diy animations : use these printable templates to make your own moving optical illusions, news : 50 free papercraft robot downloads, how to : make a paper shuriken (or ninja star), how to : make watermarks in paper for security, how to : make paper look 200 years old using coffee, how to : make an animated optical illusion out of paper, how to : make a paper bullet shooting paper gun, how to : make a paper gun that fires paper bullets, how to : make your own paper with flower petals, how to : make an easter nugget box, how to : create an amazing 3d paper design, how to : make a paper airplane that flies far and fast, how to : make an easy paper box - valentine's day gift - diy crafts, news : fully functional diy pump action shotgun made out of paper, how to : make 3d glasses, how to : make sticky note butterfly, news : gameboy goes papercraft, how to : make a mini book out of a 12x12" piece of paper, how to : make a nakamura lock paper plane | best paper plane in the world.
- All Features
- All Hot Posts
COMMENTS
Origami Boat 🛥 How to Make a Paper Boat that Floats - Paper Speed BoatSubscribe to channel: http://bit.ly/2vxE4Wu#origami #easyorigami #papercraft #PaperCra...
How To Make a Paper Boat That Floats - Origami Boatsheet: А4A classic boat made of paper that is easy to make. It is beautiful and long floats.Please like, c...
Bring the flap downward towards the center. 5. Creating Center Creases. Fold the right and left diagonal towards the center and unfold to make crease. 6. Folding and Unfolding Flaps. Fold the two flaps in the dotted lines and unfold to make crease. 7. Opening the Origami Model.
Pick up the folded piece of paper. At the top point, pull apart the 2 sides of folded paper. As you pull it apart, it should open up into a boat shape, as shown in the photo below. Adjust the paper if needed to make sure it's boat-shaped, then pinch along the bottom edges to make a fold on each side.
In this classic DIY tutorial, we'll guide you through the process of making a paper boat that not only looks charming but also floats in water. Join us as we...
Fold the bottom point up to the top point on one side. Flip the paper over. Fold the bottom point up to the top point. Pick up the piece of paper by the flat edge, with the pointed end facing down. Push the left and right ends of the paper together as before, to make a diamond shape. Press flat. Pinch the top two points of the diamond and ...
1. Make the triangle into a square. Pick up the triangle, rotate it 45 degrees, then use your fingers to open up the bottom of the triangle. Pull the paper apart gently until it pops into a square shape. Make sure the bottom corners of the triangle fold over each other and become the bottom corner of a diamond.
Step 4: Create the Point. Here's where it starts to take shape. Fold down the top corners of the paper to the center crease, leaving about an inch of space at the bottom. This forms a triangular shape at the top with a rectangular strip sitting at the bottom.
Step 4: Fold Corners in to Make a Triangle. Turn the folded paper so that the opening is facing you. Fold down the top left and right corners until they meet at the middle crease to form a triangle shape. There should be two flaps at the bottom of the paper that aren't covered by the triangle.
Step 4: Bring Up Edges of Boat. Step 4: Fold out the edges of the paper so that the cone in the center sticks up, add volume to your boat by sticking your fingers into this cone. And folding up the edges around it.
Here's how to put a paper boat together. Step 1: Take the paper sheet and fold it in the middle. 2. Make folds from each of the corners so they meet in the middle. 3. Create a fold in the open lip. 4. Repeat the same fold on the other side. 5.
Dear Origami and Paper Crafts Lover, Welcome to my channel "Colors Paper". In this video I will show you step by step how to make an Origami Boat that Floats...
To make a paper boat using square paper, begin by folding the paper diagonally in half to form a triangle. Then, fold the bottom corners towards the center to create a diamond shape. Open the bottom of the diamond and re-shape it into a square. Gently pull the top flaps apart to form the boat shape.
Step-by-step Origami Boat: 1 Place the piece of A4 paper in a horizontal position. Fold the bottom edge to the top edge and then unfold. 2 Fold the left edge of the paper to the right edge of the paper. 3 Position the paper horizontally, with the open end facing towards you. Fold the top right corner into the centre.
In this classic DIY tutorial, we'll guide you through the process of making a paper boat that not only looks charming but also floats in water. Join us as we explore the art of paper folding and learn how to create a simple and functional origami boat that will delight kids and adults alike.
Step 8: Step 8. Repeat step 6. Should have a smaller square/diamond figure. (Step 6) Pick up the paper and rotate 45 degrees, use your thumbs to open up the folds to create a diamond like figure. Once in the diamond shape squish it to make a square. (May need to turn it back 45 degrees to see the square figure) Press down along the creases to ...
Step 3: Fold in half again, this time folding top to bottom. Step 4: Fold the upper left and right corners to the middle. Step 5: Fold the bottom strip up. Step 6: Do the same to the strip on the other side. Step 7: Open up the paper all the way to collapse it into a diamond shaped figure. Go to Next page to continue with the origami boat ...
Paper Speed Boat - How to make a paper boat toys for beginners that actually floats on water out of color paper is shown in this origami video tutorial. In t...
Glue the straws together in halves. We glued 2 sets of 4 together before gluing both halves to each other in step 5. Glue the paper triangle to the popsicle stick to make the sail. Glue the popsicle stick to one half of your boat. Glue the two halves together so the the popsicle stick sail is in the middle.
This video will show how to make a paper boat that floats. To make this paper speed boat watch full video and follow the instructions that I showed step by step. Beginners can make this origami boat easily. I hope this video tutorial will help you to make easy origami speed boat out of paper.
Size: A4How To Make a Paper Boat That Floats - OrigamiWelcome to my toturial in which i will give you the instructions for a cool paper boat that really floa...
Check out this video for info on how to origami a paper boat. This is no ordinary paper boat, either! This boat actually floats! All you need is some paper, a bit of tape and your fingers and pretty soon you will have a fun new bath toy. Granted, it is still paper so it won't last long in water, but it sure does provide a cool effect when you first make it!
In this video I teach you how to turn A4 paper into an Origami motorboat, or speedboat, which floats very well.* Difficulty level: Intermediate*Material: 1 A...