Mack Yacht Services Logo

Chainplates

A couple quick notes:

  • Use new 316 grade fasteners. Not the old ones you just took out!
  • Buy new cotter pins.
  • Tape traps salt and limits oxygen which promotes decay.
  • Polish and freshwater extend the life of your investment.
  • Re-bed your chain plates every 4-5 years.
  • No silicone! the vinegar smell indicates a corrosive property stainless doesn’t like.
  • We like Butyl, Uv 4000 and Sikaflex.
  • Stainless hates detergents like dishwashing and laundry soaps as well as bleach!

Mack Yacht Services, Inc. we know chainplates

Not all Chainplate repairs are equal

  • BOAT OF THE YEAR
  • Newsletters
  • Sailboat Reviews
  • Boating Safety
  • Sails and Rigging
  • Maintenance
  • Sailing Totem
  • Sailor & Galley
  • Living Aboard
  • Destinations
  • Gear & Electronics
  • Charter Resources
  • Ultimate Boating Giveaway

Cruising World Logo

Chainplates 101: Inspect and Refit

  • By Tom Zydler
  • Updated: November 15, 2013

custom sailboat chainplates

Corroded Chainplates

Out of sight and out of mind: For many sailors, that’s an apt description of their chainplates, the stainless-steel fittings protruding through the deck that anchor a mast’s standing rigging wires. In typical installations, the longer portion of a chainplate is hidden below deck in a locker, where it’s difficult to see or inspect. It’s no wonder that many sailors on the cusp of bluewater cruising focus on beefing up or replacing the standing rigging while assuming the chainplates will continue supporting the wires that keep the mast erect.

For safety and peace of mind, however, sailboat chainplates require attention and possibly upgrading. For example, many chainplates are too thin to grip clevis pins correctly. For a ½-inch turnbuckle with a ½-inch toggle, the chainplate should be at least ⅜ inch thick. For a ⅝-inch turnbuckle and toggle, a minimum thickness of ½ inch is necessary.

Another matter worthy of consideration is the stainless-steel alloy the boat’s chainplates are made of. Though 304 stainless is widely used, it’s prone to crevice corrosion when seawater seeps past bedding compounds and becomes stagnant on the metal, thus rendering it a poor choice for chainplates. (This also illustrates the danger of relying on sealants to protect from moisture chainplates that are led through the deck.) When polished to a high gloss, 316L stainless will survive much longer. Grade 2 titanium is ideal, though its high price makes it cost prohibitive for most yacht applications.

custom sailboat chainplates

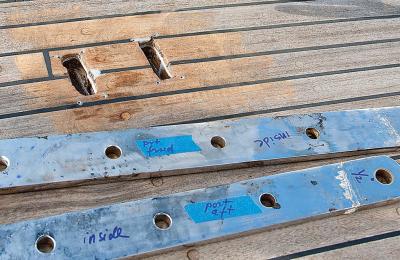
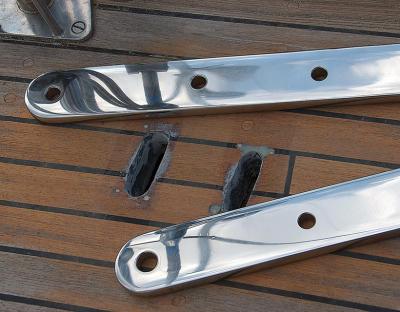
| |In this image, the damaged balsa core, which is typical in older classic-plastic production boats, is visible through the deck slots. Make sure to mark and identify the old chainplates before giving them to the fabricators. They will mark the new ones accordingly.| |

custom sailboat chainplates

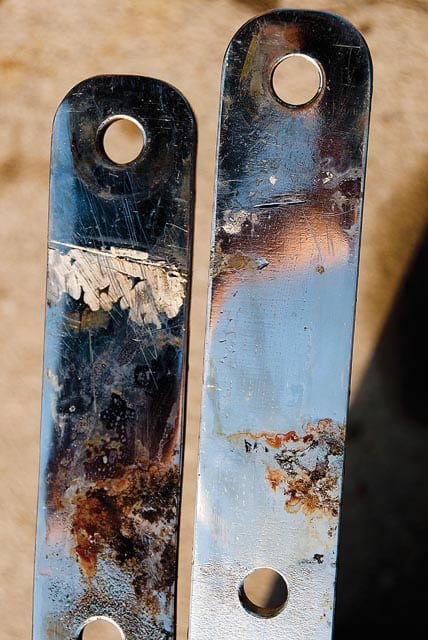
| |Three degrees of chainplate separation: the old chainplate (center), the new 316L bar stock (right) and the finished, polished, brand-new chainplate (left).| |

custom sailboat chainplates

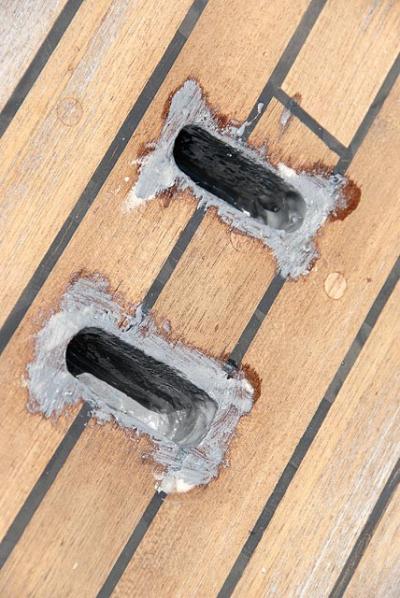
| |The real key to a chainplate replacement job will be how well you effect the repairs to the old balsa core and the deck slots. For my project, I cleared about an inch of balsa core from between the layers of deck laminate and rebuilt the area with thickened epoxy. This not only stiffened the deck, but also created a wall of solid epoxy that would protect the balsa from seawater in the event that the sealant broke down.| |

custom sailboat chainplates

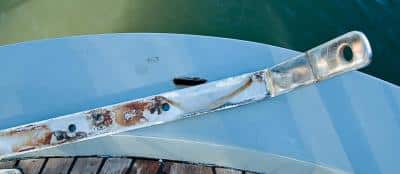
| |Once the backstay chainplate was pulled, it was clear how the corrosion started (where the metal was seated against the teak transom), and where water was trapped near the through-transom fasteners. I corrected this by enlarging the slot in the teak and inserting a rubber gasket where the new chainplate meets the transom.|

In any case, preventing seawater from leaking down the chainplates is essential. Boatbuilders routinely squeeze bedding compound between the deck and the chainplates before installing stainless cover plates. These screwed-in deck plates are supposed to compress the sealant around the chainplates. However, they are often too small to be effective, and furthermore, they embrace the chainplates so tightly they actually trap water in the worst possible location.

Thoughtful design and building practices would help prevent future problems. To maximize upwind tacking angles, racing boats often have chainplates installed well inboard, and these must be led through the deck. Since many owners of dual-purpose performance cruisers also use their boats for racing, many production sailboats have a similar arrangement for tight headsail sheeting. But even with a narrow rigging base, it’s possible to improve the chainplate installation. Some builders specify chainplates welded to a base that is then bolted through the deck onto a strong under-deck plate that’s sometimes backed by a tension rod. In such a setup the topside component can be sealed with a neoprene gasket, which is more effective than a bedding compound that can be squeezed out when the bolts are tightened. Also, this arrangement permits easy inspection of the fitting and its fasteners for smudges of rust, the first sign of creeping corrosion.

On cruising boats, it makes more sense to situate the chainplates outboard, on the outside of the hull. This provides a very wide, efficient base with longer spreaders and a wider angle between the shrouds and the mast, all of which reduces the loads on the rigging wire. The venerable Out Island series of boats designed by Charley Morgan has such chainplates, which are easy to inspect and reduce the risk of crevice corrosion. While they can still corrode on the underside where seawater can get trapped, their generous thickness provides a welcome safety factor.

All bolts holding chainplates require frequent inspections. Fashioned from 304 stainless alloy (also known as 18/8), the threads on these fasteners can collect saltwater and they can corrode quite easily. When sailmaker Dave Beatson began to remove some chainplate bolts on his Creekmore 34, half of the bolt heads fell off when he turned the wrench. So when we bought a 20-year-old Mason 44, I decided to pull out the chainplates to see what, if anything, was going on.

Ominously, I discovered that corrosion — some of which looked like the beginning of straight saw cuts — had begun to disintegrate the metal right where the chainplates vanished through the deck. And the backstay chainplate was losing metal below the deck where the bolts went through the transom. To address the situation, Peter Messenger, one of the most experienced riggers I know, advised using 316L stainless alloy for repairs. After cutting the material to size, he advised polishing it to high gloss. I ordered lengths of 316L bar in ½-inch and ⅝-inch thicknesses to match the size of the turnbuckle toggles for the lower and upper shrouds, respectively. (The original chainplates were much thinner and, while probably still strong enough, the clevis pins had a loose, sloppy fit. Also, the new bar stock I’d ordered was very slightly undersize, making it a perfect fit with the toggles.)

When effecting repairs or refits, ideally the deck area around the chainplates should be a solid glass laminate. It wasn’t on my Mason, which again is typical for most older production boats. So I cleared out about an inch of balsa core from between the layers of deck laminate and rebuilt the area with thickened epoxy. This stiffened the deck. Also, if the sealant broke down, the wall of solid epoxy would prevent seawater from soaking into the balsa and creating a permanent sponge bath, ensuring accelerated corrosion. To prevent future leaks, I discarded the slim stainless cover plates affixed to the original chainplates. Out of prefab fiberglass plate I then made larger cover plates with slots ½-inch wider than the chainplates.

This allowed a generous buildup of BoatLIFE polysulfide sealant. Before sealing, I wiped all metal parts with degreaser to remove any contaminants. When choosing a sealant, avoid the tenacious 3M 5200 polyurethane so beloved by certain boatyard workers because it hides bad workmanship. Plus, it takes days to set. Use 5200 only where you want the pieces to bond permanently. Although it slowly cracks when exposed to sunlight, you’d still need a heat gun and an iron will to remove it later.

custom sailboat chainplates

| |The new, polished chainplates for the intermediate and upper shrouds are ready to go in.|To prevent future leaks, I discarded the original stainless cover plates for the original chainplates and replaced them with larger cover plates fabricated from prefab fiberglass sheets.|I bedded the new cover plates with a buildup of BoatLIFE polysulfide sealant.|

custom sailboat chainplates

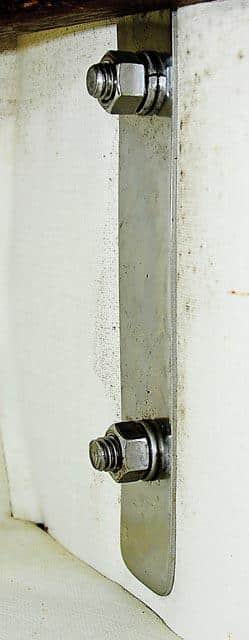
| |Belowdecks, the chainplate fasteners pass through a long 1/8-inch backing plate.| |

custom sailboat chainplates

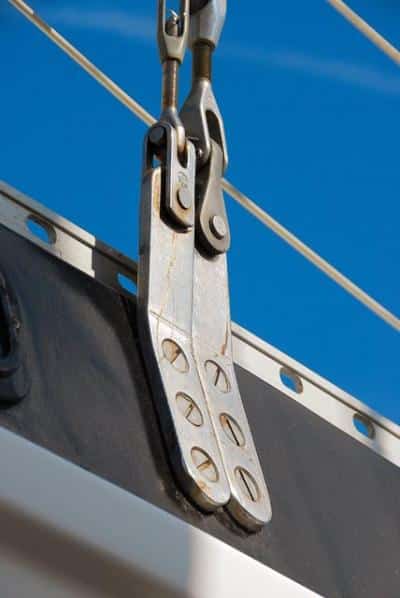
| |Outboard chainplates also work well. Note how the popular U-shaped toggle is beginning to corrode while the old forged bronze toggle is clean.|

Because I tackled the project with the keel-stepped mast still in place, I worked in stages. First I removed the chainplates servicing the lower shrouds; then I made a notation with a marker signifying their locations; finally I brought them to the fabricators to duplicate in the new material. In the calm waters of a protected marina, the upper and intermediate shrouds supported the mast adequately while I worked.

After the lower chainplates were reinstalled, I repeated the steps with the intermediates and then the upper shrouds. The backstay chainplate was the last to go back in: Tension on the mainsheet and the topping lift provided the mast with reasonable fore and aft support.

All this work boosted our confidence in the rig considerably. A month later, knowing our spar was suitably reinforced, we sailed north from Florida to Labrador.

custom sailboat chainplates

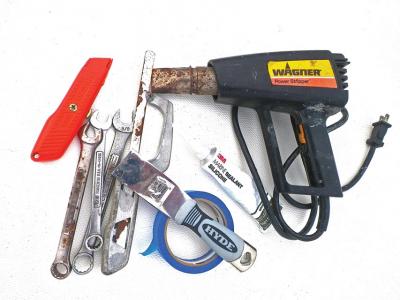
| | Tools for the Job • Wrenches to match and fit the fasteners • Heat gun to soften the old sealant around the chainplates • A narrow metal blade to cut through the sealant adhering to the chainplates • A 90-degree hook (homemade) to scrape balsa core out of the chainplate slots • Epoxy resin and hardener to build up the space left from removing balsa; plus West System 404 High-Density filler additive; a putty knife and gloves • Wide masking tape and duct tape to build up a “dam” that will prevent epoxy from dripping into the boat’s interior • Sandpaper from 40- to 60-grit to smooth out the cured epoxy • Polysulfide sealant and caulking gun • 1-inch-wide masking tape to protect the deck and the upper part of the chainplates from sealant leakage| |Longtime CW contributor Tom Zydler and his wife, Nancy, spent this summer exploring the coast of Labrador and surrounding waters aboard their Mason 44,_ Frances B_.|

  • More: DIY Sailboat Projects , How To , sails & rigging
  • More How To

buddy system for rudder check

Sailing Totem : A Mystery Clunk and a Mid-Pacific Pit Stop

Fender protection using a tee-shirt

Fender Protection on a Budget

43-foot cutter Gusto

Surviving the Storm: A Sailor’s Tale of Hurricane Lee

Boat show

Best Practices for Boat-Show Shopping

Fender protection using a tee-shirt

Gear Test: Cruising Solutions’ Wireless Headphones

Catamaran in the gulf of Mexico

La Paz, Mexico, Open for Charter with The Moorings

Dubrovnik

Sunsail Expands Charter/Flotilla Options in Croatia and Greece

  • Digital Edition
  • Customer Service
  • Privacy Policy
  • Terms of Use
  • Email Newsletters
  • Cruising World
  • Sailing World
  • Salt Water Sportsman
  • Sport Fishing
  • Wakeboarding

Oneida Engineered Products, Inc.

Chainplates

Oneida offers both standard and custom sailboat hardware. Examples of our current offerings of chainplates include:

  • Item #: 401369 CHAINPLATE, P&S PAIR, 316 S.S.
  • Item #: 129-20-61-0001 STEM HEAD C-PLATE, POLISHED, 316 S.S.
  • Item #: 129-20-61-0002 CHAINPLATES, PORT , POLISHED, 316 S.S.
  • Item #: 129-20-61-0003 CHAINPLATES, STARBOARD, POLISHED, 316 S.S.
  • Item #: 129-20-61-0004 BACKSTAY CHAINPLATE, POLISHED, 316 S.S.
  • Item #: 36-20-63-0002 CHAINPLATE, MAIN, PAIR, ELECTROPOLISHED, 316 S.S.
  • Item #: 36-20-63-0003 CHAINPLATE, HEADSTAY, ELECTROPOLISHED, 316 S.S.
  • Item #: 36-20-63-0004 CHAINPLATE, BACKSTAY, ELECTROPOLISHED, 316 S.S.

Related products

custom sailboat chainplates

Triple Ring Drink Holders

custom sailboat chainplates

Anchor Rollers with Chain Locks

custom sailboat chainplates

Telescoping, Pivoting Ladders with Grab Rails

custom sailboat chainplates

Double Ring Drink Holders

The Rigging Company

Servicing The Chain Plates

Serviced chainplates

Modern day chain plates are typically made of stainless steel and sometimes aluminum. When replacing a boat’s standing rigging one should also be sure to, remove, inspect , clean up and refasten the chainplate. Apart from design and material flaws there are three primary factors in the life expectancy of any chainplate: fatigue, age, and corrosion. One of the common misperceptions of stainless steel is that it does not rust. Depending on its grade, stainless steel is very resistant to rusting, but will rust and may do so prematurely when introducing chlorides (a.k.a. salt). If these chlorides are not able to be rinsed and removed, eventually rust colored deposits will begin to form. This in-itself presents a problem when sealing a chainplate to the deck or the hull in effort to keep water out. Chainplates that are mounted through the deck are the most suspect to crevice corrosion because once there has been any saltwater ingress, it is not likely possible to rinse or remove these salts from the surface of the metal. The only way to deal with chlorides is to remove the chainplate, clean off the rust deposits and visually inspect the plate material. Die penetrants or x-rays are a helpful tool in magnifying any areas of concern. Through-the-deck chainplates create an area of concern, where they pass through the deck, mainly due to the fact that it is right in-between the two pulling forces of the plate, i.e. the top bolt hole and the hole that accepts the pin for the stay’s turnbuckle. Through-deck chainplates are susceptible to failure because of this if not inspected regularly.

This brings me to the cover plate that mounts horizontally onto the deck. The chainplate cover plate is there to merely promote a seal. It is not structural, does not need to be through-bolted, and should be lifted, cleaned, and resealed every two to three years (give or take) depending on geographical location and use. This is both to preserve the decks core materials as well as keeping water out from below decks (Read our blog here on sealants and their uses).

Deck mounted chainplate

Deck mounted chainplates will typically have few issues with failure within the actual plate (again, this is aside from fatigue, design and/or manufacturing flaws of course). The fasteners in this case are taking the ‘ brunt of it’ and care should be taken to ensure that the fasteners and/ or any associated tie-rods are in optimal condition. When removing the stainless steel fasteners you will see evidence of rust where they go through the deck. These types of chainplates should be resealed and have the fasteners replaced regularly (about every five to seven years, depending on use and geographical location).

U-bolt chaijnplate

U-bolt style chainplates, should also be pulled, inspected and re-sealed regularly. These types of chainplates should be replaced more frequently than the other styles. This is due to the fact that they depend solely on the threads used to fasten them through the deck.

cracked and rusted chainplate

In conclusion, chainplates are an often overlooked portion of ones rigging. I have even witnessed rigging shops that neglect to inform customers of the importance of chainplate inspection. If in doubt of your chainplate’s state, it is, at the very least it is a good idea to have them removed, cleaned up and inspected by a professional. If you are a do it yourself-er, there is no shame in seeking advice, not just for removal but most importantly for inspecting them as well as tips on installing them properly. So if you are having your boat re-rigged, be sure to ask about those chainplates.

REMEMBER: Don’t forget to replace the fasteners!

Have a question, leave us a comment or shoot us an email and we will be glad to reply!

Similar Posts

Views from aloft.

It is the time of year for rig inspections. Here, we are aloft in the beautiful Inner Harbor of Baltimore, Maryland. This trip aloft was courtesy of a Lewmar Electric Winch, what more could you ask for, going up!? On second thought, we could have used a bit more sunshine, but “beggars can’t be choosers.”…

The End is Near…

The Vendee Globe challengers are approaching the end, which may come as early as this weekend. However, the drama has not stopped. Jean-Pierre Dick (still in third but surely to be passed soon),  has broken his keel, but is puttering along at a measly 11 knots. The skipper of Virbac -Paprec 3 has yet to…

Keeping Up with the Cup

Just over a week ago, the Americas Cup teams took it back to the water on their AC 45’s as the AC World Series continued in beautiful Naples Italy. Check out the final day highlights as helmsman Francesco Bruni of Luna Rossa Swordfish takes the overall championship over the Australian Tom Slingsby of Oracle Team…

Wiktionary.org offers this defintion of the word vang. Although the etymology is all very interesting. The latter is the one we are the most interested in. Below is a good video describing the benefits of the boom vang and when to use it. [youtube https://www.youtube.com/watch?v=C31nGzO54O4&w=560&h=315] The Boom Vang, in its simplest form, is a block and…

The rigging company Annapolis

Help Wanted!

The Rigging Company is NOW HIRING! We are currently accepting any and all resumes regardless of experience for full-time, year-round employment. We offer fair pay, hard work, some good times, and a whole lot of job satisfaction. So if you are interested, please stop by or send us your info and we will get back to…

Keeping up with the Cup

……….and Team USA is barely keeping up with Emirates Team New Zealand. The American team finally pulled off their first victory in yesterday’s last race. The Oracle sponsored team is going to have to maintain this trend for a while in order to stay “in-the-swing-of-things”. The current score is 3 to -1, New Zealand. Each…

Leave a Reply Cancel reply

Your email address will not be published. Required fields are marked *

Save my name, email, and website in this browser for the next time I comment.

23 Comments

I have a 1983 Bristol 35.5 that has been determined to have moisture in the knee for the backstay chain plate. The knee is sound but definitely has moisture in the wood core. To replace the knee is nearly impossible due to access to the area.

I’m strongly considering an external chain plate in the general area of the current internal mounting knee. The chain plate will only require a slight bend to reflect the necessary angle of the back stay.

The ideal thing would be to repair the knee in such a fashion that it was structurally sound though. Regardless, I think that removal of the old chainplate be done. Perhaps the knee is just wet and not rotten (fingers crossed). If so, let it dry and maybe treat that area with epoxy. At the same time inspecting the plate, cleaning and polishing it once over. Then replacing the fasteners and re-sealing the cover-plate is likely a good idea.

A fiberglass specialist will likely have the best advice here and I would ultimately seek their advice.

The final concern is with hull integrity for mounting and external chainplate to the transom. Maybe glass reinforcements need to be made to ‘beef-up’ the affected area!

Also are there other Bristol owners (on the internet) that have had this issue and what was there fix?

Just some thoughts. Hope that helps.

Thank you for your prompt reply.

According to my boat yard, to gain access to the back stay knee area would require dismantling the pedestal, dropping the rudder, etc. They have quoted the job as a $7,000 repair. Yes, the core material is mushy.

The idea of changing to an external chain plate is based on the fact the current knee is glassed to the interior transom.

I have a 1975(?) Cascade 36, with the chain-plates and stem head fiber-glassed into the inside of the hull. I have been vigilant in maintaining a seal at the deck but have not idea what the previous owners may have done. I do see evidence of slight rust around the pins that protrude inside the hull laminate but no evidence of water leaking in. I was considering just having new chain-plates made, bolting them on the outside using the existing ones for backing plates. Have you heard of such a fix? Have you ever done one of these boats? and, if so, would you have a better suggestion?

Yes, we have done this before. I would recommend just bolting the new ones to the outside for future ease of inspection. I would however go through the effort of cutting out the old plates. Inspecting the hull and deck around the affected area, make any repairs as necessary and seal everything with resin glass and paint. This is not only for a finished look, but will also ensure that further water intrusion in the future…AND it will make sure that the hull and deck are structurally sound. The last part is, it is horrible to drill those old SS chainplates, especially in the boat. The backing plate idea doesn’t really add a tremendous amount of strength, it is better to ensure that the fiberglass (which is doing the brunt of the work along with fasteners) is sound.

Thanks for the comment.

Thanks so much for that, It certainly seems an easier way. My priority will be the fore-stay If you’ve already done one of these, on a Cascade 36, could I buy the chain-plates from you? If so, what will they cost me?

Yes, you can certainly have us make them. We would use a water jet machine to cut them out and polish the tips and the part facing OB for longevity. The plates may run around around $400 per plate, a bit more because they are water-jetted. This is a much nicer way to make holes in metal, instead of tempering it with drill bits. If you send me some rough dimensions, included with a drawing that may depict any bends, I can get you firm quoted price within roughly a week. Time to complete once ordered is about to weeks.

Thanks again and if interested please email us at [email protected]

Mine is a Cape Dory 30K 1978. The chain/backing plates look like Baklava. .I just got the boat and plan to haul out next week to start the process. They used iron backing plates with welded rebar glassed to the hull would you recommend something better? I don’t want to put exterior chainplates I would like to keep things the same but maybe different material.Thanks

Hey John, I love Baklava, but not made of Iron. Do you have any pictures you can email us? The CP’s on deck are pad eyes made of bronze, right? It may be ideal for the backing plate to be made of 316 grade stainless…even G10 composite may be a nice upgrade. Oh and definitely replace the screws. Please email [email protected] for the pics and further advice.

Do you have any information please on repairing chainplates on a Colvic UFO 34. One has gone rusty inside the firbreglass. Thy are below deck inside the saloon and are encased in fibreglass. Do you make these chainplates? Paul

Thanks for commenting. We don’t have specific experience with this boat, but we have dealt with galssed-in chainplates in the past. You will likely do best by consulting a fiberglass specialist for tips and adivce on getting them out. Depending on the age of the boat, it especially sounds like you should try and get them removed and inspected at the very least, perhaps replaced, and then re-install them…all of them. Typically we have found a bolt on solution on most of these projects for the install. This will entail new chainplates to be made.

Feel free to send us some pictures and ask more questions if you need to.

Thanks, ~T.R.C.

I have a Rawson 30 and cant find any information about removing or replacing the chainplates, do you have any resources or any experience with these boats? the originals seem to just be glassed in as i cant find any bolts but that doesn’t really make sense..

Hi Kelly, thanks for the comment. It would be hard to say as most boats have so many variations for the chain plate install. However, your comment couldn’t have better timing, because I am going to look at a Rawson 30 within the next two weeks for a furler replacement. While I am there I will also take a look a the chain plates and make some recommendations for you based on this.

Talk to you soon…. Jim

….I hope this helps and thanks again for commenting.

That’s exactly what I did. Thanks for the reply.

i have a rawson 30 and i am dealing with the same issue now.. anychance you could send me a pic of what you did? thanks scott [email protected]

I don’t have any immediately available but still have access to them. Check in on this comment section once and a while and I may end up uploading some.

What we did was, have them cut out from the inside (some interior removal and modification necessary). We then installed them mechanically, again on the inside of the hull, but through bolted form the outside using polished carriage bolts. Then we made new ones as well as a custom “T” plate that was married in via the top bolt hole. This helped spread the load to the underside of the deck at the toe rail… a very strong corner. This was done primarily because the hull material seemed a bit thin. I guess an alternative might be to reinforce the hill in patches from the inside via fiberglass laminates. This is just the route we chose this time around. Hope that’s not all too confusing . In the end we added chainplate cover plates, screwed into the toe rail, to create a proper seal.

Hope that helps… ~T.R.C.

I have had a local boat yard re-fasten chainplates on a wooden hull ( first removed and then re-fastened in same position) and bungs from screws into the ribs have popped out in various places next to the chainplates. Is this because the chainplates have been screwed down too tight? My feeling is yes, and they should have been just “snugged up”. To make matters worse, the boat has been out of the water for two years so she will experience significant swelling. The hull is strip built pine, edge nailed and then screwed to frame (where the bungs have popped). Please advise.

It is hard to say for sure. It does seem that the chainplate job has something to do with it, as the affected area is around the chainplates. However, it also a wooden boat and there is a lot of movement in wooden boats (especially when going from completely swollen to completely dry). This movement may have just caused the bungs to pop around the newly fastened chainplates because the chainplates being fastened to the hull now offer a now stiffer reinforced area to the hull, so instead of the wood moving evenly throughout it runs into a hard spot where these plates were fastened. Then again it could be a number of other reasons, so it is hard to say.

I may just put the boat in the water and let her settle in for a while then go around the hull with a raft and refasten and re-bung as needed. Because if the boat has been dry for a while it will certainly change shape a good bit once swelled. I am sure other things will happen like maybe some of the seems may need to be re-caulked. You just won’t know until she is wet again and settled in. For this reason alone I think it is always prudent to wait until the boat is wet to caulk, bung, refasten, even paint the hull above the water line. A good raft can be a useful investment.

Thanks for the comment and let us know if we can help any further!

I have a Hudson Force 50 one of the chain plates has a hair crack do you make these style plates

We do! We would recommend that all of the plates and fasteners get replaced simultaneously. We would need the plates that are to be replaced for duplicatuon. If you can send a picture of the chainplate style I can provide you a quote for replacement. Thanks for the comment! ~T.R.C.

I’ve noticed heavy rust stains around the port chain plate of the mast rig on a 2005 Bavaria 38 C. lying in Denia/Spain. What could be the reason and what is the best and most economical procedure to follow? Can I do this on my own? Thank you for your attention.

This seems like a fairly new boat and the first thing I might do is contact Bavaria to see if this is something they have encountered before. Reasons for excessive rusting could be: 1. Poor quality stainless 2. The stainless has somehow been contaminated with steel or iron 3. It could also be that the metal is covered by grease, sealant, dirt or some other substance that can cause oxygen to not be able to get to the metal. Stainless steel can rust, especially when it can’t breathe. If Bavaria is of no help, then you can remove the chain plate, clean the rust off with a stainless steel wire brush, polish it, remove any excess Polish with acetone and inspect the plate for cracks and other issues. Reinstall using new sealant and monitor the plate for the next few years. If the rust returns, I would have a new chain plate made. To remove the chain plate with the mast up make sure you properly secure this side of the mast with multiple halyards and detune the the opposite shrouds. Removal is easiest when the mast is out of the boat. Hope this helps and thanks for the comment!

Username or Email Address

Remember Me

Lost your password?

Review Cart

No products in the cart.

The Rigging Company

  • Privacy Overview
  • Strictly Necessary Cookies

This website uses cookies so that we can provide you with the best user experience possible. Cookie information is stored in your browser and performs functions such as recognising you when you return to our website and helping our team to understand which sections of the website you find most interesting and useful.

Strictly Necessary Cookie should be enabled at all times so that we can save your preferences for cookie settings.

If you disable this cookie, we will not be able to save your preferences. This means that every time you visit this website you will need to enable or disable cookies again.

Visit our Popular Forums

  • Monohull Sailboats
  • Multihull Sailboats
  • Powered Boats
  • General Sailing
  • Antares Yachts
  • Fountaine Pajot
  • Lagoon Catamarans

Cruising Business

  • Boat Classifieds
  • General Classifieds
  • Crew Positions
  • Commercial Posts
  • Vendor Spotlight

Life Aboard a Boat

  • Provisioning: Food & Drink
  • Families, Kids, & Pets Afloat
  • Recreation, Entertainment, & Fun
  • Boat Ownership & Making a Living
  • Liveaboard's Forum

Seamanship, Navigation & Boat Handling

  • Seamanship & Boat Handling
  • Training, Licensing, & Certification
  • Health, Safety, & Related Gear
  • Rules of the Road, Regulations, & Red Tape

Engineering & Systems

  • Const. / Maint. / Refit
  • Product / Service Reviews
  • Electronics: Comms / AV
  • Electrical: Batts / Gen / Solar
  • Lithium Power Systems
  • Engines & Propulsion
  • Propellers & Drive Systems
  • Plumbing / Fixtures
  • Deck Hdw: Rigging / Sails
  • Aux. Equipment & Dinghy
  • Anchoring & Mooring

Photo Categories

  • Member Galleries
  • Life Onboard
  • Sailing in the Wind
  • Power Boats
  • Cruising Destinations
  • Maint. & Boat Building
  • Marine Life
  • Scuba Diving & Divers
  • General Photos

Recent Photos

custom sailboat chainplates

Listing Categories

  • African Cats
  • view more »
  • Crew Wanted
  • Crew Available
  • Enhance Your Account
  • Meet the Mods
  • Meet the Advisors
  • Signup for The Daily Cruiser Email
  > >

Cruiser Wiki

 
Please support our sponsors and let them know you heard about their products on Cruisers Forums.
03-10-2023, 10:47  
Boat: Westsail 32
is coming up on the 40-year mark. I haven't pulled a chainplate yet to inspect, but I know I need to preventatively replace a few tangs (there are 2 for the bow sprit, and 2 for the boomkin). I also am thinking of just replacing all the chainplates while I'm at it. This is partly to check it off as an item we don't have to worry about while cruising, and partly because I'd like the machining challenge. I stumbled into owning a small milling machine that is CNC enabled, and having some machining experience from my grad days.

These threads were useful:


I'm on and am not really interested in discussing using instead. has a leg up in almost every way, except for its , and, subjectively, its appeal (but I prefer a green patina over rust stains anyway).

My main questions are:
1. Silicon bronze bar stock can be hard to come by, Al bronze is a little more common. Are Al bronze alloys suitable for this applicaiton?
2. Bending is a common question/concern that comes up when fabricating chainplates at home, especially with bronze alloys. The largest angle I need to bend is 25 degrees for one of the chainplates, the other is 15, and 0. I have a large vice, and a map torch, but that's about it. Are these angles safely achievable?
03-10-2023, 10:53  
Boat: Tartan 3800
03-10-2023, 11:07  
Boat: Westsail 32
03-10-2023, 13:01  
Boat: 35 Ft. cutter, custom
03-10-2023, 18:43  
Boat: Mascot 28 pilothouse motorsailer 28ft


Don's


Reverse engineering bronze casting-Youtube
04-10-2023, 13:46  
Boat: Cape George 31
04-10-2023, 14:20  
Boat: Luders 33 - hull 23
04-10-2023, 14:58  
Boat: 35 Ft. cutter, custom
10-10-2023, 14:24  
Boat: Westsail 32
ones are all SS.

If 3/8" chainplates require a hydraulic press to bend, then I'll probably have to outsource that part of the fabrication. I wonder if it could be done with appropriate heat and a long lever though. Maybe I'll poke around.

The quote I got from Atlas Bronze for 3/8" silicon bronze (C65500) plate dimensioned 24" x 16.75" (enough for all the chain plates and at least a few tangs) was $915. If I used all the material to make chainplates, that works out to about $114/ea.

bronze (954) cast bars 3/8" x 2" from Online Metals are $106/ea. But casting is not ideal here since I want to bend them safely.
10-10-2023, 14:32  
Boat: Tartan 3800
10-10-2023, 16:13  


I fabricated 1/4 inch silicon bronze chain plates with the above tool. I also used it for a gammon iron made out of 3/8" silicon bronze bar. Also used it for a 5/8 inch bronze rod to make a mainsheet horse for a gaff main.

Bronze is different than when bending. You work it cold, and it hardens as you work it. Sometimes you have to reheat it and quench it to soften it again.

Not hard to do, but takes some practice, which can be expensive.
11-10-2023, 12:20  
Boat: Mascot 28 pilothouse motorsailer 28ft
11-10-2023, 12:54  
3/8" x 2" from Online Metals are $106/ea. But casting is not ideal here since I want to bend them safely.
11-10-2023, 13:02  
Boat: Wylie 45' Custom
16-10-2023, 07:52  
Boat: Pearson 386
torch in air burns at roughly 3600 F. I expect there is minimum bend radius info available for cold working, and the vendor of the alloy should be able to provide this.
 
,
Thread Tools
Rate This Thread
:
Posting Rules
post new threads post replies post attachments edit your posts is are code is are are are
Similar Threads
Thread Thread Starter Forum Replies Last Post
Chotu Multihull Sailboats 176 08-08-2022 06:29
mlydon Deck hardware: Rigging, Sails & Hoisting 6 17-02-2019 06:44
Eastward ho 24 Deck hardware: Rigging, Sails & Hoisting 33 24-01-2018 19:50
montenido Monohull Sailboats 4 08-05-2012 18:55
blahman Deck hardware: Rigging, Sails & Hoisting 33 07-11-2011 08:46
- - - - - - -

Privacy Guaranteed - your email is never shared with anyone, opt out any time.

  • New Sailboats
  • Sailboats 21-30ft
  • Sailboats 31-35ft
  • Sailboats 36-40ft
  • Sailboats Over 40ft
  • Sailboats Under 21feet
  • used_sailboats
  • Apps and Computer Programs
  • Communications
  • Fishfinders
  • Handheld Electronics
  • Plotters MFDS Rradar
  • Wind, Speed & Depth Instruments
  • Anchoring Mooring
  • Running Rigging
  • Sails Canvas
  • Standing Rigging
  • Diesel Engines
  • Off Grid Energy
  • Cleaning Waxing
  • DIY Projects
  • Repair, Tools & Materials
  • Spare Parts
  • Tools & Gadgets
  • Cabin Comfort
  • Ventilation
  • Footwear Apparel
  • Foul Weather Gear
  • Mailport & PS Advisor
  • Inside Practical Sailor Blog
  • Activate My Web Access
  • Reset Password
  • Customer Service

custom sailboat chainplates

  • Free Newsletter

custom sailboat chainplates

The PDQ 32 Cruising Cat Used Boat Review

A 2006 Dufour 44. Image courtesy of Racing Yachts.

Dufour 44 Used Boat Review

custom sailboat chainplates

Blue Jacket 40 Used Boat Review

custom sailboat chainplates

Catalina 270 vs. The Beneteau First 265 Used Boat Match-Up

custom sailboat chainplates

How to Create a Bullet-Proof VHF/SSB Backup

AquaMaps with Bob’s blue tracks and my green tracks at the start of the ICW with bridge arrival times. (Image/ Alex Jasper)

Tips From A First “Sail” on the ICW

Make sure someone is always keeping a lookout on the horizon while the tillerpilot is engaged. If there are a few crew onboard, it helps to rotate who is on watch so everyone else can relax.

Tillerpilot Tips and Safety Cautions

Irwin Vise-Grip Wire Stripper. (Photo/ Adam Morris)

Best Crimpers and Strippers for Fixing Marine Electrical Connectors

custom sailboat chainplates

Revive Your Mast Like a Pro

custom sailboat chainplates

Solving the Dodger Dilemma

We like going one size over what is often recommended for smaller boats. The advantages are a.Less stretch. Nylon can be too stretchy, but polyester not stretchy enough. One size over can be a Goldilocks answer. b.Better wear resistance. Because we like using short chain when hand-hauling, we cover the first 10 feet with a webbing chafe guard. This is very cut resistant, because unlike the rope inside, it is floating and not under tension. c. Better grip. ⅜-in. is pretty hard to grab with the wind is up. ½-in. fits our hands better. (Photo/ Drew Frye)

Polyester vs. Nylon Rode

custom sailboat chainplates

Getting the Most Out of Older Sails

custom sailboat chainplates

Sailing Triteia: Budget Bluewater Cruising

custom sailboat chainplates

How To Keep Pipe Fittings Dry: Sealant and Teflon Tape Tests

This is the faulty diesel lift pump, the arrow is pointing to the sluggish primer lever. That is an issue because the fuel lift pump needs to provide the right amount of fuel and fuel pressure to the injector pump. (Photo/ Marc Robic)

Fuel Lift Pump: Easy DIY Diesel Fuel System Diagnostic and Repair

Propane tank valve and pressure gauge. Since a propane leak can be catastrophic, make sure to schedule in a propane tank and fitting check into your maintenance calendar. (Photo/ Marc Robic)

Propane Leak: How to Detect, Locate and Fix

custom sailboat chainplates

Why Choose the Wharram Design?

Covering the boat is one of the last steps in the winterizing process which readies all of your boat systems for the coming temperature drop. (Photo/ Marc Robic)

Winterizing: Make It Easy With Checklists

Odorlos Holding Tank Treament Packets

Stopping Holding-tank Odors

custom sailboat chainplates

Giving Bugs the Big Goodbye

custom sailboat chainplates

Galley Gadgets for the Cruising Sailor

Instead of dreading a squall, think about it as a way to fill up your water tanks. PS tested ways to make sure the rainwater you catch is clean, tasty and safe to drink.

The Rain Catcher’s Guide

custom sailboat chainplates

Sailing Gear for Kids

custom sailboat chainplates

What’s the Best Sunscreen?

The edges of open shade can read as high as 25 percent of sunlight when surrounded by a white deck. (Photo/ Drew Frye)

UV Clothing: Is It Worth the Hype?

custom sailboat chainplates

Preparing Yourself for Solo Sailing

The R. Tucker Thompson is a tall ship based in the Bay of Islands, Aotearoa New Zealand. It operates as a not-for-profit, and takes Northland’s young people on 7-day voyages. (Photo courtesy of R. Tucker Thompson)

R. Tucker Thompson Tall Ship Youth Voyage

custom sailboat chainplates

On Watch: This 60-Year-Old Hinckley Pilot 35 is Also a Working…

America's Cup sailboats have progressed from deep-keel monohull J-class Yachts, to regal Twelve Meters, to rambunctious wing-sailed catamarans. The rule now restricts boats to a single hull, but allows retractable, hydraulically actuated foils. Top speeds of 40 knots are common. (Photo/Shutterstock)

On Watch: America’s Cup

custom sailboat chainplates

On Watch: All Eyes on Europe Sail Racing

custom sailboat chainplates

Dear Readers

  • Sails, Rigging & Deck Gear

Chainplates Revisited

Chainplate failures aren't common, but when one occurred on a new boat during its inaugural sail—with our reviewer aboard—we knew it was time to investigate. here's the result of our initial probing..

custom sailboat chainplates

Following our review of the new J/133 (PS Oct. 1, ’04), in which we recounted a chainplate failure aboard hull No. 3 on its maiden voyage, a reader’s letter prompted us to review the manner in which manufacturers design and construct the critical connections between mast, shrouds, and a boat’s structure. In the case of the J/133, we concluded that the construction method—a contemporary yet time-tested approach—was properly conceived, but poorly executed.

The folks at J/Boats declined to offer specific comments, but the boat’s builder—Pearson Composites, LLC (formerly TPI)—told us that ours was a fair assessment of the situation. (More on that later.)

Nonetheless, the issue of chainplate construction and rig attachment demands further examination, particularly for the owners of older boats whose vessels may be susceptible to chainplate failure.

Like the human anatomy, which is supported by a series of bones connected at joints (“head bone connected to the neck bone, neck bone connected to the shoulder bone”), a sailboat’s standing rigging reflects many similar connections. At one end of any stayed rig, the head of the mast is supported by stays and shrouds that in most cases disappear belowdecks to connect to a metal, wood, or fiberglass section that itself is attached to a bulkhead, the hull’s topsides or bottom, or an interior grid system.

With any rig, contrary forces are at work. At the masthead, tensioned shrouds pulling chainplates upward from a grid in the bottom of the hull, for instance, are at the same time pushing the butt of the mast, or a compression post, in the opposite direction. Consider that the headstay and backstay are pulling the bow and stern upward, and the conflicting forces on the entire structure are enormous.

“The static pressure on the hull of the Santa Cruz 70 produced by the mast, with the boat sitting static at a dock, is approximately 28,000 pounds,” explained Lance Brown, president of Santa Cruz Yachts. Given that, it’s no surprise that America’s Cup boats, which take advantage of every weight-saving method available, often have major failures.

Creating a proper set of connectors, then, requires that designer, engineer, boatbuilder, and rigging specialist each scientifically calculate the loads that will act on the sails in wind and sea, and the loadbearing capacity of the standing rigging, which will ultimately determine the lamination schedule for chainplates or the appropriate strength characteristics of whatever material is used to fabricate these critical connectors.

Ty Goss, of the custom sales division at Navtec, told us that “Once the loads on rigging and turnbuckles are determined, our prototypes are tested by running fatigue tests.

“We will load a turnbuckle to its breaking strength and stress it 120,000 to 200,000 times (1.4 times its projected life expectancy) in 15-second cycles. If it doesn’t break, we know we have the right product.”

On older boats, chainplates were often fashioned from necessary, but unsightly, metal straps attached to the exterior. Unless an owner diligently polished them, the straps or their fittings typically rusted, which produced blemishes on the topsides. These same rust lines, however, could provide an owner with visible evidence of the potential deterioration of the plates, or their fasteners.

On modern fiberglass boats, chainplates are usually out of sight and out of mind. As builders became more confident of the bonding capacity and strength of fiberglass, they began relocating these straps on the hull’s inner skin, or bedded in bulkheads. However, as with the exterior attachments, the new method was not without its drawbacks, since a leak at deck level could result in delamination of the fiberglass, or a waterfilled core; either condition reducing the structural integrity of the components.

Various methods of attaching plates are used, including the method employed by Pearson Composites, LLC in the construction of the new J/133. In that case, the shrouds are connected to a deck plate, which in turn is connected to a tie rod, which is connected to a horizontal pin beddedin a fiberglass buttress in the hull. At PC, LLC, the buttress is a solid fiberglass block with a hole bored that is within 5/1000th” of the size of the pin. This basic design is not new technology; grand-prix racing boats have been employing similar designs for 20 years.

The failure of the chainplate on the J/133 was the byproduct of a miscommunication within the builder’s facility, according to Stephen A Misencik, director of engineering and design at PC, LLC.

“Miscommunications between engineering and the production floor caused the installation of the deck chainplate assembly to be located 2″ aft of where it was originally designed to be,” Miscencik told us. “This resulted in the tie rod being mis-aligned with both the deck fitting as well as the hull buttress/pinion assembly.”

The result: “When the mast and spreaders were constructed by Hall Spars, the shroud-rod connection did not line up properly, placing excessive loads on the fiberglass buttress.” Under sail in 30- to 35-knot winds and a short, steep chop on Lake Michigan, he added “the flange bond on the starboard side on Hull No. 3 failed. Only one edge of the buttress disbonded from the hull.”

Chainplates Revisited

When J/Boat’s designers and Misencik compared notes the day after the mishap, the error was discovered, and appropriate modifications completed for future boats. Only one of the five boats that were completed at that time suffered the failure, though a factory team was dispatched to rebuild each of them.

Misencik agrees that factory workers could have been alert to a problem when they encountered difficulties installing the misaligned rod during the construction process.

Coincidentally, he also describes a problem on some early models of the J/109 that were attributed to the improper use of a bonding material. In that case, chainplates were bonded to a grid framework in the bottom of the hull with ITW Plexus adhesive.

“That’s the wrong material to use when trying to produce a rigid structure from two pieces of material,” he explained. The result was excessive flex between the chainplate and the structure. The problem was corrected by replacing the bonding agent with an epoxy mix.

Dave Gerr, director of the Westlawn Institute of Marine Technology and a noted yacht designer, told us that the first calculation to be considered in chainplate design is the boat’s righting moment.

“Then, the design objective is to take the calculated loads from the shrouds and transmit them to the chainplates, without allowing the deckplate to leak,” he said.

“It is important to work out and detail the fastening of the chainplate to the hull because the loads on chainplates are immense,” he added.

Designers typically specify standing rigging and attachments, including bolts, that are 1.3 to 1.4 times stronger than the calculated load. This fudge factor is intended to offset the fact that, regardless of the material used, it will degrade over time with aging and a lack of maintenance.

“Special considerations, though, relate to the intended use of the boat,” said Santa Cruz Yachts’ Lance Brown. That company’s slogan, “Fast is Fun,” was coined by founder Bill Lee, who built a reputation for designing and constructing rocketships. His legendary Merlin was a record setting 68 footer that introduced “downwind sleds” to the sailing vernacular, and remains the precursor of a breed of boats that have evolved to become the sailing equivalent of a Ferrari.

“We built the Santa Cruz 50 and Santa Cruz 70s as race boats, so the interiors were of little consideration, allowing us to place chainplates wherever was necessary to align with the shrouds,” said Brown. Chainplates on the 50-footer were installed using a method mirroring that of the J/133. Shrouds on cruising boats, however, may be located outboard at the rail, for instance, at the expense of tighter sheeting angles and greater pointing ability. And when located outboard, they may be buried behind cabinetry as an aesthetic consideration.

“The Santa Cruz 52 (see PS review July 1, ’95), a performance cruiser, is fitted with conventional living and sleeping quarters, so we had to take into consideration the location of seat backs and shelving. We are taking the same approach with the Santa Cruz 53C, which will be introduced in April, 2005.”

One conventional method of locating chainplates out of the way is to employ flat metal sections attached to bulkheads with fasteners.

“The fastenings,” explained Gerr, “have to be adequately strong, as must the structure they fasten to, in order to distribute the load into the hull. The key to sizing the bolts is to make sure the load from the shroud does not exceed the local crushing strength of the plywood or the laminate that is added to the ply bulkhead to take the chainplate loads.

“Elongated chainplate bolt holes in bulkheads are common trouble spots. Without an adequate load bearing area, a bulkhead will eventually crush above the bolt, resulting in the chainplate pulling upward, elongating the bolt holes, and causing the chainplate to leak.” In a worst case scenario, the chainplate may pull through the deck.”

To avoid overpopulating a bulkhead with bolts, or using larger bolts, Gerr’s alternative is the installation of an annulus. “They are made of fairly high compressive strength material,” he said, “and increase the bearing area in the ply by making the annulus two times the bolt diameter.” The bolt is then installed through the center of the annulus. On older boats that evidence the potential for this type of failure, an annulus will extend the useful life of the bulkhead with a relatively easy and straightforward fix.

Brown describes the forces on chainplates, hull, and mast butt as “contrary forces in a big circle.” To disperse the loads in the new boat from Santa Cruz Yachts, the chainplate will be solid bar stock through-bolted with 12, 1/2″ bolts to a longitudinal stringer that in turn is bonded to the hull and adjoining bulkhead in multiple layers of 0 to 45-degree and 0 to 90-degree fiberglass laid in varied orientations from deck level to the keel. The bulkhead is located on the same reinforced section of the hull as the mast butt, and bonded to the hull and deck.

“That structure is so strong that we could cut the center out of the bulkhead without compromising its integrity,” Brown reported.

Chainplates Revisited

His comment brings to mind a common alternative to the chainplate bulkhead arrangement, which is the construction of a knee (envision an upside-down capital “L”), usually constructed of wood or fiberglass bonded to the hull and under the deck, to which the chainplate is attached. Oriented athwartships, the shape is typically long and narrow so as to accommodate furniture. In this arrangement, the chainlate resembles an inverted “T” shape and is typically cut from a single piece of stainless steel or bronze.

Though the knee is tabbed to the hull and deck, Gerr explained, “The knee’s tabbing is secondary bonding, which is structurally rather weak and can suffer from failure due to poor-quality installation, improper resin mixture,” or other factors. For that reason, manufacturers should build in “a large margin of safety,” he said, to ensure a tight structure that will endure hull and deck flex, as well as the worst of the elements.

The contemporary method of attaching chainplates involves the replacement of metal straps with tierods that are secured in the hull structure. In this instance, shrouds and rods meet at the center of two plates located on the top and underside of the deck. To produce proper angles at the intersection of the shroud and chainplate, and prevent leaks caused by the deck flexing, builders are employing self-aligning rod caps that reduce the possibility of a failure.

At the other end, in many cases the tie rod is attached to the hull or grid in a metal plate into which it is threaded; bonding to a fiberglass structure is an option. Thus, in many new boats, these shiny rods are exposed in the main saloon, but go unnoticed, allowing designers to meet an aesthetic challenge.

The Bottom Line Modern engineering techniques and construction methods employed by major manufacturers, as well as marketing and legal concerns, are resulting in the production of better boats than at any time in the history of fiberglass, witness the number of American boats that meet ABYC and CE standards. In this environment, the odds of a structural failure are remote and, most likely, occasioned by a failure during the production cycle, or an inferior component.

The rigging on these boats, however, is not to be neglected. As Brown explained of Roy Disney’s Santa Cruz 70 Pyewacket and her sisters, “those boats were well maintained and continually inspected. Losing a race as a result of mechanical failure was unusual.”

Regardless of the age of a boat, annual inspection of standing rigging remains a must. In addition to inspecting wire for breaks, an owner should carefully examine the chainplate system from the point where it reaches the deck to its termination. Loose deck plates may result in water invading the hull or deck. Rust on the chainplate or bolts may indicate deck leaks, loose bolts or nuts producing a water leak or, in the worst case, the total destruction of the plate itself. Inspecting bolts and plates on a bulkhead is a simple matter; and removing cushions and furniture to allow inspection of the entire plate system is time well spent.

A lesser effort might just invite major failure.

RELATED ARTICLES MORE FROM AUTHOR

Leave a reply cancel reply.

Log in to leave a comment

Latest Videos

A Sailboat Tour of the Exquisite Littel Harbor 63 Ketch video from Practical Sailor

A Sailboat Tour of the Exquisite Little Harbor 63 Ketch

Dock and Anchor Lines - Polyester or Nylon? video from Practical Sailor

Dock and Anchor Lines – Polyester or Nylon?

The Performance Sailboat from Island Packet: Blue Jacket 40 Boat Review video from Practical Sailor

The Performance Sailboat from Island Packet: Blue Jacket 40 Boat Review

Top 3 Winter Boat HACKS! video from Practical Sailor

Top 3 Winter Boat HACKS!

Latest sailboat review.

custom sailboat chainplates

  • Privacy Policy
  • Do Not Sell My Personal Information
  • Online Account Activation
  • Privacy Manager

SailNet Community banner

  • Forum Listing
  • Marketplace
  • Advanced Search
  • About The Boat
  • Gear & Maintenance
  • SailNet is a forum community dedicated to Sailing enthusiasts. Come join the discussion about sailing, modifications, classifieds, troubleshooting, repairs, reviews, maintenance, and more!

Cost to Replace Chainplates? Should I Walk Away?

  • Add to quote

I'm about to fly out to a pre-purchase survey on a 1985 Passport 40. I looked at a survey done on this boat last year and apparently the chainplates are original on this '85 boat. Noted was some water evidence near one of the port chainplates. I'll need to replace them regardless and would like to know what I'm in for cost-wise. I'll need to get some 316 SS water jet cut for the new chainplates and open up the interior to get the chainplates in. I'll likely do some of the work myself but may or may not depending on yard policies. Is this a $4,000 job or is it a $10,000+ job?? How much time would a yard take for this project? What would be a good yard for this in Washington? My intent is crossing oceans and voyaging for many years. I intend to own this boat for a long time. I'm experienced and have crossed oceans and I build/repair inspect aircraft for a living so not afraid of complex jobs. The survey indicates a newer Perkins installed in 2000 as well as several items I need such as wind vane and some newer sails and SSB and diesel cabin heat as well as some other recent upgrades. I realize I'll need to do a refit. I'm hoping not to do a massive years long refit turning into a money-suck. That would be dumb. If you've replaced your chainplates I'd be interested in how that went and it's cost. ...And if you know of anyone on the west US with a Passport 40 who might be willing to sell -I'm buying. Thanks in advance!  

custom sailboat chainplates

I don't think water jet is the best tool for cutting chainplates. It leaves a somewhat coarse edge that will need to be cleaned up to avoid corrosion. Personally I'd machine then (CNC or manual). There is no way that a few custom machined bars of 316 stainless steel should cost $10k.  

-Hmmmm. I thought water jet cut absolutely razor clean edges? Hence the reason for water jet cutting recommendations on chain plates. I know the need to polish and then electropolish to remove stress risers after the cutting. Is your comment that water jet leaves rough edges conjecture or first hand? Jus wonderin. Thanks.  

custom sailboat chainplates

One you would have to have really GOOD LUCK to find a boat with age X chainplates The cost is very much how hidden the plates are which can range from fully exposed and easy to remove to absolutely unable to even see them Making them again depends on what you are copying and there is nothing wrong with waterjet to make the shape it just a matter of to work necessary to finish the edges and bring the holes to final size compared to other methods  

As a point of reference (every boat and project is different), we replaced all of our chainplates with the rig up - 2 at a time. had new ones custom fabricated at a local shop. Did a great job! Total cost was under $400 for the fab work. We did all the installation labor ourselves.  

Well, refit is a relative word. I guess I meant offshore prep for safety. Refit seems to some to mean "replace everything". I think I used it incorrectly. Currently newer sails, refer, standing rigging instruments and engine indicate a concientious owner. I think a some of the people I see on the list are really brilliant with tools and then again some should not pick up a wrench. I see the same thing in aircraft -people buy an aircraft with starry eyes then realize they do not have the federal licence to perform the work. Parts are a fortune and so is my labor -but I'm good and very fair. The aircraft sits a long time and sucks money and tie down fees. So I think I know mostly what I'm in for. I'm intently avoiding a "project" boat. I'm attempting to take emotion out of the purchase equation but boats are alluring little beasties. I'd love to hear what someone who has done a chainplate r&r has to offer as advice on cost and time.  

custom sailboat chainplates

I have been working on aircraft and boats all my life and now I own a machine shop. working on aircraft in front of your shop is demanding work and some times hard because of the tight space requirements. but working on a boat that is in a yard or in the water can be much harder and way more time consuming then you would think. it is not as technical but a bit like working on a big jet on a muddy dirt strip and all you have is a latter and a crescent wrench. if you forget one tool you could be done for the day.  

its not the cost of the materials it is the labor from the yard that will put the job in the $6k range. no matter which way you choose to cut stainless you will need to finish the metal to a #7 finish ( mirror ) and passivate it if you want to prevent corrosion. water jet or Laser cut will give you just as good a finish as machining in which to start the sanding and polishing process and will cost a lot less. many boats have chainplates made of standard flat bar and only require being cut to length and drilled then polished. you can also buy flat bar that is already polished to a #7. a bit expensive but saves your on labor. if you think you will keep the boat more then ten years then go Titanium. expensive but no polishing is required to prevent corrosion.  

custom sailboat chainplates

Whats to prevent the OP from replacing the chain plates one at a time? Couldn't the work be done while the mast is still up, the boat is in the water and the yard doesn't have to know about it? That would save him thousands of dollars.  

custom sailboat chainplates

Chainplates are just one item. I'm not familiar with the PP 40 construction. What about the bulkheads they are attached to? If they need repair or replacement that adds additional time and expense. If the surveyor only noted one point of water intrusion, you might not have a major issue there. Worth a close look. As Tommays mentioned, how accessible the chainplates are will either complicate or simplify the task ? Then there's the standing rigging. But any vessel of that age is going to have needs of that nature that should be built in to the budget, unless they've already been addressed.  

custom sailboat chainplates

Bad chain plates and newer engine? Doesn't sound like a deal breaker to me.  

I think I've read that some people have moved chain plates to the outer hull.  

custom sailboat chainplates

Here is how to do this on a CSY 44 CLICKY NB Several CSY 44 owners have had chainplates fail.  

custom sailboat chainplates

Am replacing the chainplates on my boat- 8 in total. Cost Stainless metal (316) $25.00 each- cut to size, drilling the holes and welding spacers on the end. $0.00 - exchanged some wood work for the labor. Brought the stainless at http://www.pennstainless.com/ they will custom cut! Installing- about $30.00 for all new nuts and bolts, and another $40.00 for bedding material. Whatever you do DO NOT let the boatyard do this project, it's not a big deal, they wanted to charge me $200.00 per piece uninstalled.! Unless hey give you a reasonable price. But you will definitely save a lot of money by DYI. And I'm doing them 2x a time while the mast is up! no big deal here!  

Roland, Thanks for the support on this project!! You didn't mention the size of boat you did the work on but it sounds like you understand where I'm coming from. Liked that you noted the cost and suppliers. It's what I was hoping to hear. Now I just have to find somewhere to work on my boat if I go ahead with the purchase.  

I'm working on a 34 footer- finishing up somethings- in between the storms and then will start installing my chainplates. Where are you located?  

Nice boat! The Passport 40 Sailboat : Bluewaterboats.org group too! https://groups.google.com/forum/#!forum/PassportOwners  

custom sailboat chainplates

The only big expense in replacing chainplates is if they are inaccessible - glassed to the hull, hidden by elaborate cabinetry etc. or if their attaching points are rotted - bulkhead replacement needed and so forth. If it's simply replacing like with like it shouldn't even get to a boat buck - assuming you turn the wrenches. Take one or two out and give them to the machine shop to use as templates. They should be made from flat bar, not cut out of plate with a jet. Get them electropolished for a few bucks more and replace - then two more and so on. I did them on my Columbia 43, which included a fair bit of welding and the reconstruction of a fairly elaborate headstay fitting for less that $1K.  

custom sailboat chainplates

SloopJonB said: They should be made from flat bar, not cut out of plate with a jet. Click to expand...

Now THAT is what I'm hoping for! $1000 bucks for parts and a #(*$&load of my labor should work ok. BUT, the surveyor noted that there was water intrusion in the port forward knee. Everything being equal I believe I may go ahead with the purchase simply because all the other things I'd need for an offshore boat are mostly there and fairly servieable/newer. I'll never find a 100% boat unless it's close to $200k and if I do the work I know it's solid. I would not go ahead with a boat that had a timed out engine unless it was completely compensated for in purchase price ie. appx. $18K.  

custom sailboat chainplates

Unless you simply like throwing away money I seriously suggest you give this man a call. He made my chain plates and another guys at my marina and they are WAY beefier than what I had and were almost too cheap to believe. Its high quality work but he charges extra for polishing, boring holes, ect ect. I just simply had the plates made and did the polishing and booring myself. I am not related to this man and have no continued working relation with him what so ever. Talon on this website also used him I believe after I gave him his info. Mr. James Idel. He works under the business Fab Solutions. His phone number is (904) 982-6113. Id give him a call- what could it hurt?  

custom sailboat chainplates

I live near Los Angeles but the boat is in state of WA. Intent -if I ok the purchase- is leave in WA for several mos. and purchase a WA cruising permit. Do a little work on and off. Sail south. Stop in Oregon for some days on way south and enjoy seafood. Pass Kalifornia completely without stopping ashore and go to a shipyard then marina in Ensenada for several mos. Return to CA after one year. I have retained a marine atty who is consulting me on this. You-know-why.  

Actually I would like to know why. Sales tax? What is a WA cruising permit.  

Well, my intent is serious voyaging so unfortunately I cannot trust any chainplates original to the boat. I'd be tickled pink to hear they had been replaced but it probably isn't so. Stainless is one metal that has a cumulative fatigue lifespan. Stainless work hardens. Work hardening means "brittle". A chainplate cycle loads and work hardens. I've heard of people removing their 'plates and breaking them in half with their hands. Easily.  

I did exactly that with my headstay fitting. It looked O/K but had some brown staining so I buffed it up with my buffing wheels. It came up like chrome but there was a faint hairline scratch remaining - I buffed some more but it was still there. I took the whole fitting in my hands and tried to bend it whereupon it twisted like taffy and snapped through the hairline mark. I doubt it took 20 lbs of force to tear it in two and it had looked perfect - the hairline was nearly invisible. At that point I pulled them all and made up new ones.  

Thank You! I have put his contact info in my file. I'll follow up after the survey...  

FYI, after my chainplates broke a couple years ago various riggers and other experts strongly advised using the new titanium alloy chainplates are the only way to go.  

Thanks. I have heard that titanium does not corrode (or takes forever). I may pursue that route but if the trade-off in dollars for titanium 'plates is insanely high I may stick with 316. I also like that Ti does not need polishing. That because I don't see the life of a 1985 boat being 60+ years. My knowledge of titanium is relative to aircraft. I gotta assume the really huge mass of titanium required to fab up 6 chainplates is outrageously expensive. Metals have recently gone sky high in price. One tiny 3/8 aircraft bolt in titanium costs about $12++. But I applaud you for having the foresight to install titanium and never have to worry again. That's peace of mind and worth the cost.  

custom sailboat chainplates

If your serious about going offshore then this project is a must and can be done by yourself. If your cruising plans are 10+ years and crossing several oceans then you will probably need to do the project again...probably in a little out of the way place with scant resources. I'm on my second set. DIY now, then you'll have the experience and knowledge to do it again.  

Titnium are a waste of money unless you are going to be keeping the boat for a very long time. Even thenbe why bother? You still onlyand have ten to fifteen years on the rigging. Its just another wy to spendthe more $ then youi need. Unless your circumnaving or sailing theis southern. Ocean beefy 316 will be justa fine. Id recomend titanium too if i was a seller. Motr $ in my poket.c  

This is what the person asking for advice stated: "My intent is crossing oceans and voyaging for many years. I intend to own this boat for a long time." So, with this in mind, you don't want to scrimp on chainplates.... go with Titanium. It is what you do in 2013 if you want the best.  

  • ?            
  • 176.5K members

Top Contributors this Month

custom sailboat chainplates

Titanium Chainplates

Customer
Service
(302) 725-8300

Titanium Chainplates Information

We will build titanium parts to your drawings. Just call Customer Service at (302) 725-8300 for a FREE quote.

Products in cart:

Table of Contents for Rigging Parts

Description:
Index:
Normally Stocked? In Stock?
Alloy (Grade): Material:
Measure:  
For member pricing
Thickness: Use decimal format only. (i.e. 0.25)
Width: Use decimal format only. (i.e. 1.75)
Length: Use decimal format only. (i.e. 2.75)
Sub-Category:
Please call (800) 725-8143 or (302) 249-3295 if you need help. The default quantity shown is the minimum order quantity.
[ ]
Item #               Description                Group Category / Sub Category Price
 
Allied Titanium Stemplate for a Seaward 46, Grade 5 (Ti-6Al-4V) Titanium with Sandblasted Finish
 
Allied Titanium Upper and Lower Shroud Chainplate for a Seaward 46, Grade 5 (Ti-6Al-4V) Titanium with Sandblasted Finish
Screecher plate for tack of screecher sail on catamarran., Grade 5 (Ti-6Al-4V) Titanium with Polished Finish
Chainplate for Tayana 55 Sailboat, Grade 5 (Ti-6Al-4V) Titanium with Polished Finish
Custom chainplate for sailboat, Grade 5 (Ti-6Al-4V) Titanium with Polished Finish
Staysail Allied Titanium Chainplate for a 1981 Pearson 530 Cutter Ketch, Grade 5 (Ti-6Al-4V) Titanium with Polished Finish
Allied Titanium Stemplate for a 1981 Pearson 530 Cutter Ketch, Grade 5 (Ti-6Al-4V) Titanium with Polished Finish
Chainplate Cover for U-Bolt type Allied Titanium Chainplate on Hobie 33, 0.059 inches thick X 1-3/4 wide X 2-5/16 inch long with four holes for Item #0006179, Grade 2 (CP) Titanium with Sandblasted Finish
Custom Chainplate - First size (Enter dimensions in "cut size"), Grade 5 (Ti-6Al-4V) Titanium with Mill Finish
Custom Chainplate - Second size (Enter dimensions in "cut size"), Grade 5 (Ti-6Al-4V) Titanium with Mill Finish
Custom Chainplate - Third size (Enter dimensions in "cut size"), Grade 5 (Ti-6Al-4V) Titanium with Mill Finish
Custom Chainplate - Fourth size (Enter dimensions in "cut size"), Grade 5 (Ti-6Al-4V) Titanium with Mill Finish
Custom Chainplate - Fifth size (Enter dimensions in "cut size"), Grade 5 (Ti-6Al-4V) Titanium with Mill Finish
Custom Chainplate - Sixth size (Enter dimensions in "cut size"), Grade 5 (Ti-6Al-4V) Titanium with Mill Finish
Custom Chainplate - First size (Enter dimensions in "cut size"), Grade 2 (CP) Titanium with Mill Finish
Custom Chainplate - Second size (Enter dimensions in "cut size"), Grade 2 (CP) Titanium with Mill Finish
Custom Chainplate - Third size (Enter dimensions in "cut size"), Grade 2 (CP) Titanium with Mill Finish
Custom Chainplate - Fourth size (Enter dimensions in "cut size"), Grade 2 (CP) Titanium with Mill Finish
Custom Chainplate - Fifth size (Enter dimensions in "cut size"), Grade 2 (CP) Titanium with Mill Finish
Custom Chainplate - Sixth size (Enter dimensions in "cut size"), Grade 2 (CP) Titanium with Mill Finish
Stemplate for 1971 Islander 32 sailboat, Grade 5 (Ti-6Al-4V) Titanium with Polished Finish
Stemplate and double bow roller for Valiant 40, Grade 5 (Ti-6Al-4V) Titanium with Polished Finish
Port and Starboard Upper Chainplate for 1997 Tayana 52 Aft Cockpit Cutter Sailboat, Grade 5 (Ti-6Al-4V) Titanium with Polished Finish
Port and Starboard Forward and Aft Lower Chainplate for 1997 Tayana 52 Aft Cockpit Cutter Sailboat, Grade 5 (Ti-6Al-4V) Titanium with Polished Finish
Backstay Plate for 1997 Tayana 52 Aft Cockpit Cutter Sailboat, Grade 5 (Ti-6Al-4V) Titanium with Polished Finish
Port and Starboard Upper Chainplate for 1997 Tayana 52 Aft Cockpit Cutter Sailboat, Grade 2 (CP) Titanium with Polished Finish
Port and Starboard Forward and Aft Lower Chainplate for 1997 Tayana 52 Aft Cockpit Cutter Sailboat, Grade 2 (CP) Titanium with Polished Finish
Backstay Plate for 1997 Tayana 52 Aft Cockpit Cutter Sailboat, Grade 2 (CP) Titanium with Polished Finish
Mizzen Starboard Forward Lower Chainplates for a 1980 Vagabond 47 Cutter/Ketch, Grade 5 (Ti-6Al-4V) Titanium with Polished Finish
Chainplate for Upper Shrouds on a 1979 CSY 44 Walkover Cutter, Grade 5 (Ti-6Al-4V) Titanium with Sandblasted Finish
Chainplate for Fwd Lower Shrouds on a 1979 CSY 44 Walkover Cutter, Grade 5 (Ti-6Al-4V) Titanium with Sandblasted Finish
Chainplate for Aft Lower and Intermediate Shrouds on a 1979 CSY 44 Walkover Cutter, Grade 5 (Ti-6Al-4V) Titanium with Sandblasted Finish
Backstay Chainplates for a Valiant 40, Grade 5 (Ti-6Al-4V) Titanium with Polished Finish
Lower Shroud Chainplate for a Valiant 40, Grade 5 (Ti-6Al-4V) Titanium with Polished Finish
Upper Shroud Chainplate for a Valiant 40, Grade 5 (Ti-6Al-4V) Titanium with Polished Finish
Backstay Chainplates for a Valiant 40, Grade 2 (CP) Titanium with Polished Finish
Backstay Chainplates for a Valiant 40, Grade 2 (CP) Titanium with Sandblasted Finish
Backstay Chainplates for a Valiant 40, Grade 5 (Ti-6Al-4V) Titanium with Sandblasted Finish
Lower Shroud Chainplate for a Valiant 40, Grade 2 (CP) Titanium with Polished Finish
Lower Shroud Chainplate for a Valiant 40, Grade 2 (CP) Titanium with Sandblasted Finish
Lower Shroud Chainplate for a Valiant 40, Grade 5 (Ti-6Al-4V) Titanium with Sandblasted Finish
Staysail Chainplate for a Valiant 40, Grade 2 (CP) Titanium with Polished Finish
Staysail Chainplate for a Valiant 40, Grade 2 (CP) Titanium with Sandblasted Finish
Staysail Chainplate for a Valiant 40, Grade 5 (Ti-6Al-4V) Titanium with Sandblasted Finish
Upper Shroud Chainplate for a Valiant 40, Grade 2 (CP) Titanium with Polished Finish
Upper Shroud Chainplate for a Valiant 40, Grade 2 (CP) Titanium with Sandblasted Finish
Upper Shroud Chainplate for a Valiant 40, Grade 5 (Ti-6Al-4V) Titanium with Sandblasted Finish
[ ]

custom sailboat chainplates

(001) 401-739-1140 -- (001) 401-739-1149
 

These Chainplates are designed to be bolted directly to a flat Deck. Generally used for Shroud attachment on smaller boats, but sometimes used in Forestay and Backstay applications, they are suitable for larger boats and in other applications where the Deck is sufficiently reinforced.

Deck Mount Chainplates are listed below by the size of the Pin(s) they are attached to the rigging with. If you require Deck Mounted Chainplates not listed here, we stock some others and are able to fabricate a variety of Custom ones, please forward a sketch with complete measurements and details for a quote.
(thru-Deck Mounted) .


Stainless Steel Deck Mount Chainplate with 3/16" Pin for attachment of Shroud. Formed SS Channel is attached to Deck with (2) 1/4" bolts on 1 5/8" centers. Unit is (maximum) 2" long x 5/8" wide x 3/4" high, Pin hole is 1/2" above deck.


Stainless Steel Deck Mount Chainplate with Captive 3/16" Pin for attachment of Shroud. Captive spring-loaded Key Pin for quick release applications. Note that items attached to Key Pin require a (minimum) 1/4" hole. Formed SS Channel is attached to boat with (2) 1/4" bolts on 1 5/8" centers. Unit is (maximum) 2" long x 5/8" wide (excluding pin) x 3/4" high, Pin hole is 1/2" above deck.


Stainless Steel Deck Mount Chainplate with 1/4" hole for attachment of Shroud. Welded SS Chainplate is attached to Deck with (2) 1/4" bolts on 1 1/4" centers. Unit is (maximum) 2" long x 1" wide x .100" thick, Pin hole is 1" above deck. Special replacement unit is 10% thicker than original as used on


Cast Bronze Deck Mount Chainplate with 1/4" hole for attachment of Forestay or Backstay. Heavy-duty unit is attached to Deck with (4) 1/4" FH screws on 15/16" (forward) and 1 5/8" (aft) centers. Trapezoidal unit is (maximum) 2 1/4" long x 2 5/8" wide x 1 1/4" high, and 1/4" thick at the Pin hole. Pin hole is 3/4" above deck. for Backstay attachment.


Cast Bronze Deck Mount Chainplate with (2) 1/4" holes for attachment of Shrouds. Heavy-duty unit is attached to Deck with (2) 3/8" FH screws on 1 5/16" centers. Unit is (maximum) 2 3/8" long x 1 15/16" wide x 1 1/2" high, and 5/16" thick at the Pin holes. Pin holes are 1" above deck, and 13/16" apart.


Cast Bronze Deck Mount Chainplate with 5/16" hole for attachment of Shroud. Heavy-duty unit is attached to Deck with (2) 3/8" FH screws on 1 3/8" centers. Unit is 2 1/2" long x 1 3/4" wide x (maximum) 1 3/4" high, and 5/16" thick at the Pin hole. Pin hole is 1 1/8" above deck.


Cast Bronze Deck Mount Chainplate with (2) 5/16" holes for attachment of Shrouds. Heavy-duty unit is attached to Deck with (4) 5/16" FH screws on 3 3/4" (fore & aft) and 1 1/2" (side to side) centers. Diamond-shaped unit is (maximum) 4 5/8" long x 2 3/8" wide x 1 5/8" high, and 5/16" thick at the Pin holes, base is 1/4" thick. Pin holes are 1 1/8" above deck, and 1 1/4" apart. In addition to shrouds, this item is frequently used for attachment of a staysail stay, with the aft hole used for the tack of the sail.


Cast Bronze Deck Mount Chainplate with (3) 5/16" holes for attachment of Shrouds and Backstay. Heavy-duty unit is attached to boat with (5) 3/8" FH screws. Diamond-shaped unit is (maximum) 5" long x 4" wide x 1 5/8" high, and 3/8" thick at the Pin holes. Pin holes are 1 1/8" above deck. and others. Specify Port or Starboard.


Cast Bronze Deck Mount Chainplate with (1) 5/16" and (1) 3/8" hole for attachment of Shrouds. Heavy-duty unit is attached to Deck with (4) 5/16" FH screws on 3 3/4" (fore & aft) and 1 1/2" (side to side) centers. Diamond-shaped unit is (maximum) 4 5/8" long x 2 3/8" wide x 1 5/8" high, and 5/16" thick at the Pin holes, base is 1/4" thick. 5/16" Pin hole is 1 1/8" above deck, 3/8" Pin hole is 1" above deck. In addition to shrouds, this item is frequently used for attachment of a staysail stay, with the aft hole used for the tack of the sail.


Stainless Steel Deck Mount Chainplate with 3/8" hole for attachment of Shroud. Investment Cast SS Chainplate is attached to Deck with (2) 5/16" FH screws on 1 3/8" centers. Diamond-shaped unit is (maximum) 2 7/16" long x 1 3/4" wide x 1 1/2" high, Pin hole is 1" above deck.


Cast Bronze Deck Mount Chainplate with 3/8" hole for attachment of Shroud. Heavy-duty unit is attached to Deck with (2) 1/2" FH screws on 1 5/8" centers. Unit is 3 1/4" long x 2 11/16" wide x (maximum) 2" high, and 3/8" thick at the Pin hole. Pin hole is 1 1/4" above deck.


Cast Bronze Deck Mount Chainplate with (2) 3/8" holes for attachment of Shrouds. Heavy-duty unit is attached to Deck with (4) 5/16" FH screws on 3 3/4" (fore & aft) and 1 1/2" (side to side) centers. Diamond-shaped unit is (maximum) 4 5/8" long x 2 3/8" wide x 1 5/8" high, and 5/16" thick at the Pin holes, base is 1/4" thick. Pin holes are 1" above deck, and 1 1/4" apart. In addition to shrouds, this item is frequently used for attachment of a staysail stay, with the aft hole used for the tack of the sail.


Cast Bronze Deck Mount Chainplate with 1/2" hole for attachment of Shroud. Heavy-duty unit is attached to Deck with (4) 3/8" FH screws on 2" centers. Unit is 3 1/4" square x (maximum) 2 1/8" high, and 9/16" thick at the Pin hole. Pin hole is 1 1/4" above deck.


Cast Bronze Deck Mount Chainplate with 5/8" hole for attachment of Shroud. Heavy-duty unit is attached to Deck with (6) 1/2" FH screws. Unit is 4 1/2" long x 3 5/16" wide x (maximum) 3" high, and 5/8" thick at the Pin hole. Pin hole is 2 1/16" above deck.

~ Back to Chainplates Main Page ~


Join Duckworks
Get free newsletter
Comment on articles
 
  Chainplates

Here an article how to make chain plates from carbon fiber and glass cloth. I was using these in a small way already for my own SC 435. Andrew dit not only made his stay connectors but also the cleats and rudder gudgeons in a similar way. Generally it is the way to go with materials we can get today - better load distribution, no corrosion, no leaking bolt holes etc.

Here a link to a video I posted for Andrew.

New materials give us possibilities to build better boats. Some of them you will never see on production boats. One of them is having chain plates for stays made from artificial material like uni directional carbon fiber and glass fiber. The advantage is an evenly distributed load on the hull. Chain plates on hulls impose stress points through the fasteners of the chain plate. So these areas must be beefed up with packing material. Over the years the bolts have the tendency to leak. Even when the chain plates are made from stainless steel and the fasteners are stainless steel bolts they can start to corrode. This is because the stainless steel in the bolts is a different material to the flat chainplate.

Here a short description how to make 'organic' fastening points for stays.

Start by fairing the area where the fastening point has to be build up. If necessary add fillets to smooth the area.

Build up a distance piece from plywood.  Prepare a short piece of PVC tube about 80 mm wide, diameter about 20mm to receive the stay. For small boats this can be a eyelet.

Apply the first layer of uni directional carbon fiber. Fan these layers out as shown. The strands go from the outside to the inside in the same pattern and length. The u.d. strands have to be fanned out as shown. This way the load is distributed evenly over the hull.

Next comes a layer of glass cloth. Generous overlap the U.D. strands inside and outside.

The result is as I call it an "organic" boat.

The load gets more evenly spread as with a connection with bolts - better stress relief and no chance of leaks through bolt holes.

Website :  www.ikarus342000.com

custom sailboat chainplates

  • Sail Accessories
  • Storm Sails
  • MARINE CLEARANCE
  • Optiparts hardware & Opti Covers
  • Sunfish Boat Covers and boat parts
  • Laser Boat Covers and Boat Parts
  • Other One Design Covers and Boat Parts
  • 420 and FJ Boat Covers & Parts
  • Catalina 310 & 320 Sails -New – In Stock
  • Catalina Capri 22 Sails – Standard- In Stock
  • Coronado 15 Sails – New
  • Catalina 400 Sails – New
  • Catalina 34 New Sails – In Stock – Standard and Tall Rig
  • Catalina Wave Sail
  • Catalina Capri 22 Sails -Tall Rig – In Stock
  • Catalina 440, 470 and 50 Sails – New & Used
  • New Catalina Furling Mainsails
  • Catalina 387 – 380 – 390 New Sails
  • Catalina Capri 26 and Catalina 27 – New Sails – In Stock
  • Kayak Accessories
  • Sailing Books
  • GIFTS under $25
  • Racing Gadgets
  • Shackles & Snap Shackles
  • Canvas Covers
  • Dollies, Dolly Parts, Roof Racks
  • Sailing Apparel and Gear

Come Visit Our New Location

957 n. lime ave, sarasota, fl  34237, largest selection of used sails in the southeast, new custom sails * sail repairs * rigging * canvas, thousands of sails in stock.

Masthead offers thousands of used sail choices; in stock at our location and ready to ship. All of our sails have been professionally evaluated by one of our sailmakers. Our sails come to you ready to use without the need for repairs. We offer modifications and alterations to match your requirements through our  in-house, full service sail loft.

To locate a sail on our website, go to our  USED SAIL SEARCH TOOL

CHOOSE a sail type and enter your approximate luff dimension in the search box:

  • STORM SAILS

Don’t have your rig dimensions, no problem. Click here to search by boat:  RIG DIMENSIONS TABLE .

If you prefer for us to assist you in finding the right sail, please call 727-327-5361 or email:  [email protected]

OR fill out our contact form here and we’ll contact you:  CONTACT FORM .

custom sailboat chainplates

Used & Clearance

Get a great deal on new and used marine hardware and accessories.

custom sailboat chainplates

The RS Cat 16 XL is a class leading Roto-molded high performance beach cat with a modern hull shape. Can easily be single-handed or sail with a family crew. Exceptionally strong, simple and fast to assemble. Main and Jib standard with asymmetrical spinnaker and single trapeze.

New Sailboats

Catalina 22 Sport is our most popular boat. The Retractable Keel "swing keel" draws 1' 8" with the keel up and 5' with the keel down "It sails with the keel up or down". The new Catalina 22 Sport is the perfect west coast of Florida weekend cruiser or daysailor [..]

custom sailboat chainplates

The RS Aero is a 21st Century modern single-handed sailboat, much like the Laser was 47 years ago. The Hull weighs 66 lbs. and total sailing weight at 88 lbs. RS's philosophy has always been to prioritize Ultra-Light weight, Performance and Practically in order to produce a simple, [...]

Can’t find what you need, use our online contact form or call us Call: 727-327-5361 .

Sailboat Owners Forums

  • Forums New posts Unanswered threads Register Top Posts Email
  • What's new New posts New Posts (legacy) Latest activity New media
  • Media New media New comments
  • Boat Info Downloads Weekly Quiz Topic FAQ 10000boatnames.com
  • Classifieds Sell Your Boat Used Gear for Sale
  • Parts General Marine Parts Hunter Beneteau Catalina MacGregor Oday
  • Help Terms of Use Monday Mail Subscribe Monday Mail Unsubscribe

Moving the chainplates to the Hull sides?

  • Thread starter Pilotocopilot
  • Start date Feb 25, 2012
  • Hunter Owner Forums
  • The Cherubini Hunters

Pilotocopilot

Pilotocopilot

Has anyone done this on their 37C, I find it a pain getting around them and would seriously consider relocating them to the hull sides with backing plates through bolted on the inside. Any thoughts on disadvantages and advantages would be appreciated.  

I had toyed with that idea, as my boat dosent have proper chain plates, it has flat plates under the deck, onto which a right angle plate goes up through the deck, and the rigging attaches to this. I think it would be possible to put them onto the outside of the hull, but, i think their would need to be some form of re-enforcing, on the inside of the hull, like a strip of plywood, glassed in, because with how thin the fiberglass is on the hull, i dont think it would take long, for the bolts holding the chain plates, to elongate the holes, and then leaks. I decided not to do it, because of the chance of it leaking, and having to constantly be re sealed. But i would have to do it, to find out if that was really going to be the case.  

I consider chainplates that attach to the outside of the hull to provide greater integrity and strength to the rig and are highly desirable in a sea going vessel. The benefit of not having them obstruct the deck area are a secondary benefit.  

Ed Schenck

Why Benny? Because the chainplates are stronger? Or does the increased angle of the shrouds strengthen the rig? Maybe one of our engineer members can do that math. If you move a shroud out six inches how does that change the loads? Use my boat: mast = 52.5' from keel, 45' from the partner; four lower shrouds = 23.3'; two uppers = 43.7'. Remember too that you have to change the angle of the spreader brackets.  

Jackdaw

Ed Schenck said: Why Benny? Because the chainplates are stronger? Or does the increased angle of the shrouds strengthen the rig? Maybe one of our engineer members can do that math. If you move a shroud out six inches how does that change the loads? Use my boat: mast = 52.5' from keel, 45' from the partner; four lower shrouds = 23.3'; two uppers = 43.7'. Remember too that you have to change the angle of the spreader brackets. Click to expand

Would the hull need reinforcing at the attach point or is there enough hull thickness to support the tension. I have not had the opportunity to drill through the hull to have an idea of how thick the glass is from below the toe rail to let's say 20" down so I would appreciate any info on the hull thickness aspect as well.  

We've had to go around them every day for close to 10 months and I can say that you get used to them very quickly, so I would suggest taking some time before investing to much time and money in such a project. From a structural point of view, as said before, you'll need longer spreaders so that the lower section of the stays remain as parallel to the mast as possible. The spreaders may need to be beefed up to avoid buckling (this needs to be verified, as the section may already be overdesigned, as the rest of the boat). As for hull reinforcement, it would need to be investigated more deeply (hull thickness, lay direction...), but as always, if in doubt, and if it doesn't add a lot of weight/inconveniences, add material until you feel it's overdesign.  

DianaOfBurlington

DianaOfBurlington

I hear what your saying and coming from you I'll take it at face value, but boy are they a pain especially if your carrying anything.  

That's an interesting alternative I never considered. Do you see any issue then if the two lower shrouds were moved and not the upper. It may not be as big an issue going around one as it is all three, in addition not having to replace the spreaders circumvents having to drop the rig to make the changes. Don't worry nothing transpires until I sit and have a few drinks contemplating the changes and then maybe have a few more to make sure it's the right decision.  

I would move the upper alone without the lowers rather than the reverse. The upper benefits from the wider stance more than do the lowers. I am with you, Pilot, and find my best solutions occur after taking the time to contemplate each issue. Rarely do I get a purely-new 'Eureka' moment (though I had one today. I will post it to the blog when I finish what I started). Are you really in Lucaya? --or, where is the boat? I would consider having a look at it for you.  

The boat is just outside Lucaya one canal west of the Bell Channel, I'm up here in Toronto until the beginning of April then flying down for a month to renovate our condo down there. I will probably move it State side in June to somewhere in Florida - South Carolina,having no preference other than a cost effective place to haul out so I can do the bottom and have the transmission(slight leak in the rear seal) and prop shaft looked at ( may have worn out at the cutlass bearing). If you have the time John I'm always looking for crew to help with my trips, this one being about 3-5 days with the stream during some of the nicest sailing season for the area. I'm hoping to get a crew of 4 together,the boat has all the necessary safety equipment and then some, as it has to satisfy my wife, so from an EPIRB to Certified Life Raft to Sat Phone, Chart Plotter,Radar....... If your up to a little bit of offshore sailing.  

Gosh, after reading this I'm really going to have to consider moving the shrouds on my H30 to the toe rail. Having the deck clear to go forward would be really nice. The jib (150%) on my boat sheets outside the lifelines so there would not be any performance penalty. I'm going to have to replace the standing rigging on my boat soon anyway (the turnbuckles have run out of adjustment room) so that might be the time.  

I dont think you would need to change the spreaders, beacuase if you look up to your spreaders, the rigging goes straight up, it then curves at the spreaders, and goes to the masthead, if you moved it a few inches at the bottom, it would make no difference, i looked at mine, and its one side of the toe rail, as oppesed to the other side, it would make no difference to where the spreaders are. You have to remember this is not precission engineering, they invented all this years ago, where ropes and lines were all aproximate, and everything was expiremental. Nothing is exact on a sail boat, you can move lines and stays a few inches, with no effect, i am thinking of moving my main sheet, five feet forwards of where it is just now, and i know it will work better there, it will just get in the way more.  

Pilot, e-mail directly and know that I will definitely consider that trip! I'd be happy to look over the boat at any time if I can sort out how and when to get down there.  

AtlanticAl said: I dont think you would need to change the spreaders, beacuase if you look up to your spreaders, the rigging goes straight up, it then curves at the spreaders, and goes to the masthead, if you moved it a few inches at the bottom, it would make no difference, i looked at mine, and its one side of the toe rail, as oppesed to the other side, it would make no difference to where the spreaders are. You have to remember this is not precission engineering, they invented all this years ago, where ropes and lines were all aproximate, and everything was expiremental. Nothing is exact on a sail boat, you can move lines and stays a few inches, with no effect, i am thinking of moving my main sheet, five feet forwards of where it is just now, and i know it will work better there, it will just get in the way more. Click to expand

I didnt say anthing about the 1970s, i was thinking more of the 1700s, when it was all expiremental, i think it still all experimental, and if you look at suhaili which was robin knox jonstones boat, it was built in india, by people who learned boat building from their fathers, and when they built it, they didnt know that it would be the first boat to sail non stop around the world, in the early photos, it dosent even have any spreaders, it was just built with basic tools, by indians who knew no maths or science, just basic boat building, yet that boat sailed round the world. I have also seen photos of my own boat, with the main sheet much further forward, right now, its five feet aft of the boom, but out of the way of everything, i want to move it forward, it would still be connected to the same place in the boom, but would just be directely below the place on the boom its connected to, it would just make the cockpit more clutered, and make the boat more awkward, if their is more than just me aboard, but i think for just me, it will make the whole rig easier to handle, as their will be less rope to heave in, and everything will be closer to hand.  

Jim Legere

DianaOfBurlington said: Yes, midboom sheeting is very popular; and I dislike it from a performance and engineering standpoint every time. It is merely a compromise imposed on boat buyers by the marketers for the sake of convenience-- all facts will support this. Midboom sheeting, on the average production yacht (Beneteau, Catalina, Hunter, et al) is definitely not a performance asset. Whether or not you would prefer it for your own boat, I respectfully advise you to know beforehand what the realities about it are, and then make your choice from a position of being informed. I hope you take this in the spirit intended. Click to expand

rardiH36

I've been following this thread, but have refrained from entering ... mainly because I didn't get it. We have one of the best sailboat designers of the time electing to place the shrouds/chainplate interface on each model where they are. And even today, boats are designed with a wide variation of chainplate placement. Why move them around unless one feels quite certain that a very noticeable improvement in performance will result? DianaofBurlington made this clear in his last post. As for easier walking along the deck, will moving the chainplates out really be than much of an improvement to compensate for the many hours and many $'s of expense. And to compensate for the violation of the original design? On my 1980 H36, yes I could move the shrouds out to the toe rail -- maybe 6-8". And yes that would allow more foot room on the deck. But still the angle of shrouds would require that the head/torso be bent inward anyway to pass by. No matter what, the deck will never be a jogging track. The only valid considerations should be will better performance and/or strength result? I've pondered many times the pros and cons of moving my shrouds inboard closer to the cabin top interface. For the reason DianaofBirlington cited. Less sheeting angle probably would allow better pointing. But moving the shrouds inboard would require real thought about how to insure strength integrity. Then one also also has to buy and install an inside jib track on the main deck next to the cabin top. Up to now, I sometimes use a reverse barber-hauler to pull the jib clew more to the center. This does pull the clew towards the center by up to a foot depending on wind velocity and the fore/aft location of the jib sheet snap blocks on the toe rail. But really I can't say for sure that I do much better on a close haul. My other tighter sheeting thought is to limit my jib size to say 95% so that I could lead the sheets inside the shrouds when close hauled. The smaller jib size would prevent the leach from rubbing up against and under the spreaders which was an issue when I experimented with my 135 Genoa (even furled a bit). When off the wind, the jib sheet would instead be led outside the shrouds for sheeting on the toe rails as John Cherubini designed. The attached pictures show the shroud into deck location on the 1980 Cherubini Hunter 36. Solid thick pieces of SS bar go through the deck and are very robustly tabbed to the hull. Its one very tough design.  

Attachments

IMG_0871.jpg

  • This site uses cookies to help personalise content, tailor your experience and to keep you logged in if you register. By continuing to use this site, you are consenting to our use of cookies. Accept Learn more…

COMMENTS

  1. Chainplates & Stemhead Fittings

    Spars, Rigging, and Hardware for Sailboats. Rig-Rite, Inc. Phone: (001) 401-739-1140 -- FAX: (001) 401-739-1149 ... Chainplates and Stemhead Fittings are listed below by configuration, and then by the size of the Pin they are attached to the rigging with. ... we stock some others and are able to fabricate a variety of Custom ones, please ...

  2. Chainplates

    We can provide stainless steel chainplates and other parts that will last for years to come. (705) 725-1779 (800) 268-0395 Home; About; Products; Services; Boat Stairs. ... Whether you need multiple chainplates for your boat or you require a custom stainless steel product with unique specifications, our team can help you achieve your goals. ...

  3. Chainplate Fabrication: Part 1

    Sailboat manufactures mass produce their chainplates at the time of production, but older sailboats need to have custom made chainplates fabricated as they are no longer in stock. To manufacture your own chainplates, you need to locate the raw material: 316L Stainless Steel. 316L is readily available in various shapes and sizes, but for ...

  4. Standard Chainplates

    Stainless Steel Chainplate Blank with 3/8" hole for attachment of Shroud. Chainplate Blank has no drilled holes for attachment to boat, and is designed for use in replacement applications where mounting bolt pattern varies, especially in older boats where Chainplates were hand drilled. Flat SS Chainplate is 10" long x 1 1/4" wide x 3/16" thick, 3/8" hole center is 3/4" from end.

  5. Chainplates

    Chainplates. At Mack Yacht Services, we know chainplates! In our experience, they are the most overlooked piece of equipment on boats today. Chain plates are the base of your rigging system and need attention just like everything else on your boat. Barring hurricanes, chainplate failure is the number one reason spars are replaced in our area.

  6. Anyone fabricate their own chainplates?

    You could cut the chainplates to length with a cutting wheel on a hand grinder then buff and polish as necessary. You'll need to either buy or borrow a drill press to drill the holes. ... and do it yourself for less than buying a set of chainplates and then you have the basic toolset for doing 99% of the custom metalwork on your boat ...

  7. Chainplates 101: Inspect and Refit

    For safety and peace of mind, however, sailboat chainplates require attention and possibly upgrading. For example, many chainplates are too thin to grip clevis pins correctly. For a ½-inch turnbuckle with a ½-inch toggle, the chainplate should be at least ⅜ inch thick. For a ⅝-inch turnbuckle and toggle, a minimum thickness of.

  8. Upper Shroud Chainplates C-30 Custom Pattern

    Upper Shroud Chainplates C-30 Custom Pattern. Due to subtle changes during production, it is not possible to fabricate custom chainplates without having your old chainplate as an example. We both mechanically polish and then electropolish the completed chainplates. These steps are imperative to prevent immediate degradation of the assembly ...

  9. Know-how: Chainplate Replacement

    The exact cost of replacing chainplates will vary by boat. An upgrade from stainless steel to titanium will increase the cost by 30 to 40 percent. For me, the sense of security my crew and I felt during our aforementioned 1,500-mile offshore journey was priceless. February 2020. know how diy maintenance. Everyone dreads the day that something ...

  10. Chainplates

    Home / Marine Products / Sailboat Hardware / Chainplates. Chainplates. Oneida offers both standard and custom sailboat hardware. Examples of our current offerings of chainplates include: Item #: 401369 CHAINPLATE, P&S PAIR, 316 S.S. Item #: 129-20-61-0001 STEM HEAD C-PLATE, POLISHED, 316 S.S.

  11. Double Chainplates

    Double Chainplate Set allows for attachment of (2) 3/8" Pins for Shrouds on each side of the boat. Chainplate Set is bolted through Bulkhead belowdecks with Backing Plate on other side of Bulkhead, using (8) 5/16" (8mm) bolts and locknuts, Cover Plate is attached to Deck. Stainless Steel Chainplate Set includes (2) Chainplates (CP 84-272-1), (2 ...

  12. Servicing The Chain Plates

    By The Rigging Company February 2, 2015. The chainplate is typically a metal plate used to fasten a stay to the boat. One end of the chainplate has a hole for the pin of the turnbuckle, the remainder of the chainplate is used to attach the plate to the boat via a bulkhead, knee, tie rod or the hull itself. Chainplates get their name from the ...

  13. Fabricating bronze chainplates and tangs

    The quote I got from Atlas Bronze for 3/8" silicon bronze (C65500) plate dimensioned 24" x 16.75" (enough for all the chain plates and at least a few tangs) was $915. If I used all the material to make chainplates, that works out to about $114/ea. Aluminum bronze (954) cast bars 3/8" x 2" from Online Metals are $106/ea.

  14. Chainplates Revisited

    Chainplates on the 50-footer were installed using a method mirroring that of the J/133. Shrouds on cruising boats, however, may be located outboard at the rail, for instance, at the expense of tighter sheeting angles and greater pointing ability. And when located outboard, they may be buried behind cabinetry as an aesthetic consideration.

  15. Upgrading and Bedding Chainplates

    I'm bedding the new chainplates I bought from CD. I feel good about the steps I have taken so far. 1. Drill into existing 3/8" holes with the 1/2" bit. 2. Dremel out the accessible wooden core inside the perimeter of the 1/2" hole (even though it is still solid as can be). 3. Fill the gap from...

  16. Cost to Replace Chainplates? Should I Walk Away?

    BluemanSailor. 87 posts · Joined 2009. #15 · Jun 28, 2013 (Edited) Am replacing the chainplates on my boat- 8 in total. Cost Stainless metal (316) $25.00 each- cut to size, drilling the holes and welding spacers on the end. $0.00 - exchanged some wood work for the labor.

  17. Titanium Chainplates, Items 1 to 50 of 149

    Marine. Rigging Parts / Stemplate. 4,064.10. Each. Qty in Stock: 7. 0006185. Chainplate Cover for U-Bolt type Allied Titanium Chainplate on Hobie 33, 0.059 inches thick X 1-3/4 wide X 2-5/16 inch long with four holes for Item #0006179, Grade 2 (CP) Titanium with Sandblasted Finish.

  18. Rebedding Upper & Lower Chain Plates

    Eventually I will make some changes to allow this to be bedded with butyl correctly. But that will involve removing the chainplate, converting the cover to through-bolted instead of wood screws. This will likely involve making a new cover that is a tighter fit. Ideally I would like to find a way to have the covers welded onto the chainplates.

  19. Deck Mount Chainplates

    Spars, Rigging, and Hardware for Sailboats. Rig-Rite, Inc. Phone: (001) 401-739-1140 ... Deck Mount Chainplates: Deck Mount Chainplates: These Chainplates are designed to be bolted directly to a flat Deck. Generally used for Shroud attachment on smaller boats, but sometimes used in Forestay and Backstay applications, they are suitable for ...

  20. Duckworks

    If necessary add fillets to smooth the area. Build up a distance piece from plywood. Prepare a short piece of PVC tube about 80 mm wide, diameter about 20mm to receive the stay. For small boats this can be a eyelet. Apply the first layer of uni directional carbon fiber. Fan these layers out as shown.

  21. Masthead Enterprises Home Page

    SPINNAKER. STORM SAILS. Don't have your rig dimensions, no problem. Click here to search by boat: RIG DIMENSIONS TABLE . If you prefer for us to assist you in finding the right sail, please call 727-327-5361 or email: [email protected]. OR fill out our contact form here and we'll contact you: CONTACT FORM.

  22. Moving the chainplates to the Hull sides?

    Mar 2, 2012. #8. By moving the shrouds outboard, you limit your headsail sheeting options. Also, you will have the breach of hull integrity by fastening them to the hull. We built the first Cherubini 44 cutter for Warren Luhrs who wanted the chainplates bolted through the hull (probably for the reasons mentioned here).

  23. Cayo Boatworks

    Cayo Boatworks was born from our unwavering passion for shallow water fishing and our relentless pursuit of skiff perfection. We pour our hearts and expertise into every aspect of our craft, from conceiving original designs in-house to leveraging cutting-edge 3D computer-aided design technology. Our commitment to excellence extends to precision ...